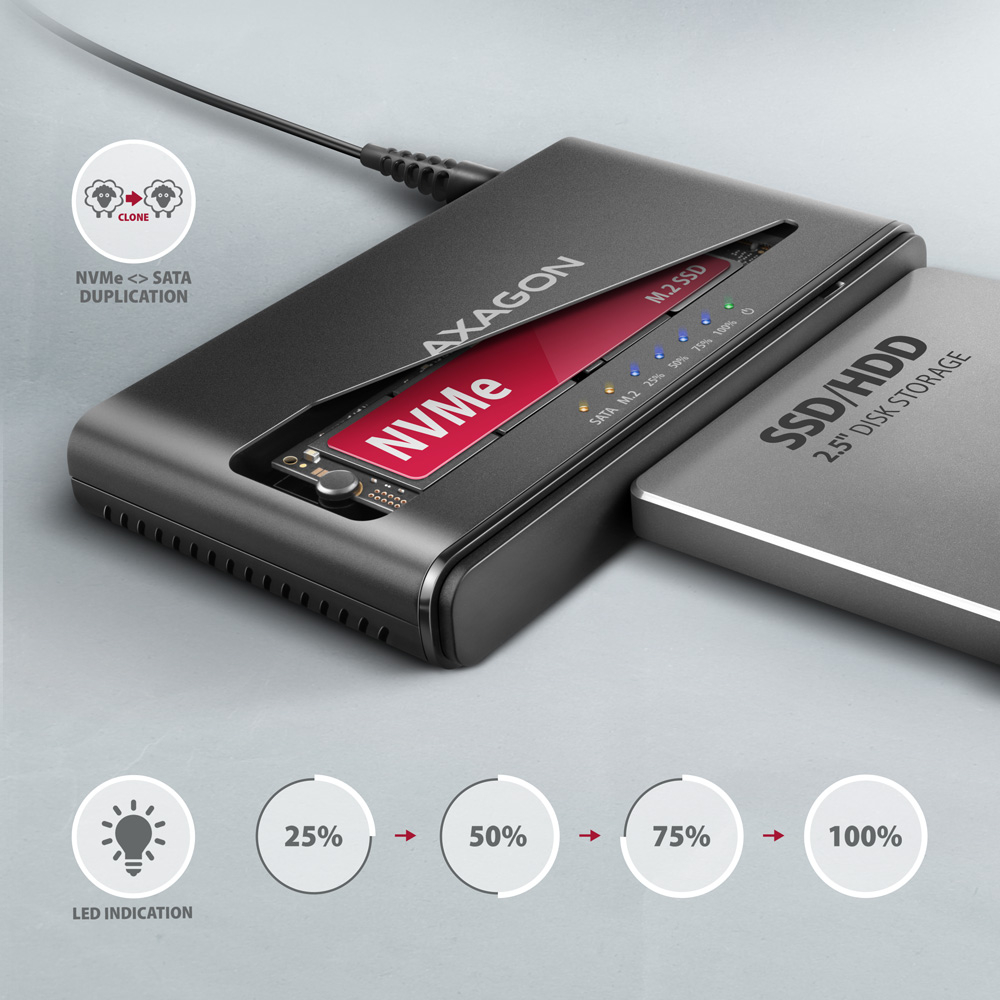
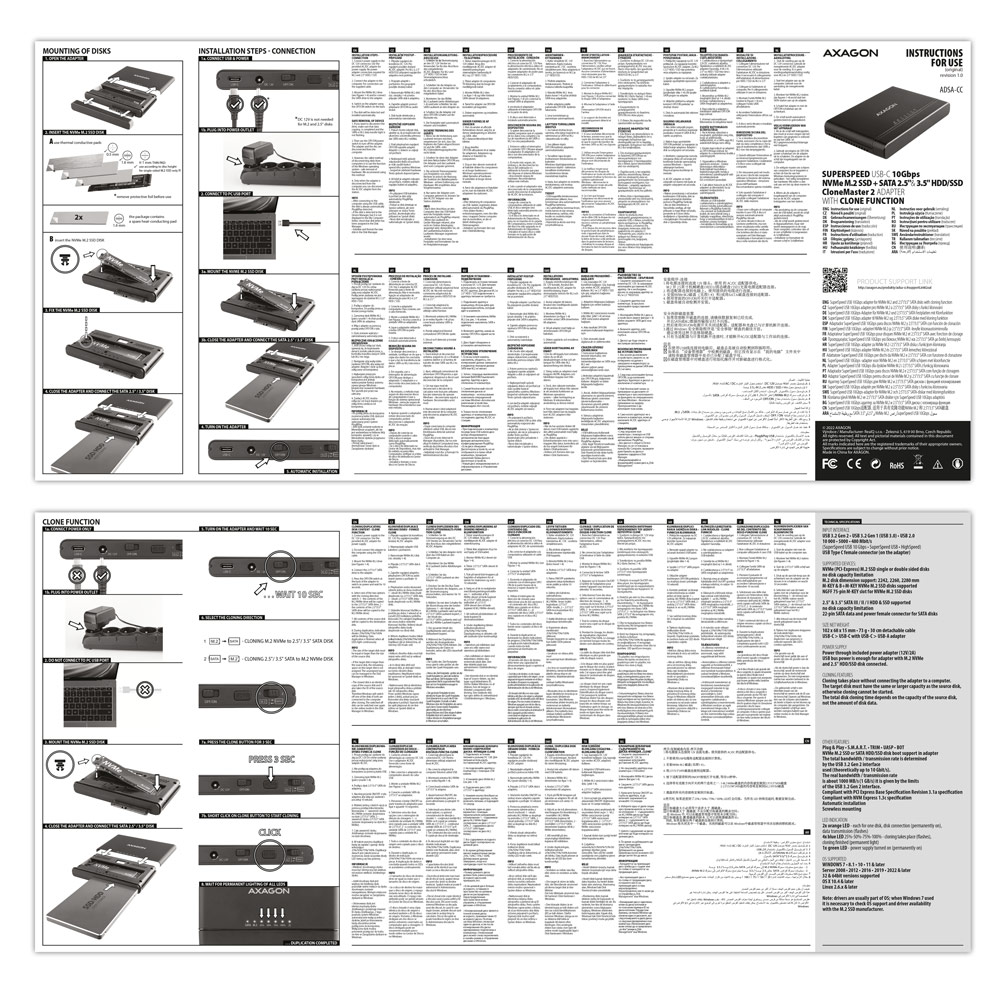
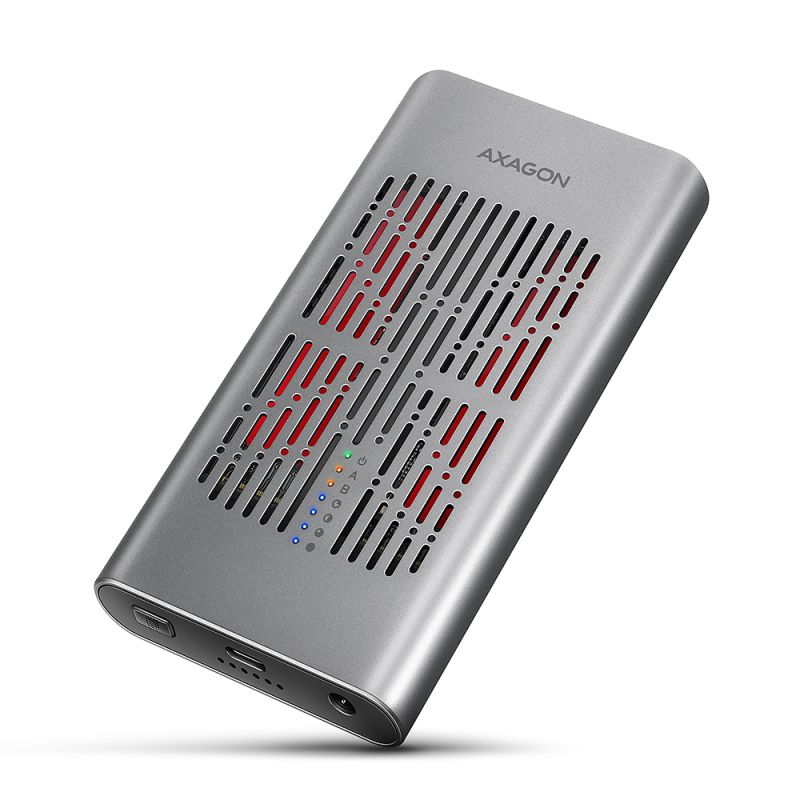
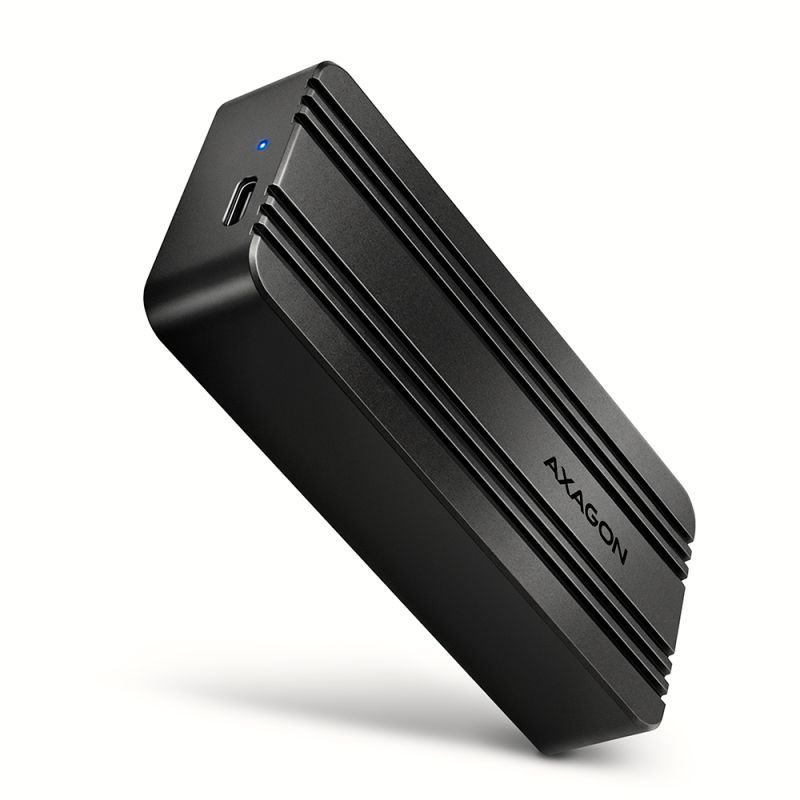
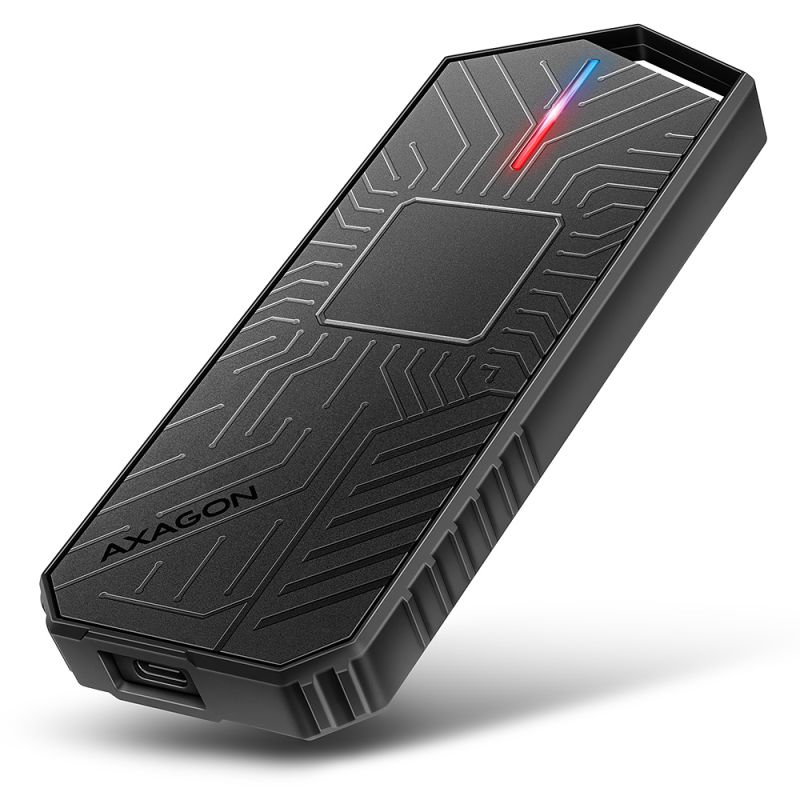
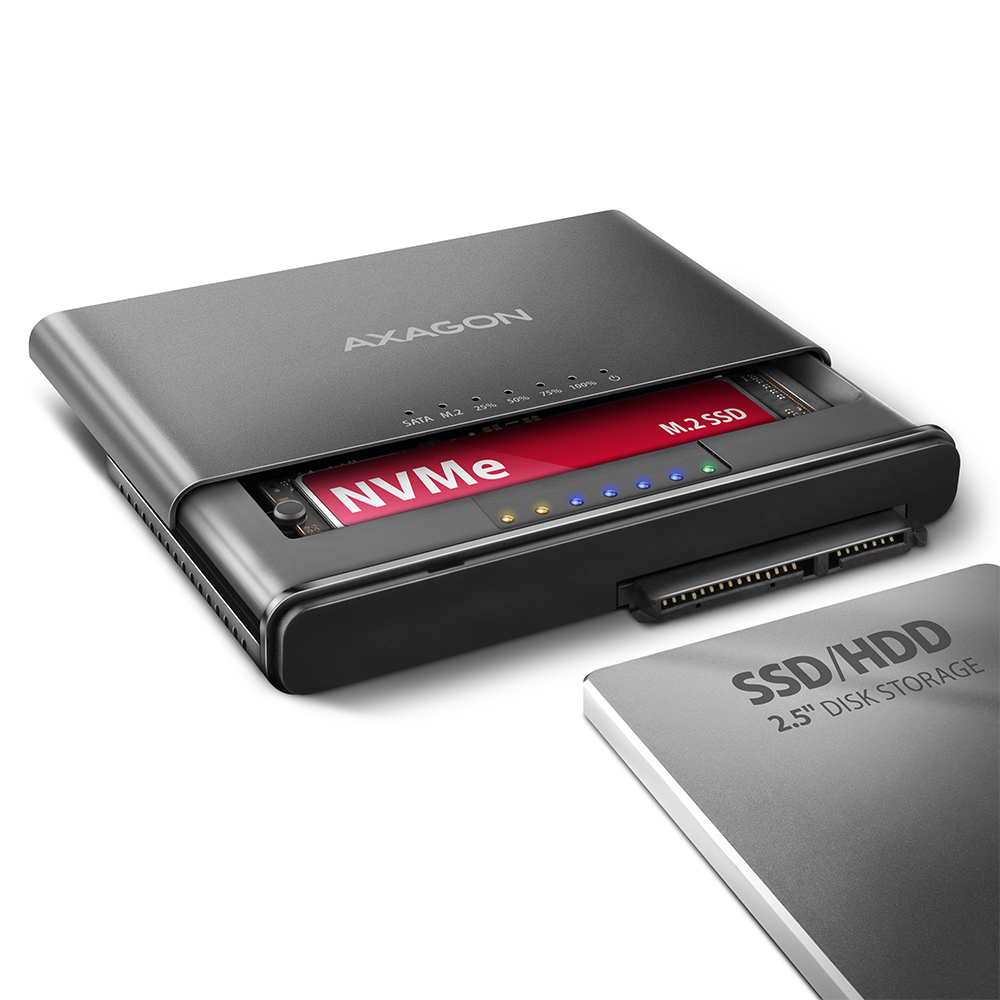
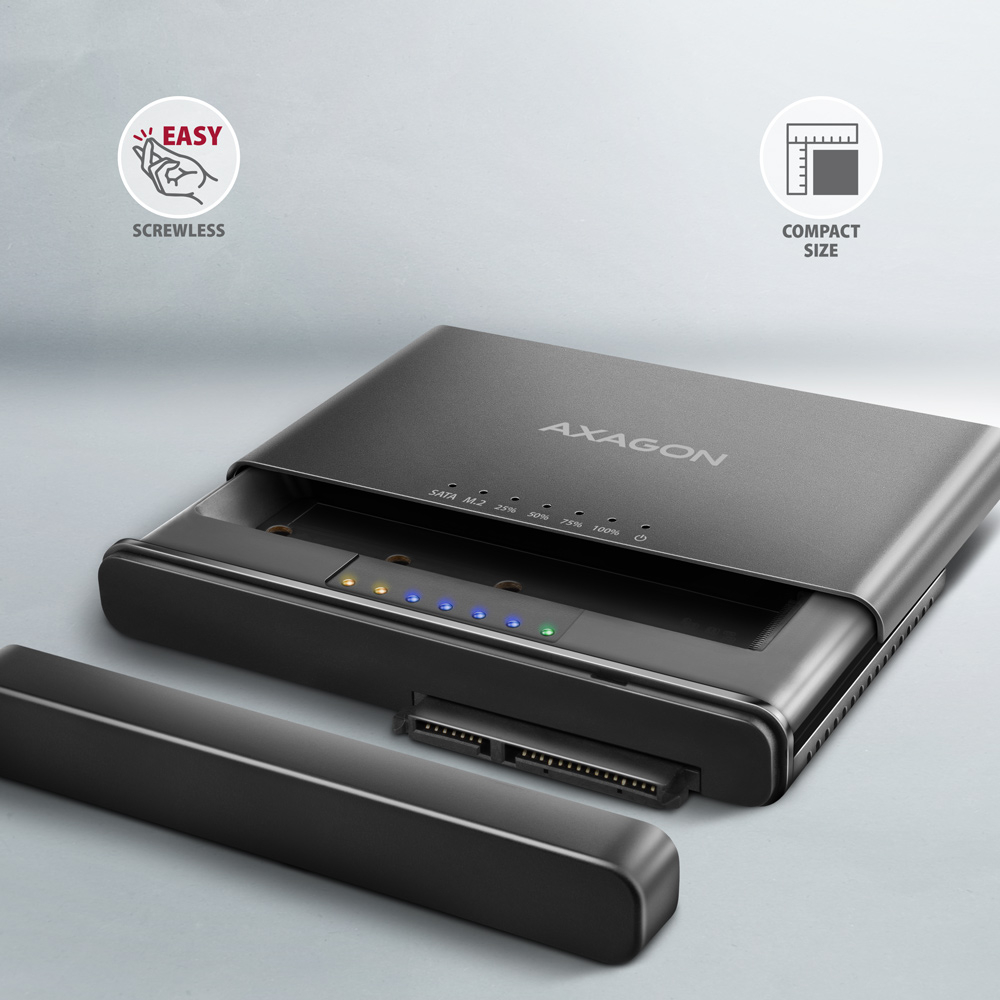
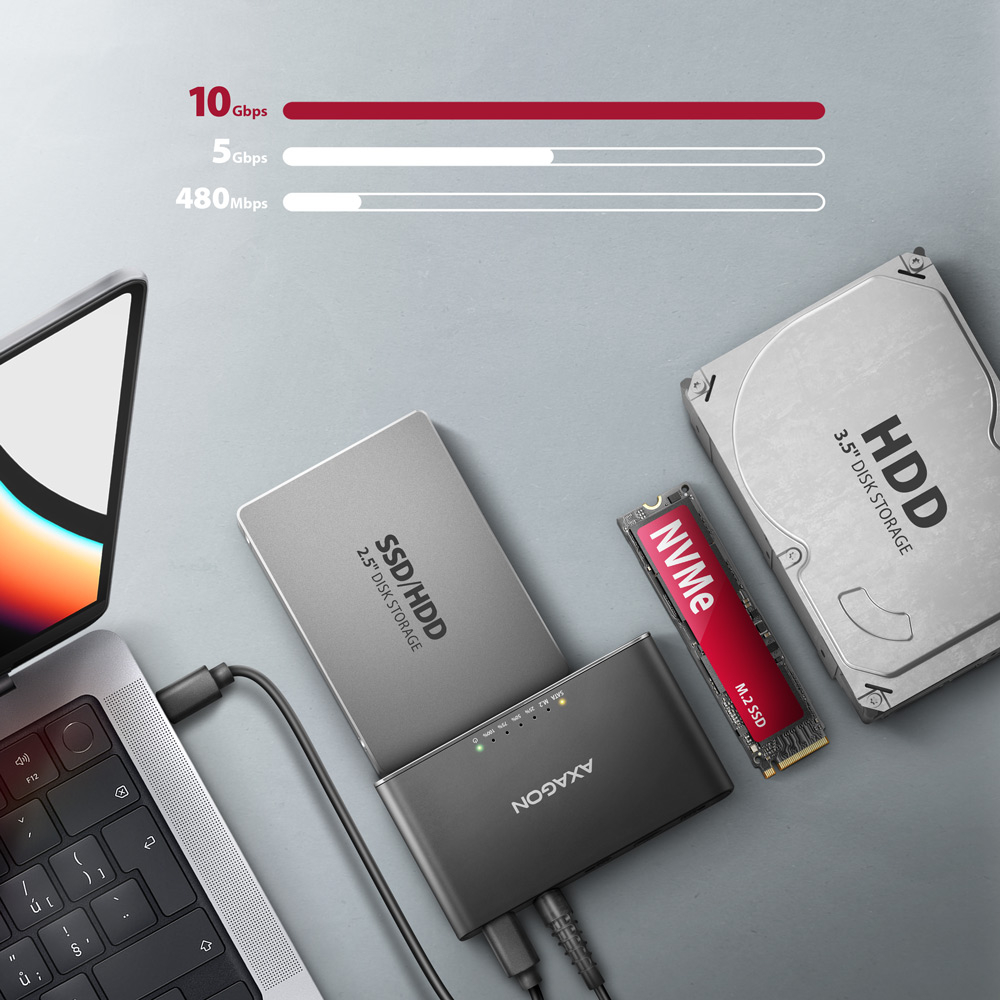
The AXAGON ADSA-CC CLONE MASTER 2 universal USB-C 10Gbps adapter connects up to two drives to your computer quickly and easily at the same time. Easily connect any 2.5" or 3.5" drive directly to the adapter's external SATA connector. Simply insert the NVMe M.2 drive into the adapter body without the use of a screwdriver or other tools. You can also connect a SATA M.2 drive to the adapter using an external adapter such as the AXAGON RSS-M2SD.
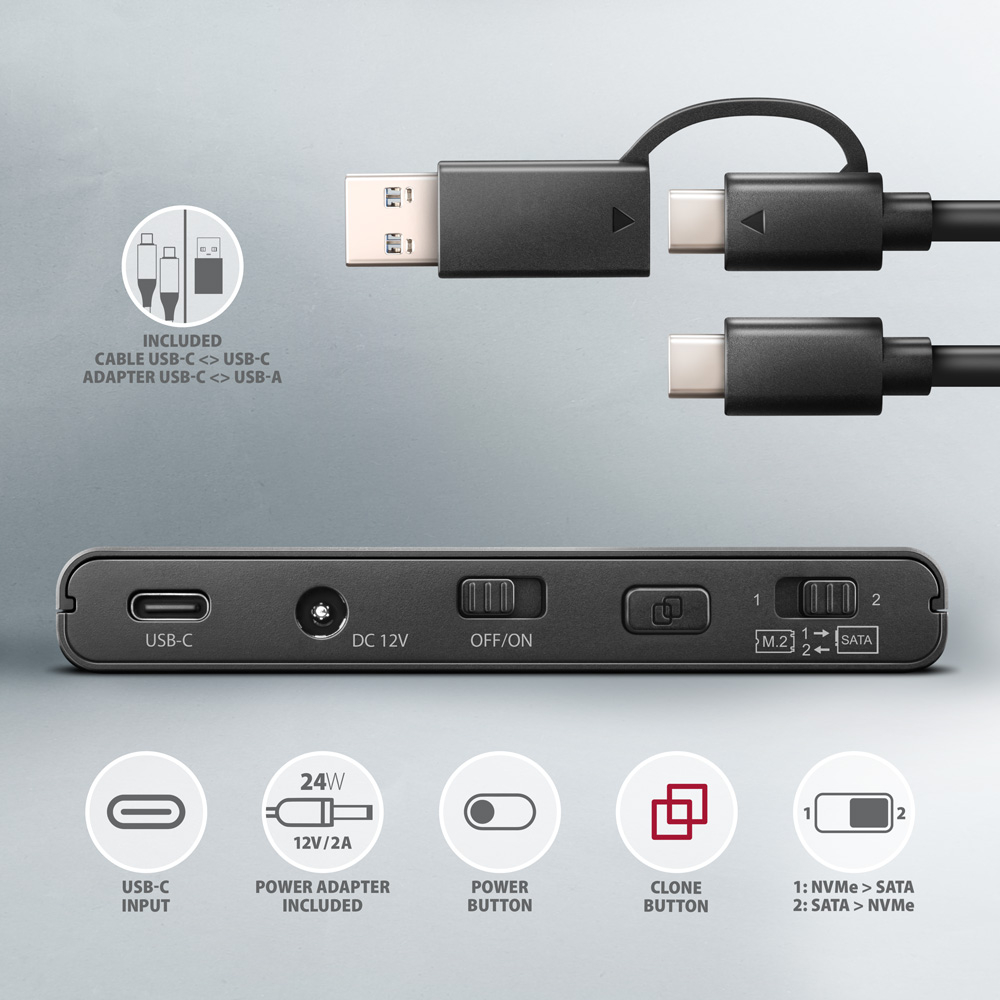
In the package you will find a USB-C <-> USB-C cable with a fixed USB-C -> USB-A reduction. This solution enhances the versatility of the adapter, so you can connect it to any USB port on your computer, whether it's a double-sided USB-C connector or a traditional USB-A connector.
Thanks to the cloning function without the need to connect to a PC, the adapter can be used as a stand-alone device for convenient duplication and disk imaging. The cloning direction is adjustable via a switch, so you can easily choose whether to clone the contents of an NVMe M.2 drive to a SATA drive or vice versa. After all the data is copied, the target disk is an exact copy of the original disk. This is the easiest way to transfer the contents of one drive to another, including a working operating system (Windows, macOS, Linux ...).
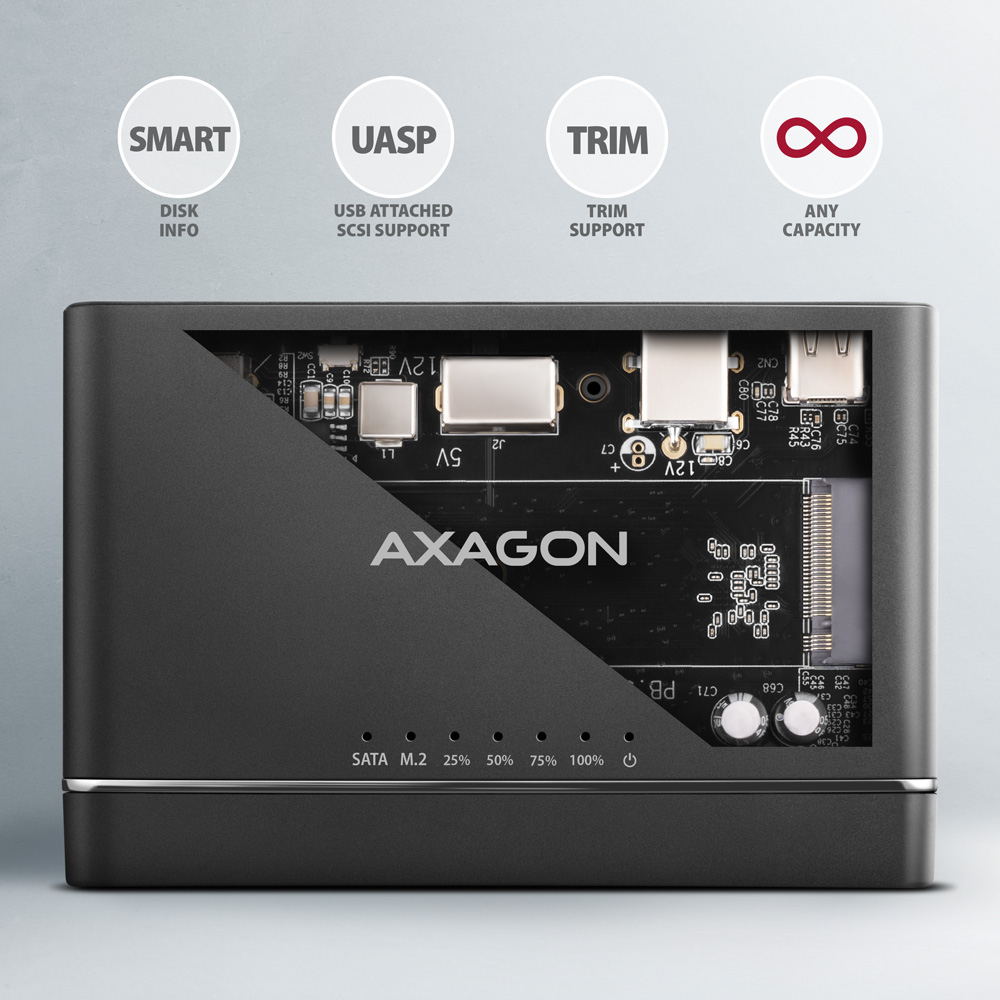
In addition to the fast USB 10Gbps interface, the adapter also supports all important functions for working seamlessly with different types of drives, such as UASP for faster data transfer, TRIM for limiting the gradual degradation of SSD performance over time, S.M.A.R.T. for monitoring the status of the drives, BOOT for the ability to boot from drives connected to the adapter, Auto Spindown to automatically put drives to sleep during prolonged inactivity, Turn Off to shut down the drives after removing the device or putting the PC to sleep, and USB Bus Power to power the adapter including connected M.2 and 2.5" drives only from the USB port. In case of connecting a 3.5" drive, the included power adapter is of course already required.
These features make the CLONE MASTER 2 adapter a very handy and useful tool for frequent work with different types of drives. This makes it an ideal helper for backup, migration, data transfer and storage, testing and cloning discs, etc.
Input:
• USB 10Gbps (USB 3.2 Gen 2).
• Speed up to 10 Gbit/s.
• Connection via reversible USB type C female connector.
M.2 slot device support:
• NVMe (PCI-Express) M.2 SSD one-sided and double-sided drives.
• Support of M.2 drives with a size of 2242, 2260, 2280 mm.
• Supports M-KEY & B+M-KEY NVMe M.2 SSD disks.
• No capacity limitation.
Support for devices connected to the SATA port:
• SATA 2.5"/3.5" SSD/HDD.
• SATA M.2 SSD with M.2 -> SATA reduction e.g. AXAGON RSS-M2SD.
• No capacity limitation.
Disk cloning feature:
• Cloning takes place without connecting the station to a computer.
• The target disk must have the same or larger capacity as the source disk, otherwise cloning cannot be started.
• Cloning direction switch - from NVMe M.2 drive to SATA drive or from SATA drive to NVME M.2 drive.
• SSD cloning speed up to 500 MB/s.
• The total disk cloning time depends on the capacity of the source disk, not the amount of disk data.
Other features:
• Compatible with USB 10Gbps (USB 3.2 Gen 2).
• Backward compatible with USB 5Gbps (3.2 Gen 1 / USB 3.0) and USB 480Mbps (USB 2.0).
• Supports transmission rates 10.000 / 5.000 / 480 Mbit/s.
• Compliant with PCI Express Base Specification Revision 3.1a specification.
• Compliant with NVM Express 1.3c Specification.
• The total adapter bandwidth / transmission rate is determined by the USB 3.2 Gen 2 interface used (theoretically up to 10 Gbit/s).
• The real adapter bandwidth / transmission rate is about 1.000 MB/s (1 GB/s), it is given by the limits of the USB 3.2 Gen 2 interface.
• Compliant with Serial ATA 3.0 specification (SATA/600), transmission rates of up to 6 Gb/s (600 MB/s).
• Compliant with Serial ATA 2.0 specification (SATA/300), transmission rates of up to 3 Gb/s (300 MB/s).
• Compliant with Serial ATA 1.0 specification (SATA/150), transmission rates of up to 1.5 Gb/s (150 MB/s).
• Compliant with USB Mass Storage Class specification.
• Supports UASP (USB Attached SCSI) for faster data transmission in Windows 8.1 and later.
• Supports TRIM functionality to limit gradual degradation of the SSD performance over time.
• Supports S.M.A.R.T. (Self-Monitoring, Analysis, and Reporting Technology) system monitoring disk condition.
• Support for booting from disks connected to the adapter.
• HDD Auto Spindown - automatic spinning down when they idle for 10 minutes.
• HDD Turn Off - turns off the drive after removing the device or spinning down the PC.
• Full Plug and Play support.
• Connection via USB-C female connector.
• Cable USB-C male <-> USB-C male 30 cm length + USB-C -> USB-A reducer included.
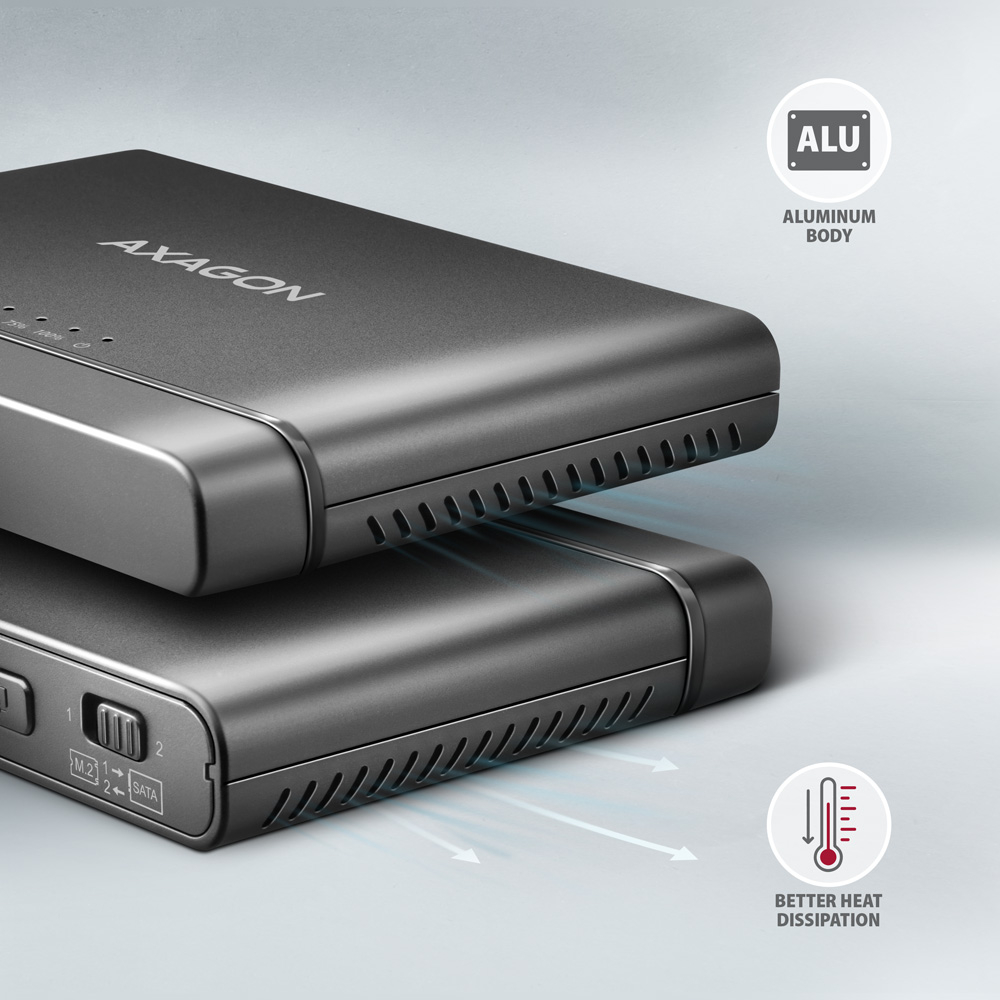
• Adapter dimensions 102 x 68 x 15 mm.
• Adapter weight 73 g (without accessories).
Power:
• USB Bus Power - for M.2 and 2.5" drives, power via the USB bus is sufficient.
• Self Power - for 3.5" drives, power is required using the included external AC/DC adapter 12V - 2A with a 150 cm cable.
• Power switch.
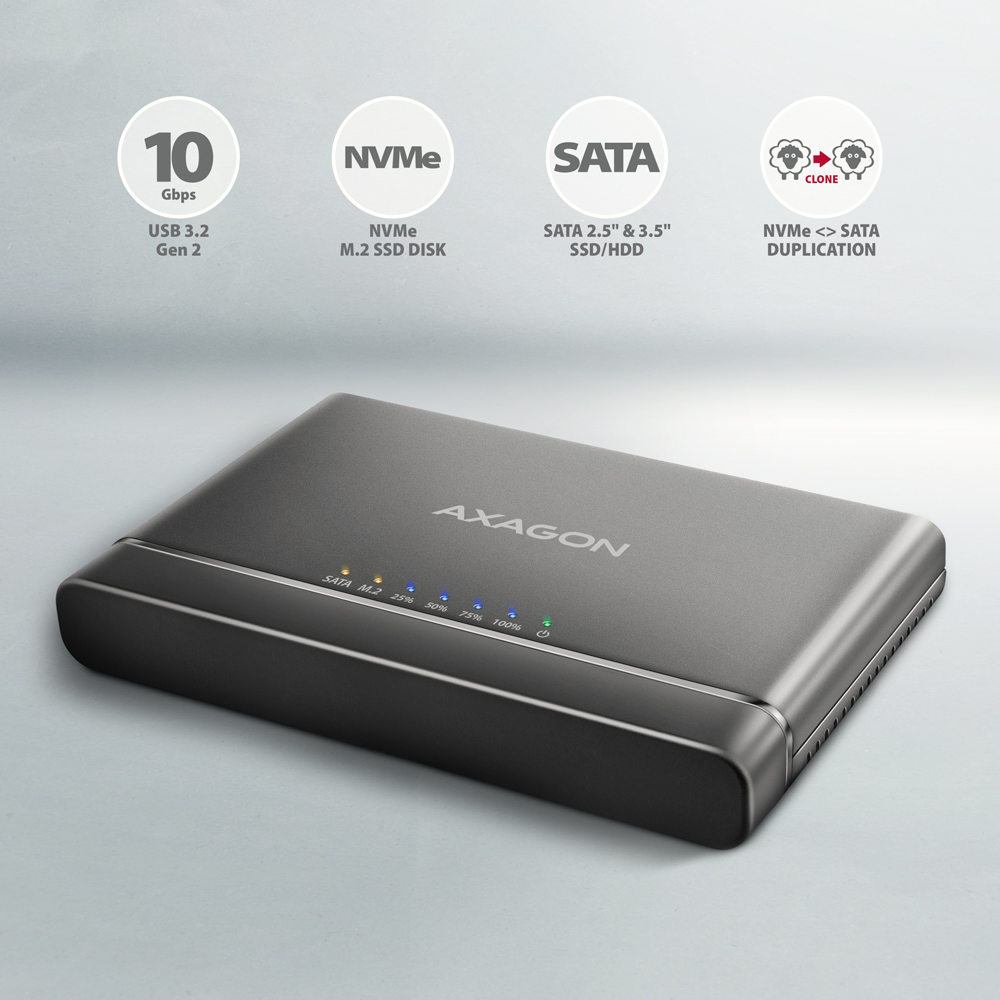
LED indication:
• the green LED indicates that the adapter is powered on (permanent light).
• 2x orange LED indicates connection for each of the disks (permanent light) and data transmission (blinking).
• 4x blue LED indicates cloning process 25% -50% -75% -100% (blinking), resp. cloning completion (permanent light).
Supported OS:
• Windows 8.1 / 10 / 11 and later,
• Windows Server 2012 R2 / 2016 / 2019 / 2022 and later,
• Mac OS X 10.x and higher,
• Linux with kernel 2.6.x and higher.
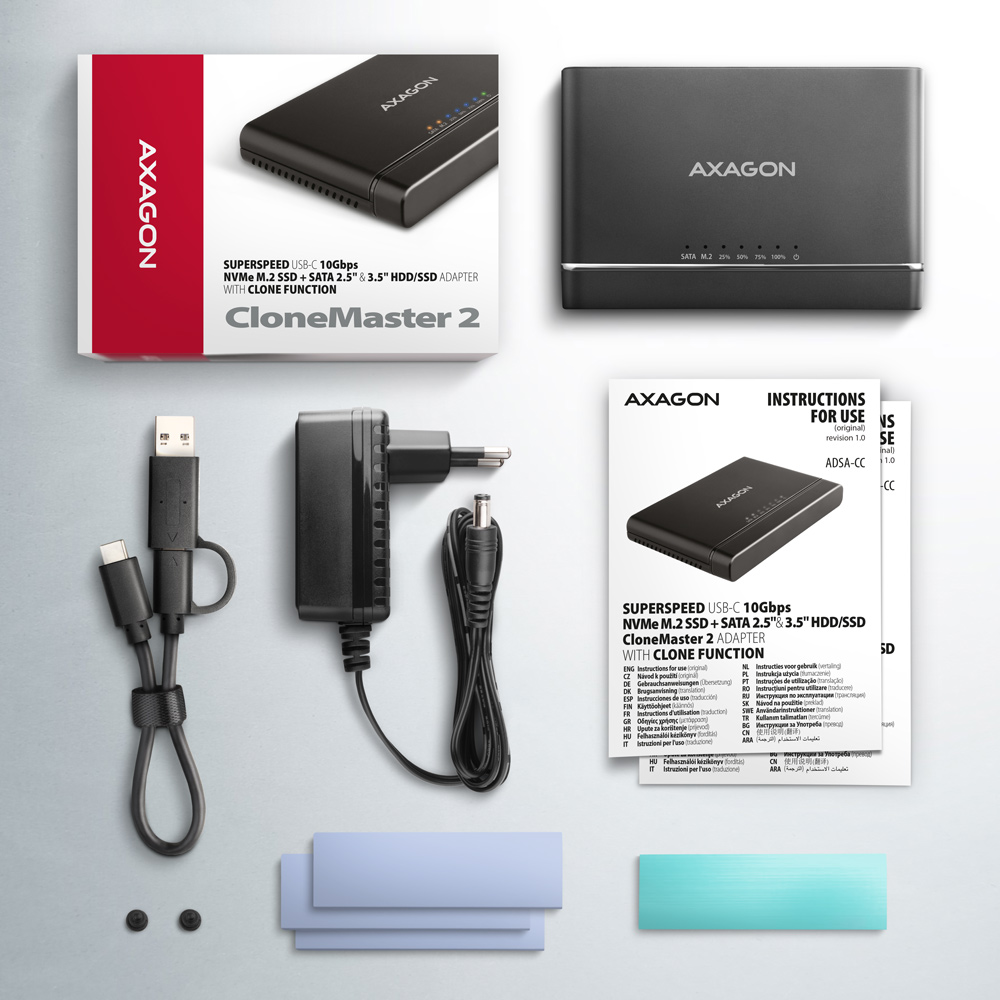
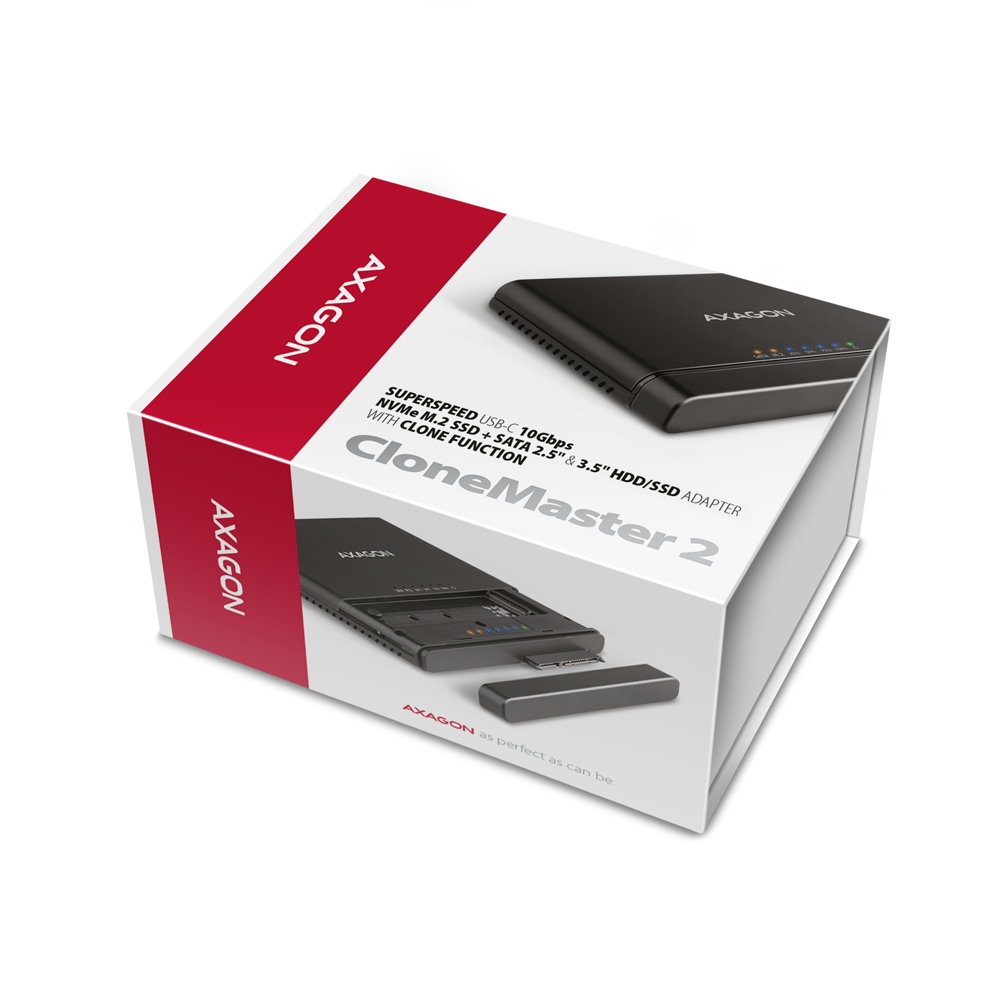
Package contains:
• M.2 + 2.5"/3.5" SSD/HDD adapter,
• power adapter 100-240V / 12V-2A,
• 4 thermal conductive pads,
• USB-C <-> USB-C cable 30 cm long + USB-C -> USB-A reduction,
• multilingual manual CZ / DE / DK / ENG / ESP / FIN / FR / GR / HR / HU / IT / NL / PL / PT / RO / RU / SK / SWE / TR / BG / CN / ARA,
• packed in a cardboard box.


 English
 Czech
Czech
 Slovak
 German
 Hungarian
 Polish
 + 3 more photos