


 English
 Czech
Czech
 Slovak
 German
 Hungarian
 Polish
-
Home

-
Disk accessories
-
3.5" enclosures
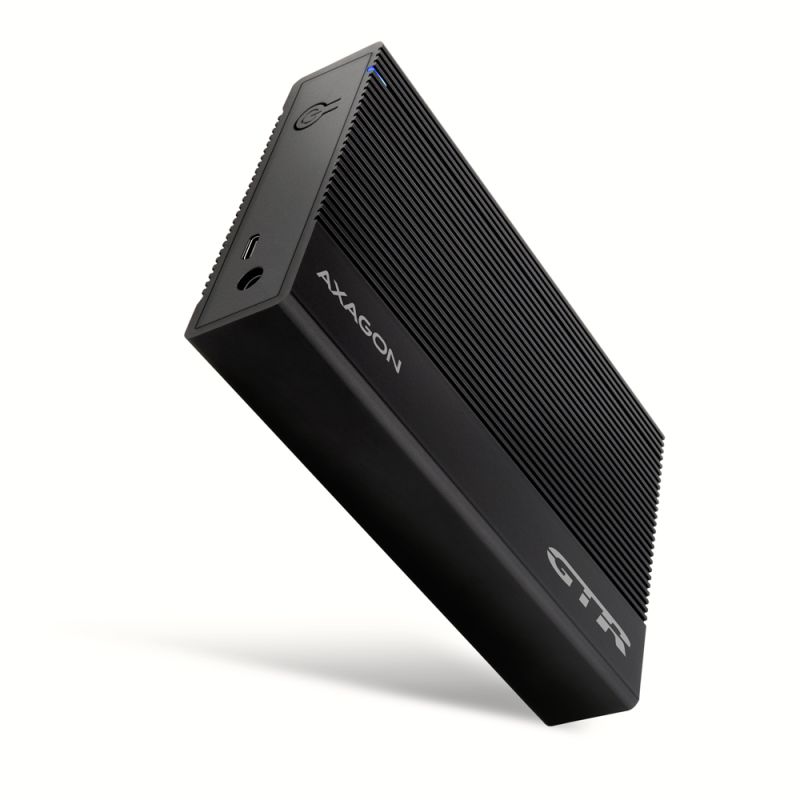
- EE35-XA3 USB 3.2 Gen 1 ALINE box 3.5"
 + 2 more photos
EE35-XA3 USB 3.2 Gen 1 ALINE box 3.5"
Product code: EE35-XA3
Category: 3.5" enclosures , Disk accessories , All products
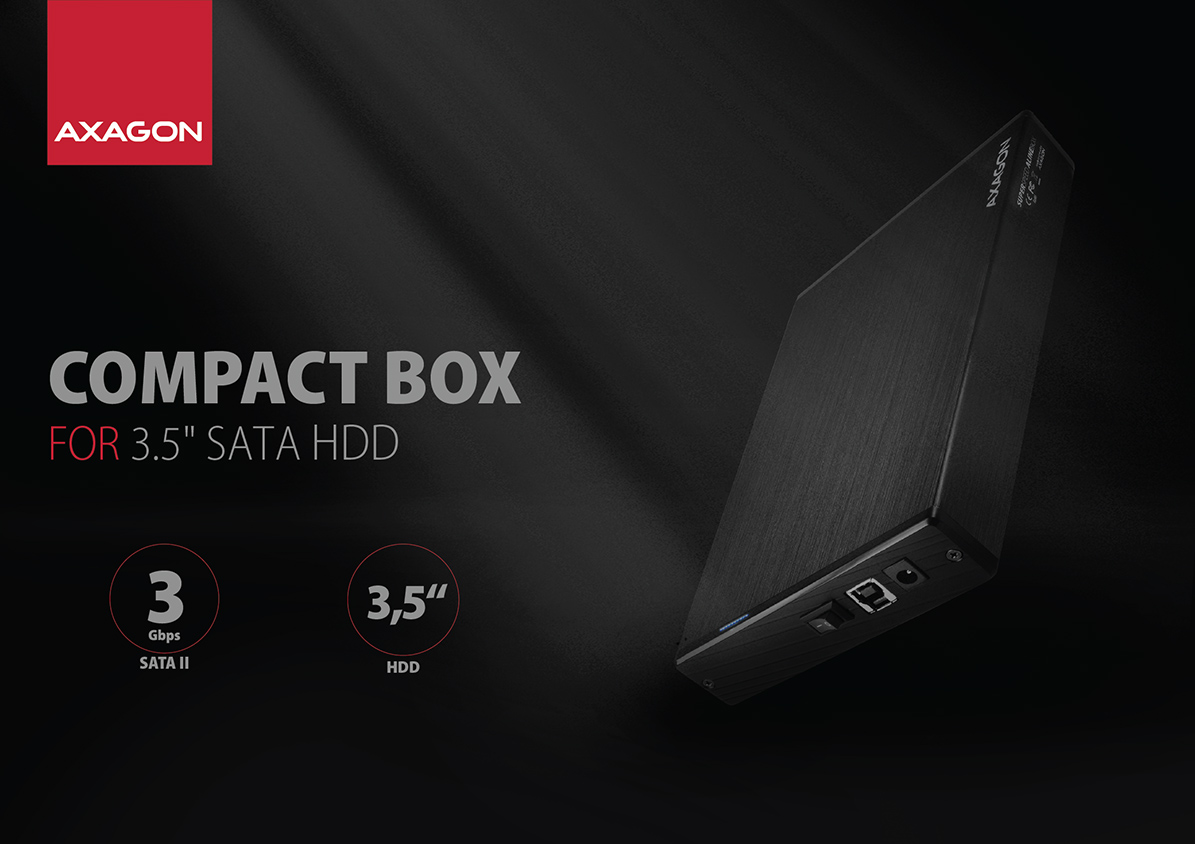
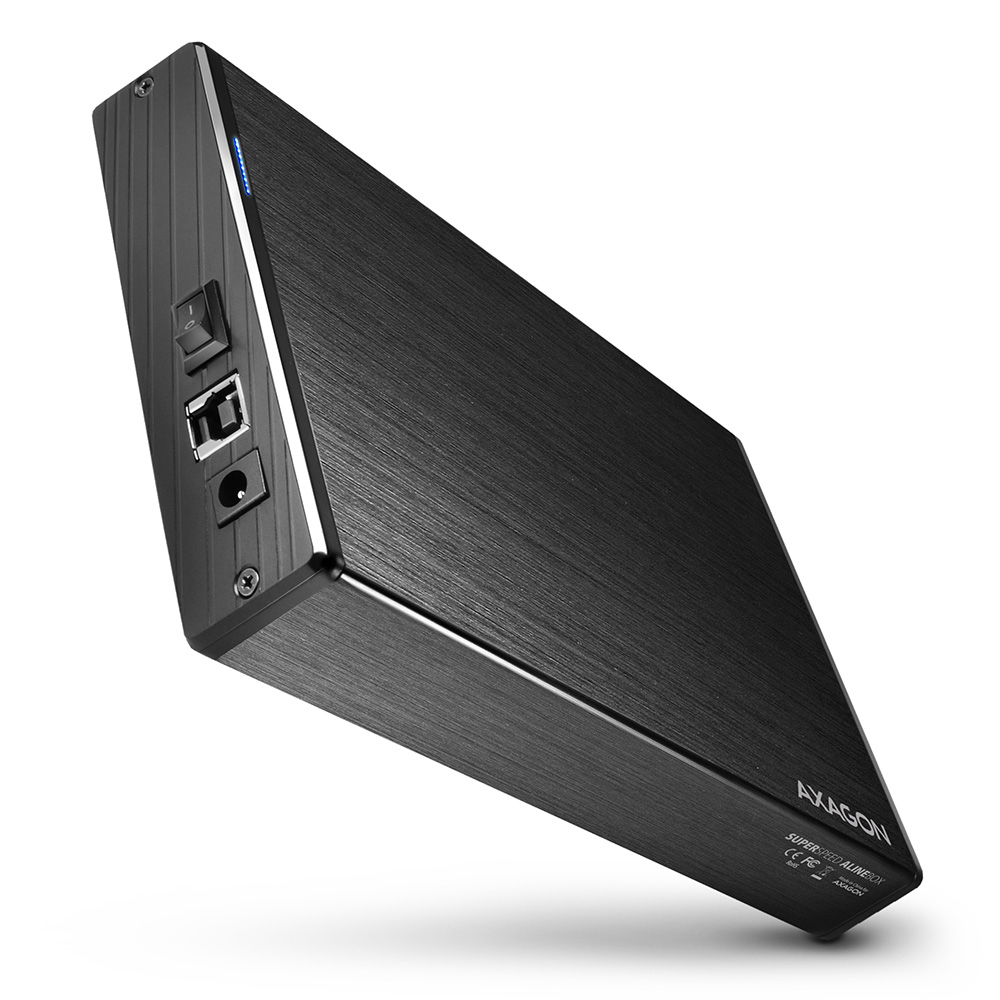
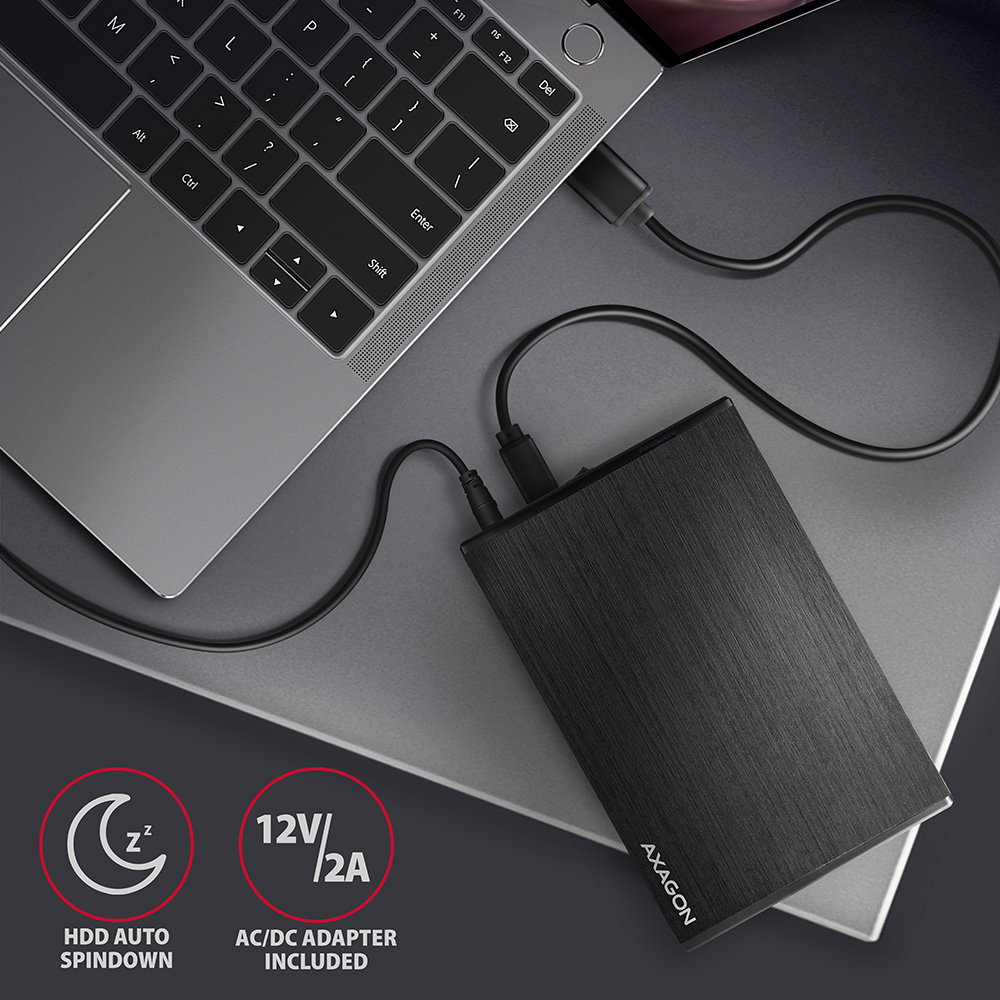
The compact external box EE35-XA3 is suitable for all 3.5" SATA disk.
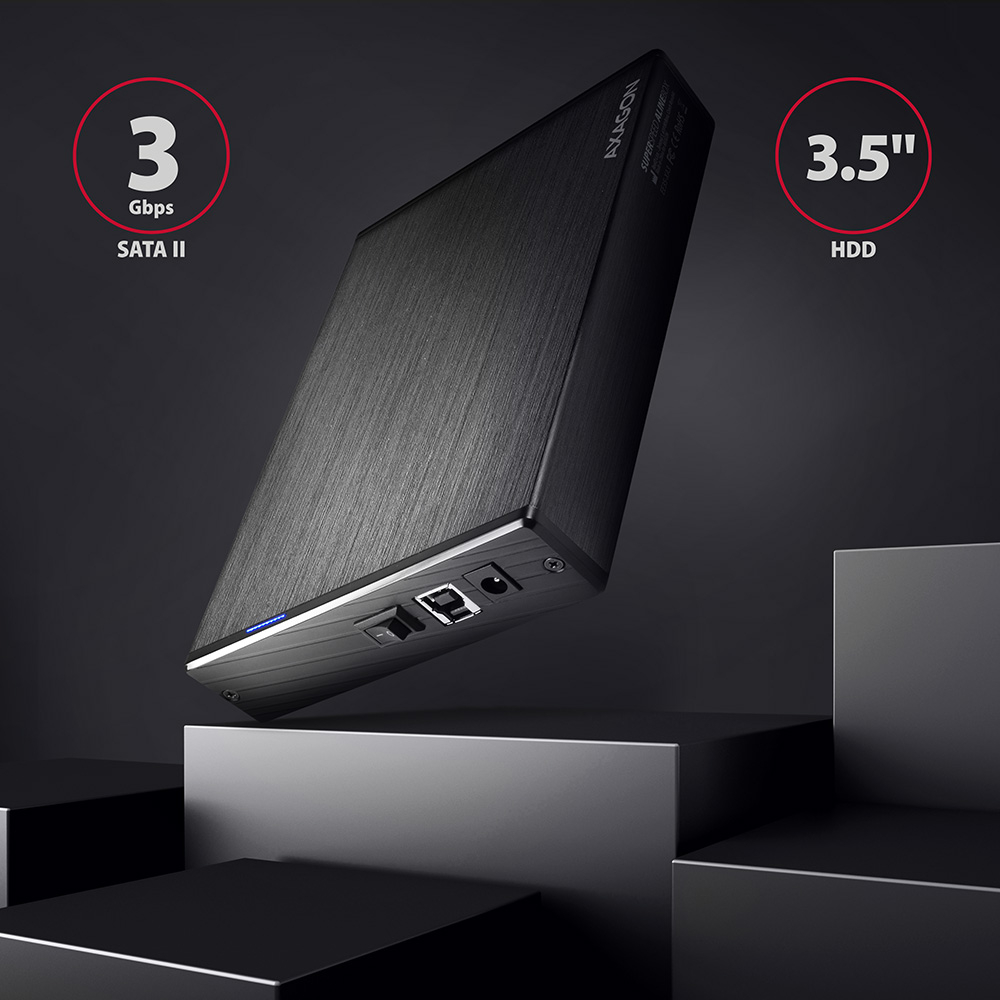
It can handle all SATA, SATA II and SATA III 3.5" drives without maximum capacity limitations.
USB 3.2 Gen 1 (USB 3.0) interface guarantees acceptance of high-speed connectivity to all current computers.
USB 3.2 Gen1 • 3.5" HDD • ANY CAPACITY • UNIVERSAL USE
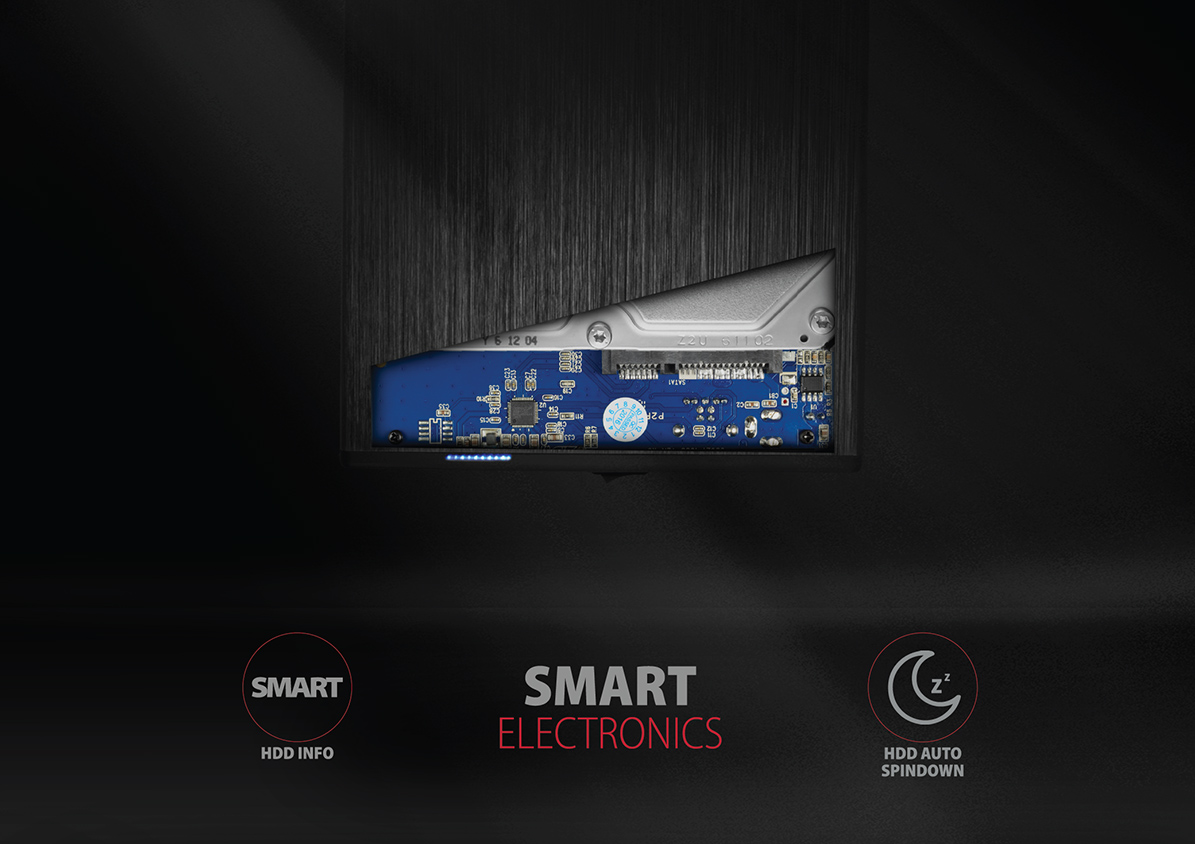
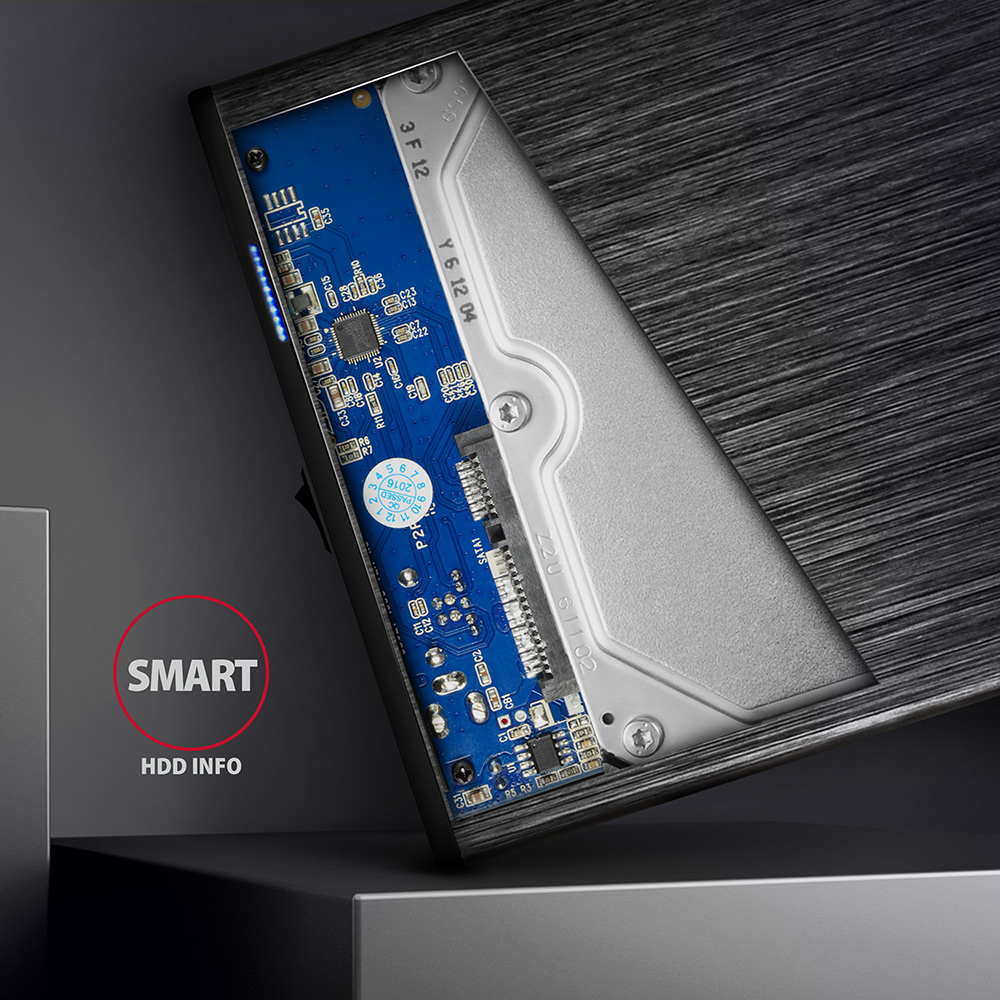
Reading of S.M.A.R.T. information monitoring the condition of the external disk.
Automatic sleeping of the disk over long periods of idling.
Possibility to “boot” computer from SSD or hard drive in the docking station.
HDD S.M.A.R.T. INFO • AUTO SPINDOWN TIME • BOOT SUPPORT
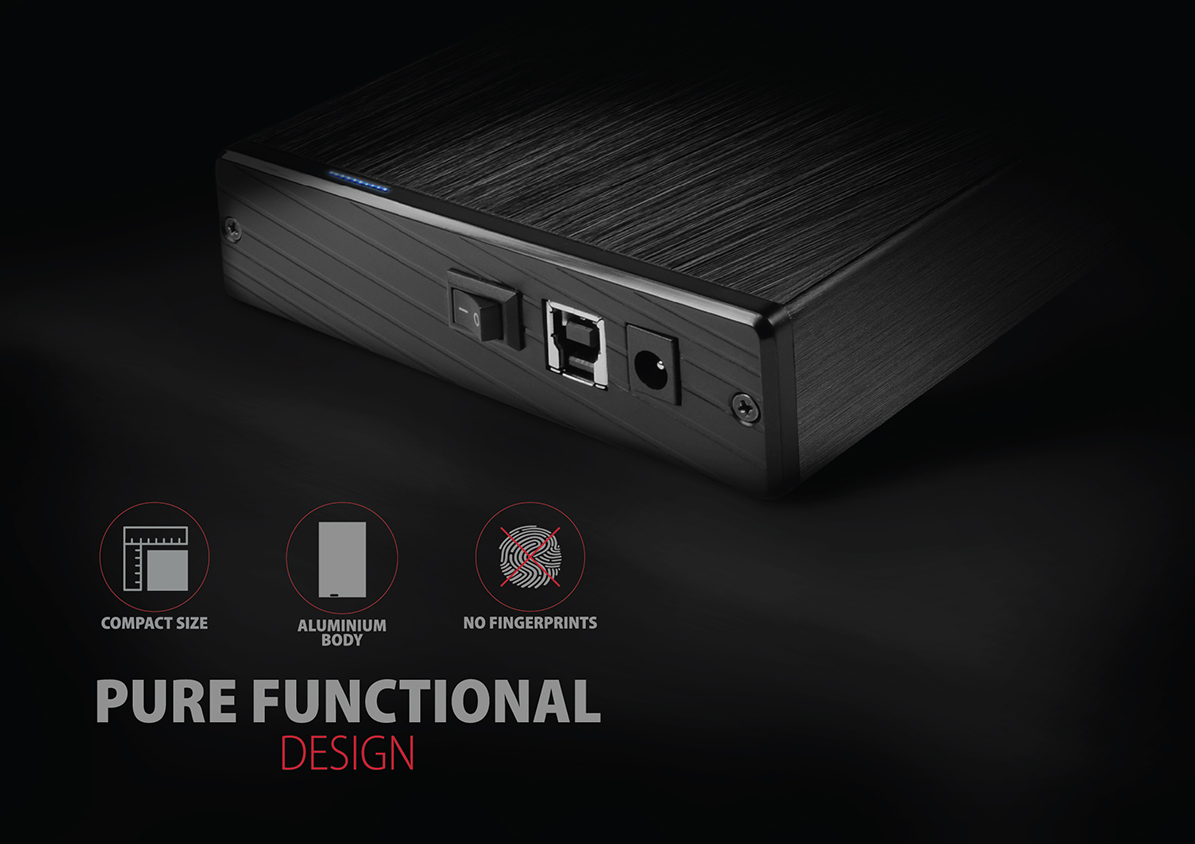
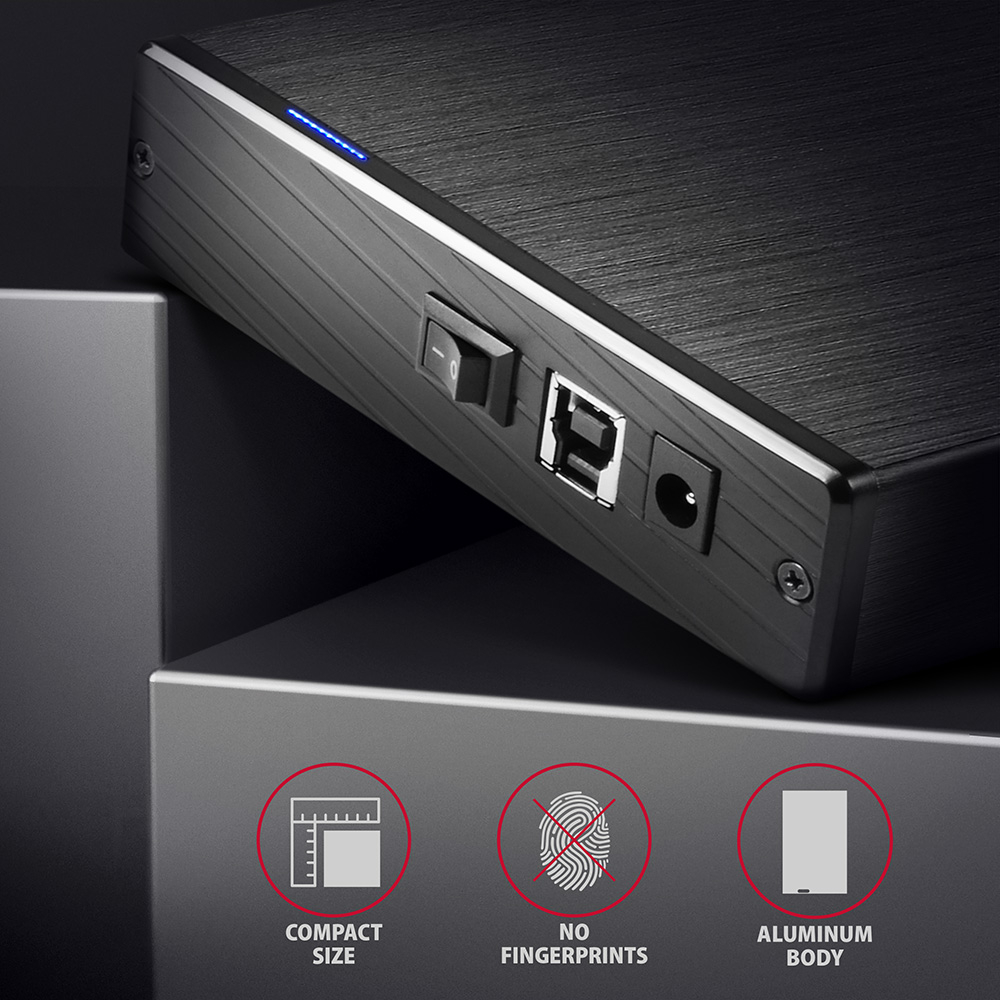
Lightweight and also cast aluminum housing for perfect mechanical disc protection and excellent heat dissipation.
The brushed surface is not only elegant but effectively prevents fingerprints.
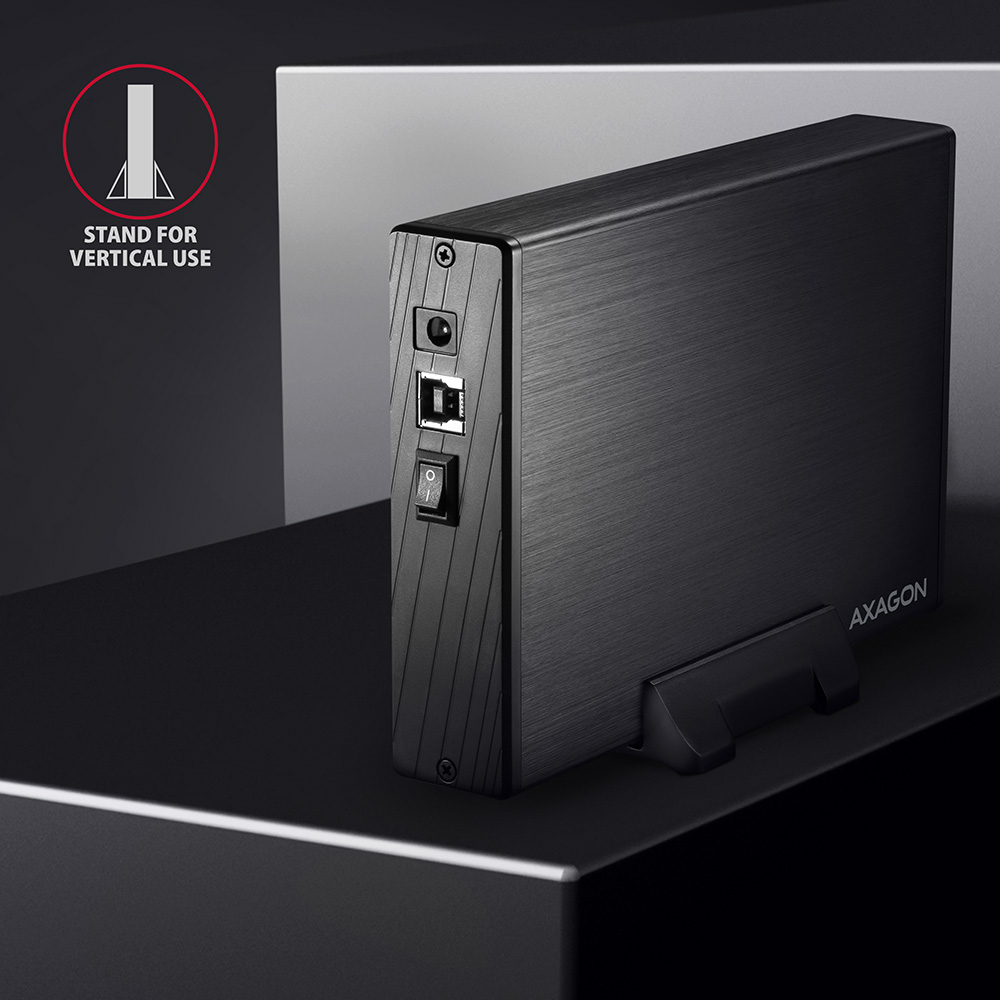
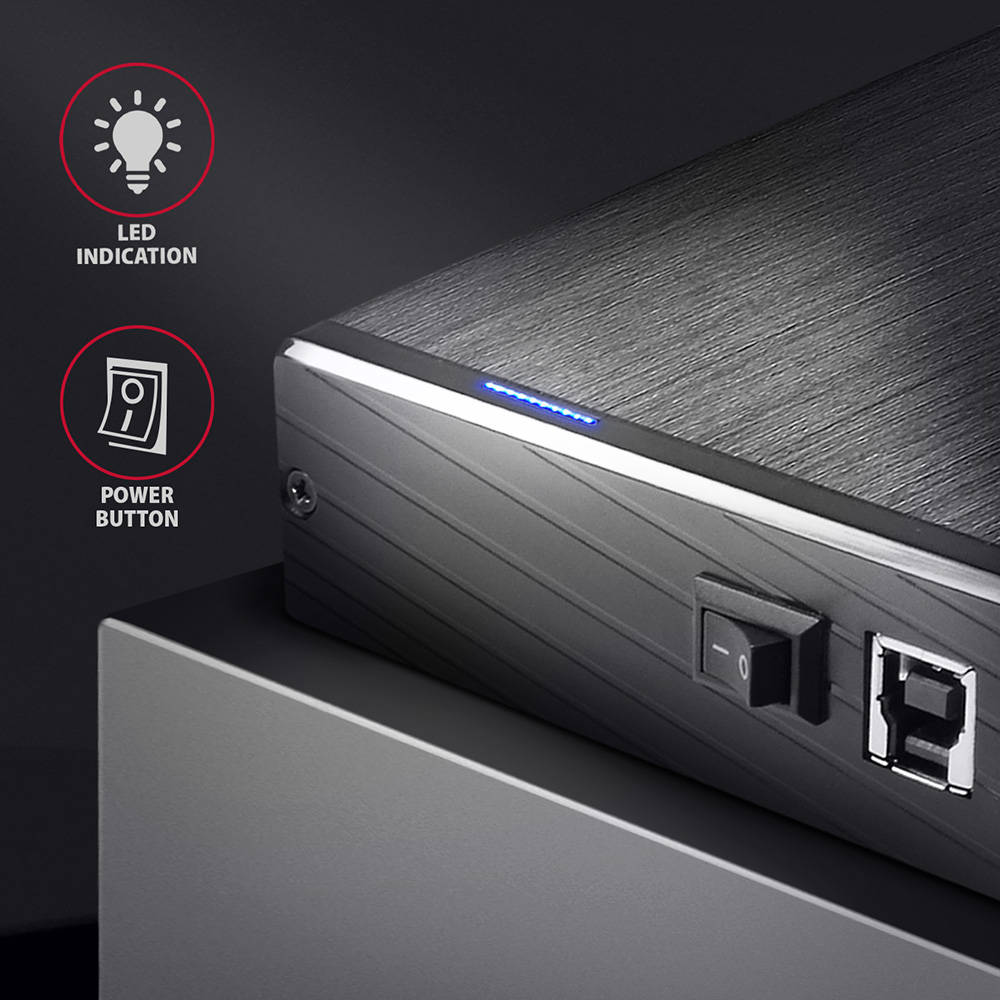
Among the 3.5" boxes impresses with its compact dimensions of 180 × 120 × 32 mm. Subtle blue glare non-dazzling LED indication design.
DURABLE • LIGHTWEIGHT • BRUSHED ALUMINUM - NO FINGERPRINTS • DELICATE BLUE LED
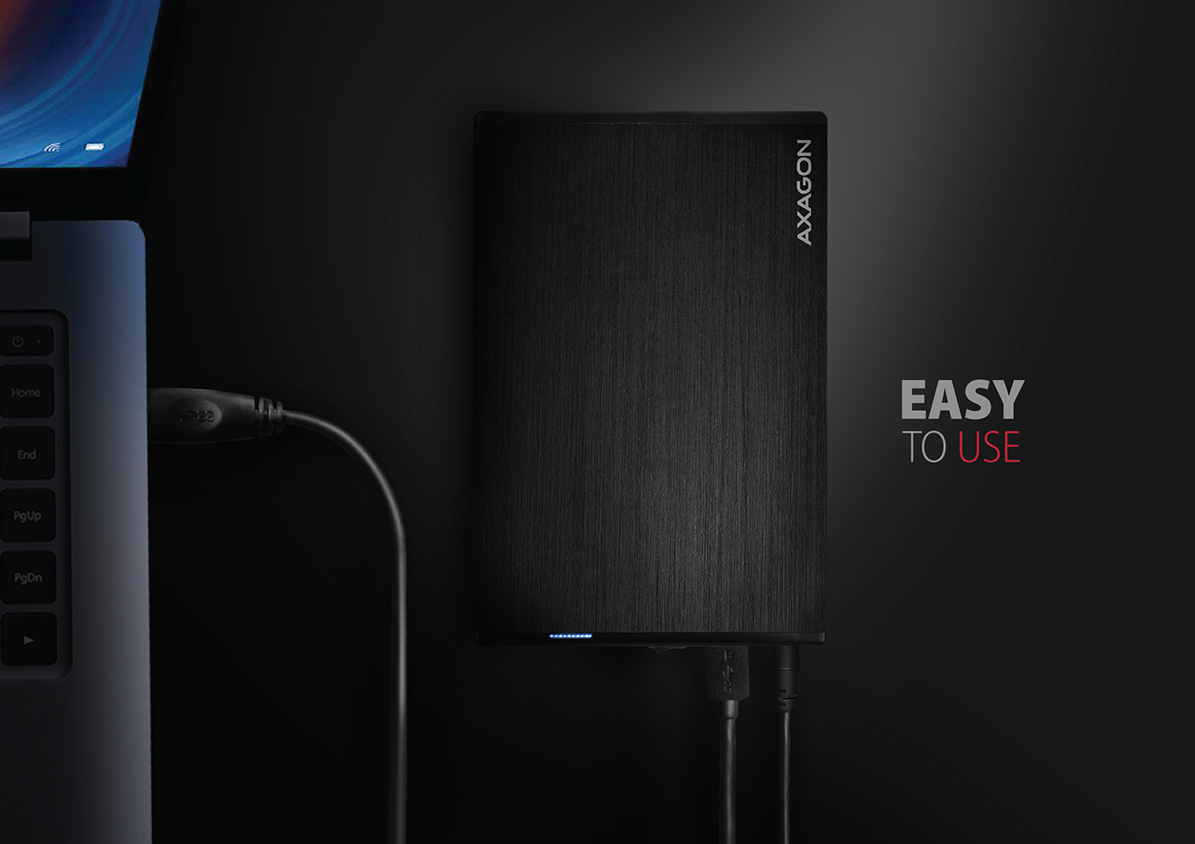
Automatic installation can be handled even by a layman. Drivers are included with operating systems and are installed completely automatically.
Easy mounting of the disc - the disc is fitted with the guide rails, the disc is connected to the SATA connector of the motherboard,
it is inserted into the box body and the forehead is fastened by a pair of screws with the included screwdriver.
Power switch on the rear panel of the box. Powered by a compact external AC/DC adapter 12 V – 2 A (24 W) with a 150 cm power cable.
AUTO INSTALL • EXTERNAL POWER • POWER BUTTON
The compact aluminum AXAGON EE35-XA3 ALINE external box with a high-speed USB 3.2 Gen 1 (USB 3.0) interface intended for 3.5" SATA disks.
The UASP support allows you to enjoy the most possible speed of modern hard drives.
Reading of S.M.A.R.T. information monitoring the condition of the external disk. Supports spinning down of connected disks as well as the box.
Durable cast aluminum case for perfect mechanical protection of the disk and excellent heat dissipation.
The decently shaped case with a brushed surface that provides elegant look and prevents unwanted fingerprints.
Easy mounting of the hard disk as well as automatic installation can be handled even by a layman and easily create an external disk.
Input:
• USB 3.2 Gen 1 (USB 3.1 Gen 1 / USB 3.0) SuperSpeed USB transmission rates up to 5 Gbit/s.
• Connection via micro USB type B female conector.
Device support:
• SATA II - 3 Gb/s (300 MB/s) interface,
• Supports 3.5" HDD.
Features:
• Compatible with USB 3.2 Gen 1 / USB 3.1 Gen 1 / USB 3.0 and backward compatible with USB 2.0.
• Supports transmission rates 5000 / 480 Mbit/s (SuperSpeed / HighSpeed).
• Supports 3.5" SATA III / II / I disks of all capacities without limitation.
• Compliant with Serial ATA 2.0 specification (SATA/300), transmission rates of up to 3 Gb/s (300 MB/s).
• Compliant with Serial ATA 1.0 specification (SATA/150), transmission rates of up to 1.5 Gb/s (150 MB/s).
• The total bandwidth / transmission rate of the box is determined by the SATA/300 interface used (theor. 3 Gbit/s).
• Supports UASP (USB Attached SCSI Protocol).
• SSD/HDD boot support in external box.
• Possibility to connect your device while running thanks to the Hot Plug support.
• Full Plug and Play support.
• HDD Auto Spindown support - automatic spindown of a disk after period of inactivity lasting 10 minutes.
• HDD Turn Off - turns off the disk after removing the device or spinning down the PC.
• Connection via durable large USB 3.2 Gen 1 Type B female connector.
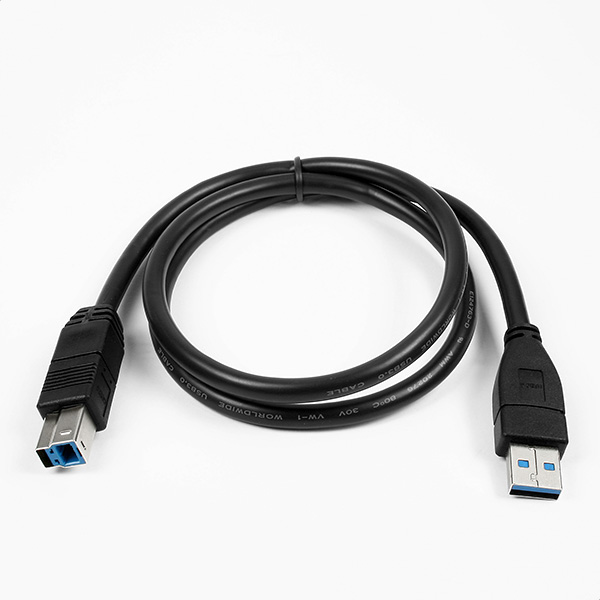
• An USB-B / USB-A cable 80 cm long is included.
• A blue, decent LED indicates the connection to the computer's USB port (permanent light) and the data transmission (blinking).
• The durable box body is a cast aluminum alloy, the box faces are plastic.
• Simple disk installation - the guides are mounted on the disk, the disk is plugged directly into the SATA connector of the motherboard, and inserted into the box body; the front panel is fastened with two screws using a screwdriver that is included.
• Compact adapter dimensions 180 × 120 × 32 mm.
• External box weight 244 g (without cables and disk).
Power supply:
• Power supply via a compact external AC/DC adapter 12V - 2A (24 W) with a 150 cm long supply cable.
• Power switch on the rear panel of the box.
• AC adapter dimensions 74 x 36 x 91 mm (incl. fork).
• AC adapter weight 128 g (incl. supply cable).
Supported OSs:
• MS Windows XP / Vista / 7 / 8 / 8.1 / 10 and later, Windows Server 2003 / 2008 / 2012 / 2016 and later (supported are all 32- and 64-bit Windows OS versions), Mac OS X 10.x and higher, Linux with kernel 2.6.x and above.
• Note: Drivers are included with supported operating systems and are installed completely automatically. No other drivers need to be installed and are not even available.
Package contains:
• USB 3.2 Gen 1 external box for 3.5" SATA disk,
• USB-B - USB-A cable 80 cm long,
• power adapter 100–240 V / 12 V – 2 A,
• mounting strips, screws and the screwdriver,
• a stand that allows the box to be operated in upright position,
• printed installation guide in CZ / DE / DK / ENG / ESP / FIN / FR / GR / HR / HU / IT / NL / PL / PT / RO / RU / SK / SWE / TR / BG / CN / ARA,
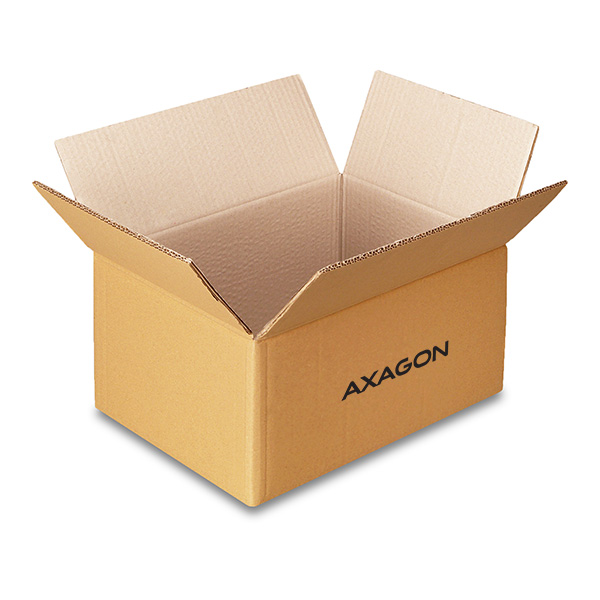
• packed in a cardboard box.
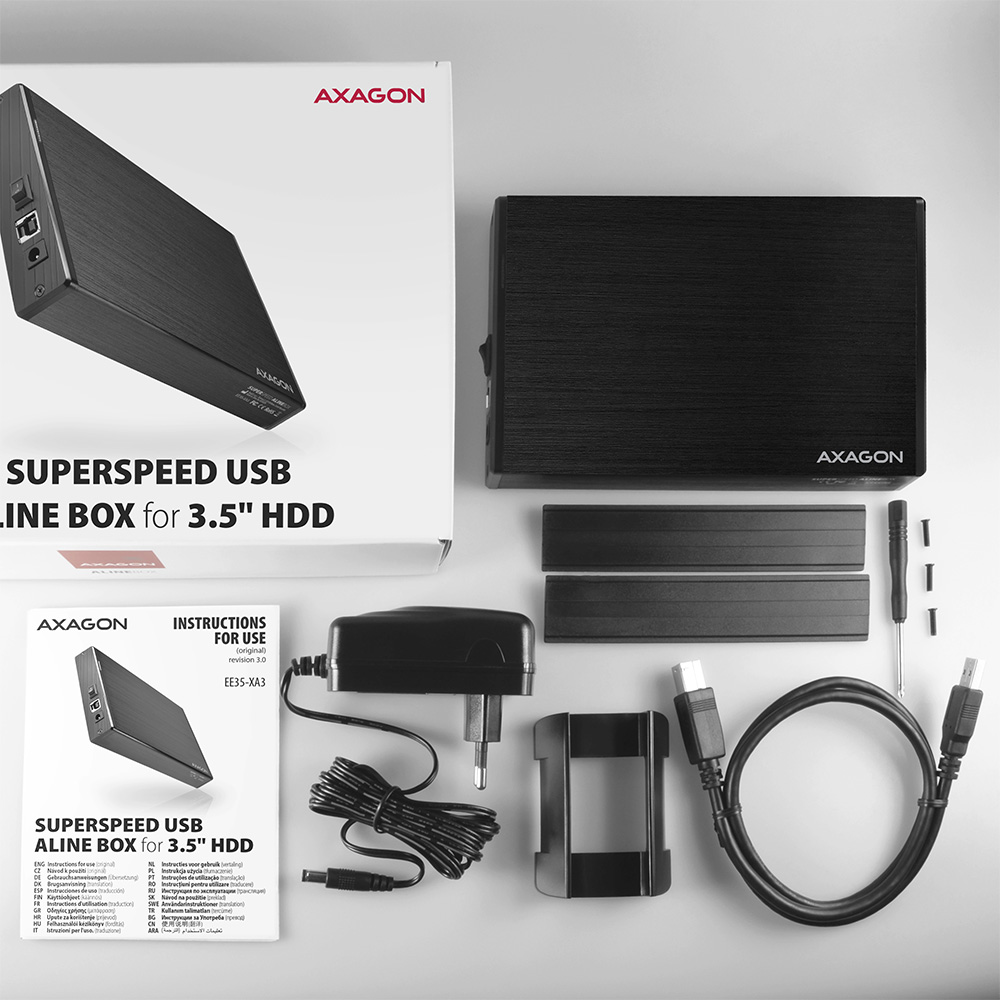
Package contents
- USB 3.2 Gen 1 external box
- USB-B - USB-A cable 80 cm long
- power adapter with 150 cm cable
- mounting strips for the disk
- screws and the screwdriver
- stand
- installation guide
Cable
- USB-B / USB-A cable
- length of 80 cm
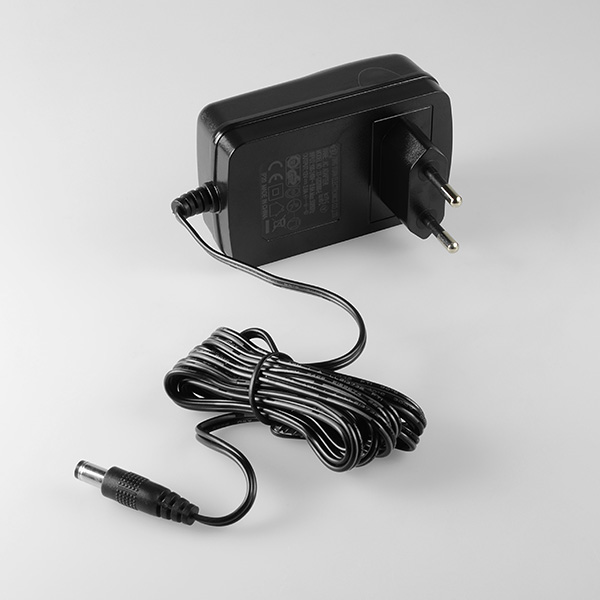
Power adapter
- compact power adapter 100-240V / 12V-2A
- with an integrated two-pin Euro fork
- with 150 cm long cable
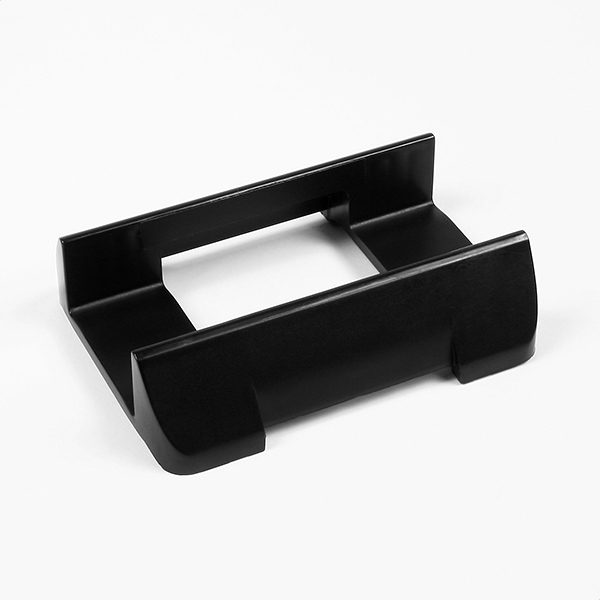
Stand
- to operate the box in upright position

Manual
- printed installation manual in CZ / DE / DK / ENG / ESP / FIN / FR / GR / HR / HU / IT / NL / PL / PT / RO / RU / SK / SWE / TR / BG / CN / ARA
Product package
- cardboard box
- package dimensions: 202 × 163 × 80 mm
- weight of 1 pc package: 548 g
- EAN: 8595247902863
Export package
- number of pieces in the box: 30
- total weight of the box: 17.5 kg G.W.
- box dimensions: 51 × 43 × 42 cm
User Manual
DownloadEE35-XA3 - Installation Guide - CZ / DE / DK / ENG / ESP / FIN / FR / GR / HR / HU / IT / NL / PL / PT / RO / RU / SK / SWE / TR / BG / CN / ARA
Where can I download drivers to my external box (adapter / docking station)?


A): Drivers are included with operating systems and are installed completely automatically. The external box (adapter / docking station) is detected as a standard storage device, such as a USB flash disk, no additional drivers are needed.
B): No other drivers need to be installed and are not even available. If you continue to have problems with your external box (adapter / docking station), check out more tips that can help you troubleshoot problems.
The external box (adapter / docking station) is not displayed in "Device Manager".
A): If the external box (adapter / docking station) is not displayed in "Device Manager", there may be a USB port malfunction. It is also possible that your computer has a poor power supply to USB ports and the power is not sufficient to operate an external box (you can detect by listening that HDD is not spinning). This is a problem especially for older computers, where the source part already works at the limit of its parameters. In this case, it would help to use a USB hub, with an auxiliary power supply, by which the external box (adapter / docking station) would be connected to the computer.
B): Try plugging the external box (adapter / docking station) into another USB port, preferably on the back of your PC. The external box (adapter / docking station) should be detected and the drivers loaded automatically. If the problem persists, plug the external box (adapter / docking station) into the USB port of another computer to verify its functionality.
The external box (adapter / docking station) is reported in "Device Manager" as "Unknown Device".
A): If this happens, it means that the operating system failed to get the necessary information to install the drivers.
B): The cause may be a defective USB cable or damaged device. If the problem persists, plug the external box (adapter / docking station) into the USB port of another computer to verify its functionality.
The external box (adapter / docking station) is not displayed in the "My Computer" folder.
A): If this happens, it means that the Windows operating system did not assign a drive letter to the new storage device.
B): If the drive letter is not assigned, open "Disk Management", right-click on the desired drive and manually assign the drive letter. If the drive letter can not be assigned to the disk, it is possible that the disk is formatted as "dynamic". If you want to keep disk data, connect it to the original device and make a backup of the disk. Then convert it to a normal disk, initialize it to MBR (or GPT, see other points), and then perform Low Level Format (e.g. using the Low Level Format Tool)
After inserting a newly purchased HDD/SSD into an external box (adapter / docking station) and connecting to a computer, the disk is not displayed in "Device Manager".
A): The newly purchased disk must be initialized before first use.
B): If the new disk is not initialized automatically, open "Disk Management", right-click on the desired disk and initialize it.
What is the disk initialization?
A): By initializing the disk, you can set the mode in which the hard disk will work.
B): You can use the partition with the master boot record (MBR) or the GUID partition table (GPT). For disk up to 2TB, use the MBR option, we recommend selecting GPT on a larger disk than 2TB. Subsequently, the initialized disk should be formatted.
The external box (adapter / docking station) with a 3.5“ HDD is not displayed in "Device Manager".
A): If the external box (adapter / docking station) with a 3.5“ HDD is not displayed in "Device Manager ", the inserted disk may not be powered.
B): Make sure you have the power supply plugged in and the external box (adapter / docking station) turned on with the power switch. If the disk is properly powered, it should spin (can be detected by listening).
Does the external box (adapter / docking station) support disk capacity greater than 2TB?
A): The AXAGON external boxes (adapters / docking stations) are always equipped with the latest firmware to support disks of all capacities.
B): The 2TB limit is given as the maximum partition size when initializing a disk with the master boot record (MBR). If you want to create a larger partition on the HDD stored in the external box (e.g. 3TB or more), you must select the GUID partition table (GPT) when initializing the disk. Subsequently, the initialized disk should be formatted.
Do the external boxes (adapters / docking stations) support the USB Mass Storage (UMS) protocol and can be easily connected to a TV like a USB Flash disk?
A): The external AXAGON boxes (adapters / docking stations) support the USB Mass Storage protocol making it easy to connect to TV.
B): When using a disk larger than 2TB, some TVs do not support GPT format. In such case, MBR format must be used when initializing a disk.
What are the main differences between USB 2.0 and USB 3.2 Gen 1 (USB 3.0)?
A): The connectors are compatible, but inside the USB 3.0 connector has five more contacts. The USB 3.2 Gen 1 (USB 3.0) connector is usually identified by the use of blue (exceptionally black) plastic.
B): The main difference is the speed of data transmission. USB 2.0 reaches a maximum speed of about 30 MB/s, while USB 3.2 Gen 1 (USB 3.0) is able to achieve a theoretical speed of up to 600 MB/s. If you place a disk in the external box that has a read speed of 120 MB/s, you can only get a quarter speed, that is about 30 MB/s, in the box with USB 2.0.
How is it with the disk spin-down feature with external boxes (adapters / docking stations) that are logged on as "Mass Storage"?
A): For proper spin-down setting, this feature must be supported by all components that are in the path between the operating system and the HDD, i.e. the USB controller, box electronics, and the disk itself. The spinning down of idle disks is set up by the operating system, but it is very complicated.
B): We recommend setting up using one of the freeware programs, where the procedure is mostly simplified. E.g. by HDDScan (http://hddscan.com/). The program has the ability to verify whether the disk and all components in the path support the feature. Select "Spindown" to test an immediate spin down of the disk. Set up the spindown time using a slider in the "Power Management" section.
Where can I download drivers to my external box?
A): Drivers are included with operating systems and are installed completely automatically. The external box is detected as a standard storage device, such as a USB flash disk, no other drivers are needed.
B): No other drivers need to be installed and are not even available. If you continue to have problems with your external box, check out more tips that can help you troubleshoot problems.
The external box is not displayed in "Device Manager".
A): If the external box is not displayed in "Device Manager", there may be a USB port malfunction.
B): Try plugging the external box into another USB port. The external box should be detected and the drivers loaded automatically. If the problem persists, plug the external box into the USB port of another computer to verify its functionality.
What is the disk initialization?
A): By initializing the disk, you can set the mode in which the hard disk will work
B): You can use the partition with the master boot record (MBR) or the GUID partition table (GPT). For disk up to 2TB, use the MBR option, we recommend selecting GPT on a larger disk than 2TB. Subsequently, the initialized disk should be formatted.
The external box is reported in "Device Manager" as "Unknown Device".
A): If this happens, it means that the operating system failed to get the necessary information to install the drivers.
B): The cause may be a defective USB cable or damaged device. If the problem persists, plug the external box into the USB port of another computer to verify its functionality.
The external box is not displayed in the "My Computer" folder.
A): If this happens, it means that the Windows operating system did not assign a drive letter to the new storage device.
B): If the drive letter is not assigned, open "Disk Management", right-click on the desired drive and manually assign the drive letter.
After inserting a newly purchased HDD/SSD into an external box and connecting to a computer, the disk is not displayed in "Device Manager".
A): The newly purchased disk must be initialized before first use.
B): If the new disk is not initialized automatically, open "Disk Management", right-click on the desired disk and initialize it.
The 3.5“ external box is not displayed in "Device Manager".
A): If a 3.5" external box is not displayed in "Device Manager ", the inserted disk may not be powered.
B): Make sure you have the power supply properly connected and the box turned on by the power switch. If the disk is properly powered, it should spin (can be detected by listening).
Do external boxes support disk capacity greater than 2TB?
A): The AXAGON external boxes are always equipped with the latest firmware to support disks of all capacities.
B): The 2TB limit is given as the maximum partition size when initializing a disk with the master boot record (MBR). If you want to create a larger partition on the HDD stored in the external box (e.g. 3TB or more), you must select the GUID partition table (GPT) when initializing the disk. Subsequently, the initialized disk should be formatted.
Do the external boxes support the USB Mass Storage (UMS) protocol and can be easily connected to a TV like a USB Flash disk?
A): The external AXAGON boxes support the USB Mass Storage protocol making it easy to connect to TV.
B): When using a disk larger than 2TB, some TVs do not support GPT format. In such case, MBR format must be used when initializing a disk.
Prerequisites for proper M.2 function.
AXAGON M.2 SSD disk adapter is let say only HW connector change from M.2 into PCI-Express or SATA. Adapter itself do not have controller electronics and need no drivers. It is necessary to check M.2 disk driver availability for older OS like Windows 7.
Proper M.2 adapter function requires:
- computer mainboard support M.2 disks – SATA disks are more often supported than NVMe disks,
- computer mainboard support booting from PCI-Express bus – in case of OS installation to M.2 NVMe disk,
- driver availability for M.2 SSD disk – apply especially for NVMe disks on Windows 7 OS.
Please contact the motherboard manufacturer's technical support to determine support for motherboard M.2 drives. In some cases updating the BIOS/UEFI is sufficient.
Check the M.2 SSD driver availability on the manufacturer's website or contact the disk manufacturer's technical support.
M.2 SSD disk does not appear in the BIOS / UEFI motherboard disk list.
The disks connected to the SATA motherboard controller are usually displayed In BIOS/UEFI. The NVMe disk is usually displayed in the "Disk Boot Order" menu.
This applies when the requirements of "Prerequisites for proper M.2 function" are met.
After installing the PCI (PCIe) card into my computer, “Device Manager” generates the error code "Code 10 - The device cannot start".
A): If the PC does not run with the card or the card is mistakenly detected in “Device Manager”, or if there is a yellow exclamation mark on the driver, or if “Device Manager” reports an error code “Code 10 - The device cannot start”, the card is in conflict with another device in your computer.
B): In most cases, this conflict can be solved by moving the card to another PCI (PCIe) slot, with the BIOS assigning other free resources to the card. If the move does not help, try the card separately, with no additional cards inserted. If the card cannot be moved to another slot, you can reset the BIOS of the computer (by jumper on the board or pulling out the backup battery, we recommend that you note all the original settings and reset everything to the required values). This will cause the IRQ, DMA, and I/O resources to be redistributed.
The network card is not displayed in "Device Manager".
A): If the network card is not displayed in "Device Manager", a USB port (or a PCIe slot in the event of an internal network card) may be malfunctioning.
B): Try plugging the network card into another USB port (or another PCIe slot on the PC motherboard in the event of an internal network card, or temporarily disconnect all other PCIe cards). The network card should be detected and you should be prompted to install the drivers. If the problem persists, plug the network card into the USB port (PCIe slot) of another computer to verify its functionality.
Why my new hard disk does not appear in the "My Computer" folder after connecting to the controller?
A): The newly purchased disk must be initialized before first use.
B): If the new disk is not initialized automatically, open "Disk Management", right-click on the desired disk and initialize it.
Is your SATA 6G controller connected via a PCI-e 2.0 bus not running at full speed?
A): First, try moving the card to another PCI-e slot in case there is a device conflict. The issue could also be caused by a poor-quality or damaged SATA cable.
B): Check whether your SSD partition is properly aligned (using a program that displays this information, e.g., ASS SSD Benchmark). More information about this issue can be found here: http://pctuning.tyden.cz/software/ladeni-windows/17030-optimalizace-windows-7-pro-ssd-co-funguje-a-co-ne?start=2
What is the disk initialization?
A): By initializing the disk, you can set the mode in which the hard disk will work.
B): You can use the partition with the master boot record (MBR) or the GUID partition table (GPT). For disk up to 2TB, use the MBR option, we recommend selecting GPT on a larger disk than 2TB. Subsequently, the initialized disk should be formatted.
Test
Test
After installing the Axagon SATA controller, my PC has a slow start to Windows. Can something be done about it?
A): The lead time is naturally longer by the time it takes to detect the controller and connected disks. The start time can be shortened in the MB BIOS by enabling the "Quick Boot" feature. For newer boards, this feature is labeled "Fast boot". The lead time depends, of course, also on the disk used for the SSD/HDD operating system and the number of peripherals connected to the computer.
B): In the case of newer motherboards, it is more practical to use the spin down (instead of turn off) feature.
How does disk cloning work on the ADSA-ST? And does the target disk have to be exactly the same size as the source disk?
A): The ADSA-ST clones disks bit by bit, regardless of their content. This creates an identical copy of the disk. A requirement for cloning is that the source disk must not contain any bad sectors (otherwise, the cloning process will stop). If the target HDD is smaller than the source HDD, cloning will not start.
B): For cloning, the target HDD must be the same size or larger than the source HDD. If the target HDD is larger than the source HDD, a partition equal to the size of the source HDD will be created on the target disk, and the remaining space will stay unallocated. After cloning, you can extend the partition to include the unallocated space or create a new partition using Windows Disk Management.
The external box does not see my M.2 drive
A): Check if the M.2 disk type is NVMe (neither SATA M.2 drives nor mSATA drives are covered by this box)
B): Update the firmware of your NVMe M.2 drive using the manufacturer's utility
C): Update the firmware of the external box - download link
Contact us
Similar products
Follow!