Product code: HMC-6G2L
Category: Docking stations , One video output + LAN
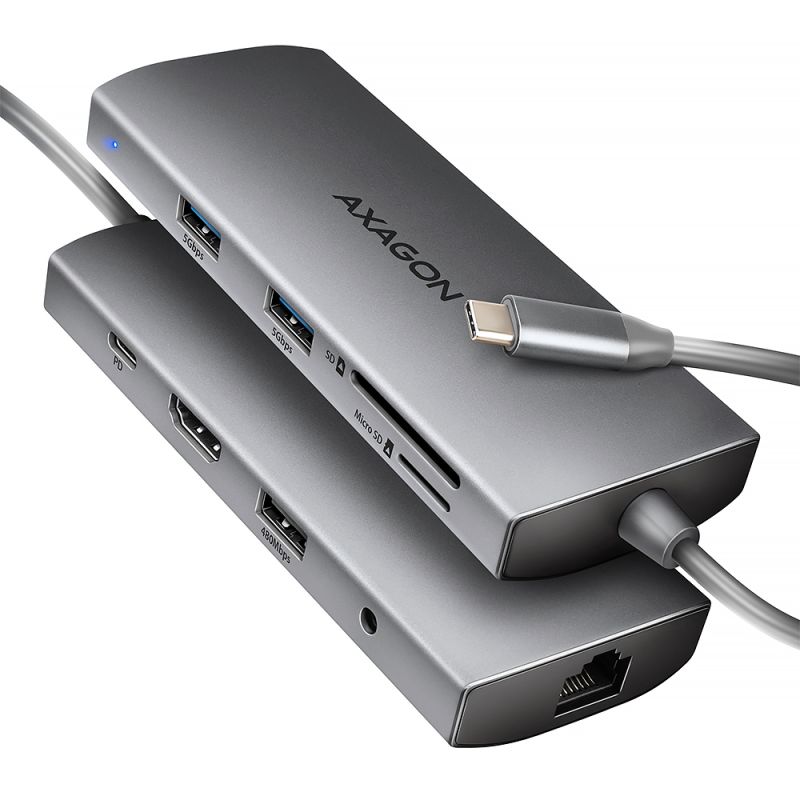
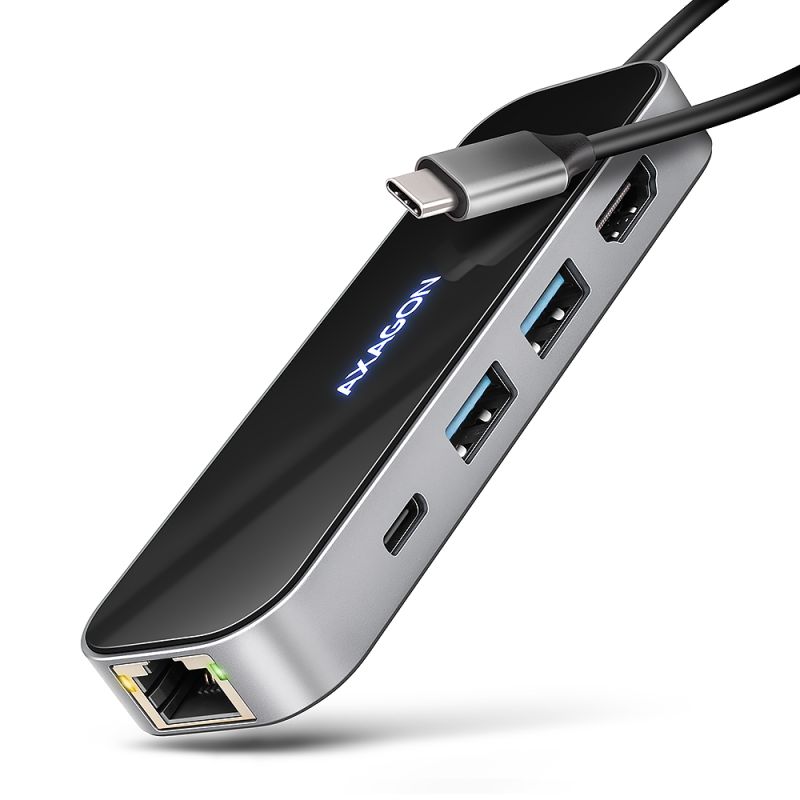
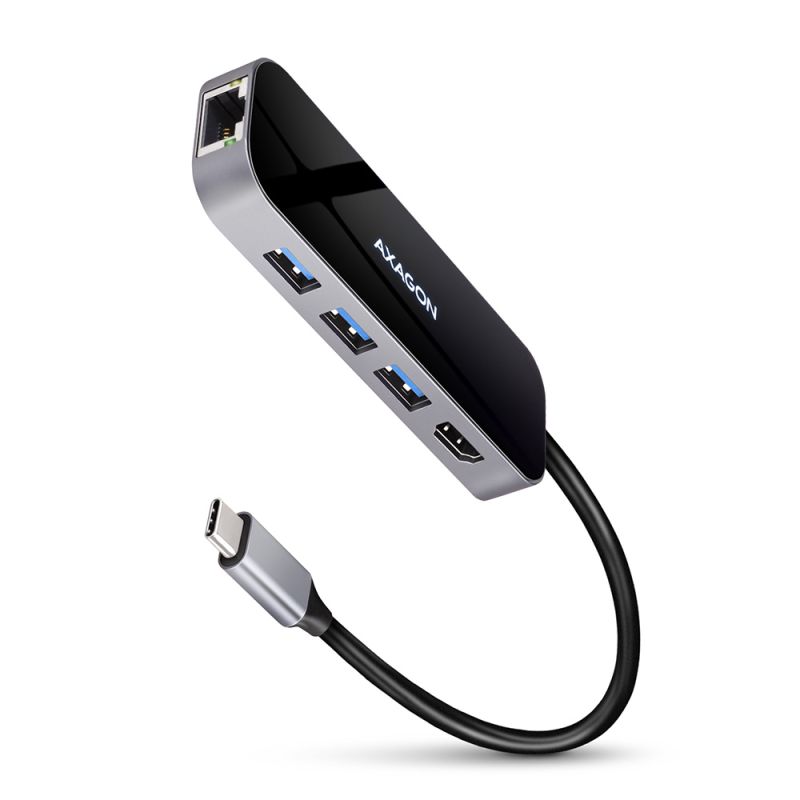
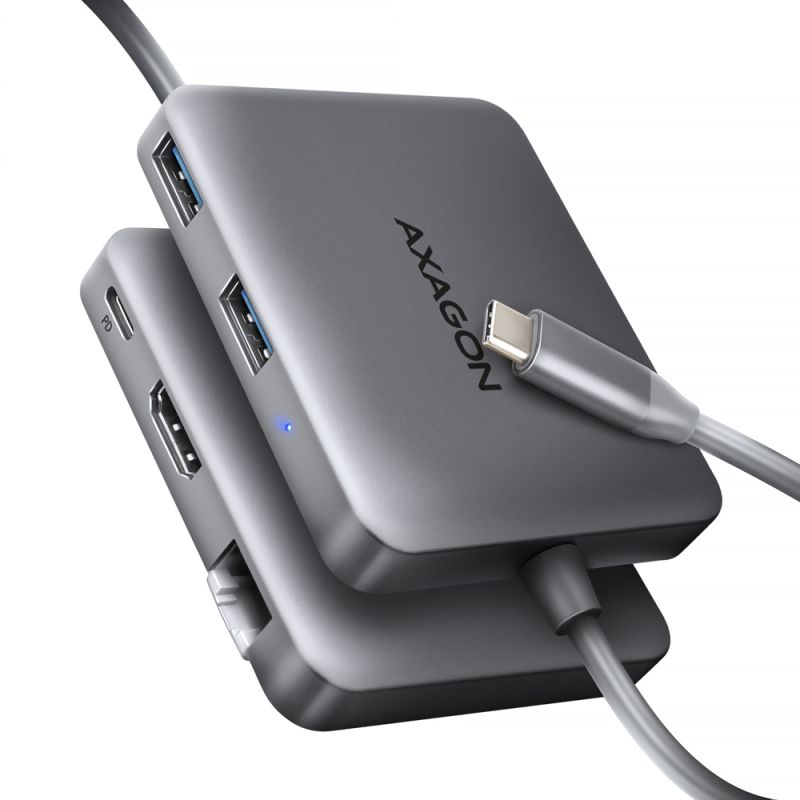
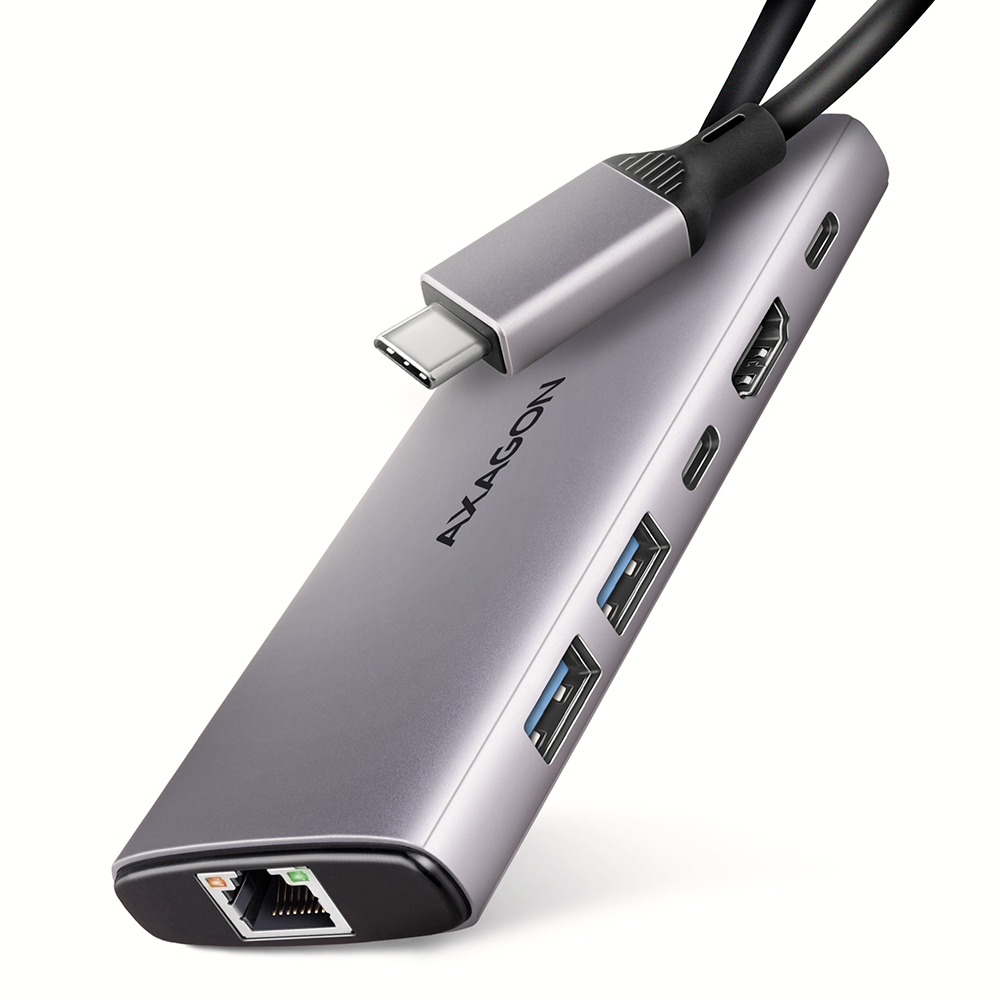
The multi-port USB-C 10Gbps AXAGON HMC-6G2L hub 6in1 expands your laptop, computer or phone with six ports. You can easily and quickly connect a monitor, three USB devices and a Gigabit Ethernet network to the computer at the same time via the double-sided USB-C connector. You also get the possibility to supply laptop using Power Delivery technology at the same time. The port replicator will thus provide you with a simple and compact 6-in-1 docking station not only for Windows laptops but also for Apple laptops such as MacBook Air or MacBook Pro.
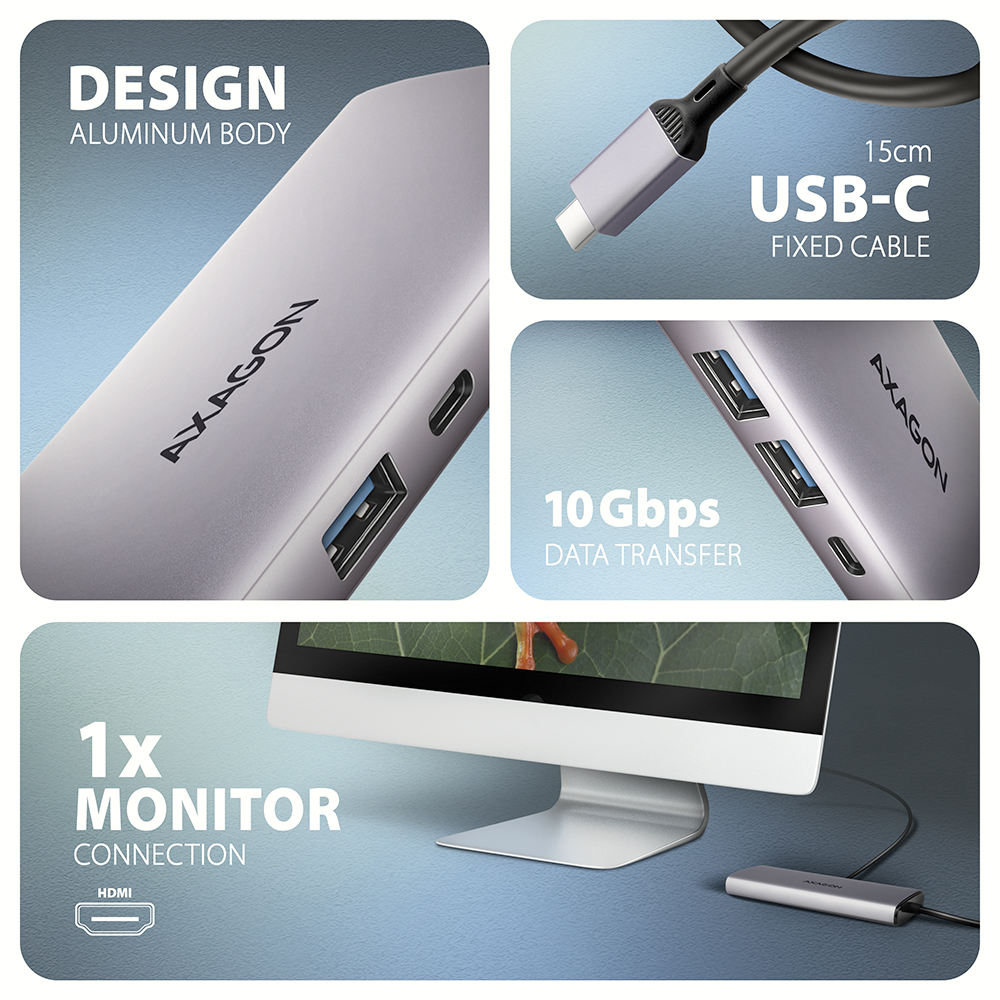
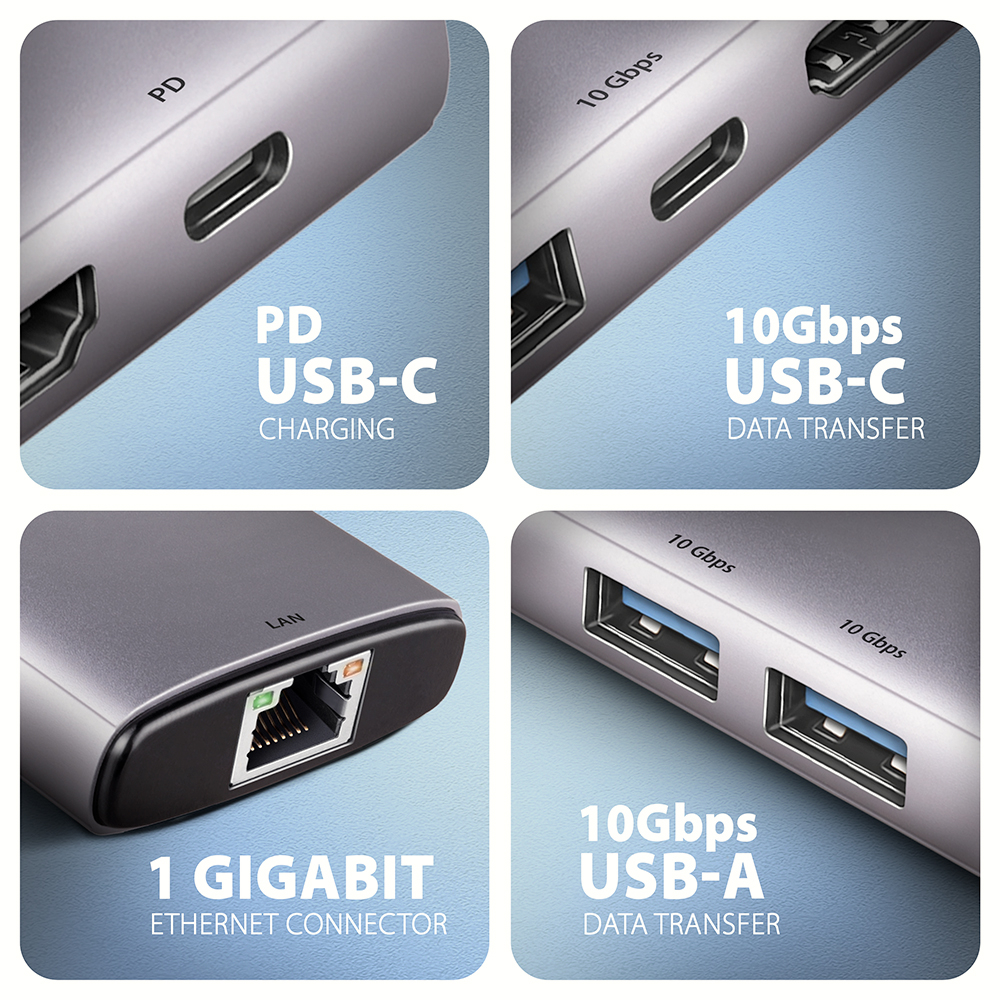
The USB hub offers three USB 10Gbps outputs. Two with standard USB-A and third with USB-C data connector. With the advanced USB 3.2 Gen 2 standard, you can connect high-speed devices such as NVMe M.2 external drives to all outputs at up to 2x the speed of 10 Gb/s compared to standard Gen 1 hubs with only 5 Gbps. The hub can permanently connect several external drives simultaneously and also allows charging of phones and tablets with up to 1.5A/5V current. From the hub, you can easily charge e.g. Android smartphone, Apple iPhone, Apple iPad etc.
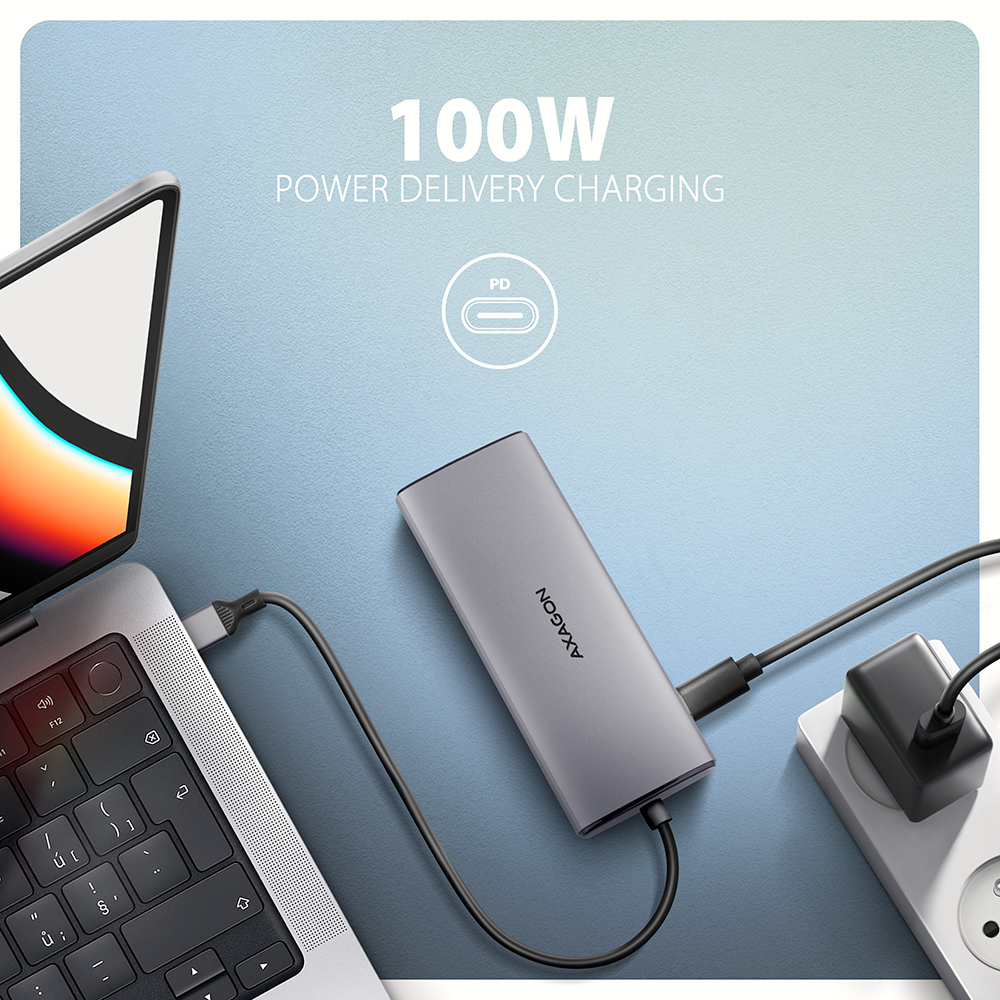
Another USB-C (PD) connector is reserved only for charging phones or laptops using Power Delivery 3.0 technology with up to 100W of power. Connect a suitable USB-C Power Delivery charger into the hub and connect the hub to a laptop that supports Power Delivery. This saves one USB-C port.
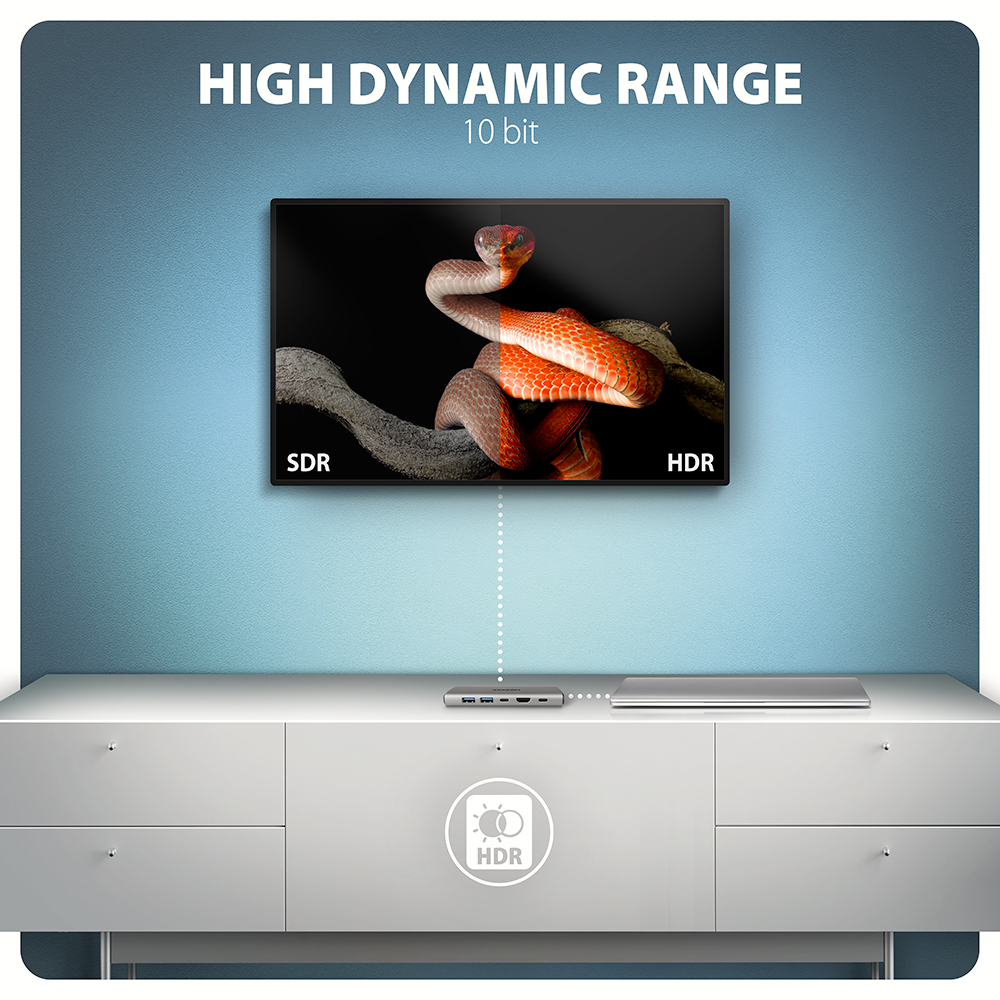
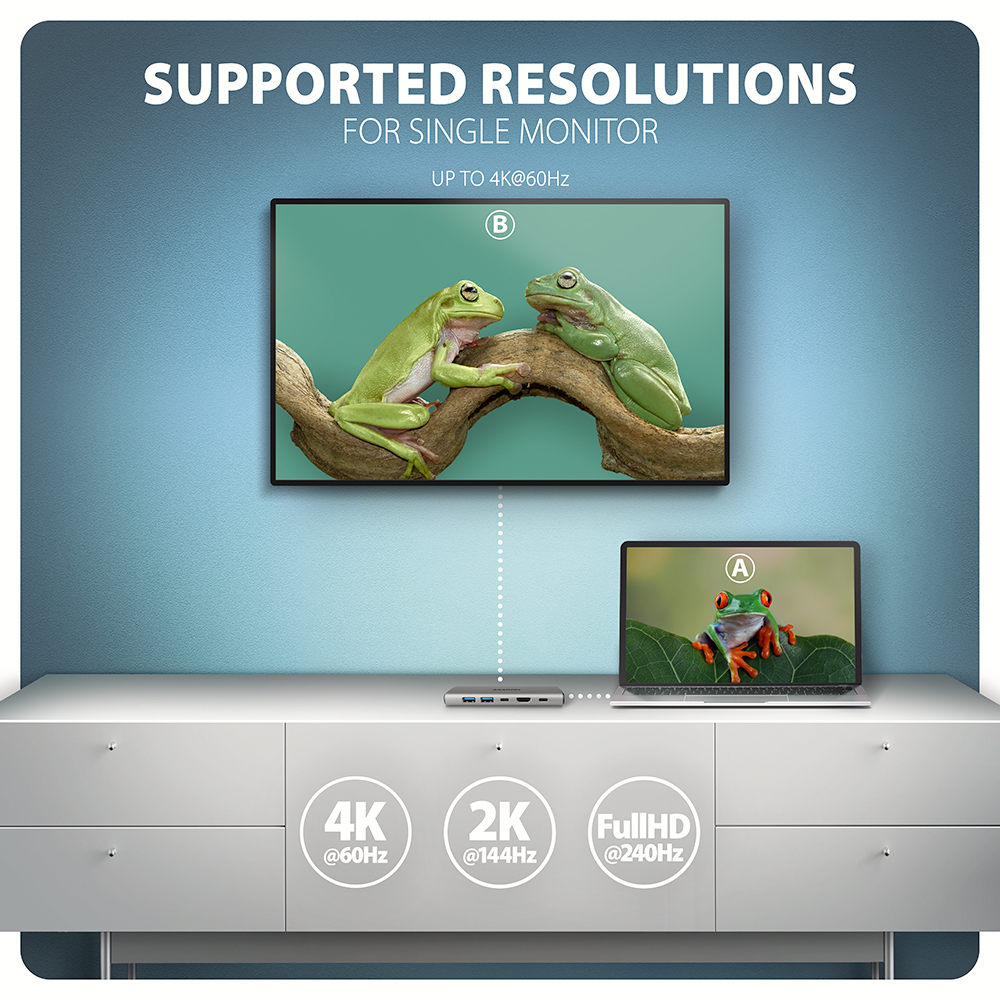
HDMI output provides high quality image up to 4K/60Hz Ultra HD resolution and supports multi-channel audio transmission. High frequencies at popular gaming resolutions of 2K/120Hz or FullHD/240Hz are also supported. Thanks to HDR (high dynamic range) support, you can enjoy a significantly expanded range of colours and contrasts. For video outputs to work properly, the laptop must have a USB-C port with DisplayPort Alternate Mode (DP Alt Mode) support or a Thunderbolt 3, 4 port and above.
Gigabit network card extends your computer by a fast and stable network connection, adds the missing RJ-45 network connector or another network card.
The compact and slim aluminium body not only looks great, but also provides mechanical durability and passive cooling. You will also be pleased with the finely textured surface, which does not leave fingerprints.
You can use your current USB peripherals without having to purchase new ones. Thanks to the Plug and Play and Hot Plug functions, connecting the hub itself is very simple without complicated installation, and peripherals can also be easily connected and disconnected while the computer is running. The hub does not afraid of connection to phones with a USB-C connector. For example, you can connect a flash drive, keyboard, mouse, display, TV or projector to the phone.
Input (connection to laptop):
• USB 10Gbps (USB 3.2 Gen 2), connector USB-C male.
• Compatible with USB 3.2 Gen 1, USB4 a Thunderbolt 3/4.
Input (power supply):
• USB Power Delivery 3.0 100W, USB-C female connector.
• Charging of the notebook from the power adapter via USB-C hub.
• PD power must be supported by both the laptop (phone) and the wall charger.
USB outputs:
• 2x USB 10Gbps port, USB-A female connector.
• 1x USB 10Gbps port, USB-C female connector.
• USB-C hub can handle the connection of several external drives at the same time.
• Charging of mobile devices (including iPad) with a current of up to 1.5A/5V from the hub's USB-A and USB-C ports.
Video output:
• 1x HDMI A port, HDMI A female connector.
• 4K resolution 4096 x 2160 at up to 60Hz.
• 2K / WQHD resolution 2560 x 1440 at up to 120Hz.
• FHD resolution 1920 x 1080 at up to 240Hz.
• Support for the above max. supported resolutions and frequencies requires connection to a computer with DisplayPort version 1.4.
• For the video output function, the hub must be connected to a USB-C port supporting DisplayPort Alternate Mode (DP Alt Mode) or to a USB-C port supporting Thunderbolt 3/4. A suitable OS is also required. The video output function will not be available without these requirements.
• HDR support (High dynamic range, 10-bit support) - realistic reproduction of light and dark details.
• HPD (Hot-Plug-Detect) support.
• TMDS (Transition Minimized Differential Signalling) support.
• Full support for HDCP 1.4 and 2.3 (High-bandwidth Digital Content Protection).
• Support for up to 2-channel LPCM audio.
• Support for 2-channel audio sampling rate up to 192 kHz and up to 24-bit audio - depends on source and end device, i.e. laptop/phone and TV/monitor/AV receiver.
RJ-45 output:
• Gigabit Ethernet interface with RJ-45 connector for UTP or STP cable connection.
• Supported transmission rates for the Ethernet interface 10/100/1000 Mb/s.
• Supported IEEE 802.3 10Base-T, IEEE 802.3u 100Base-TX, IEEE 802.3ab 1000Base-T specifications.
• 10/100/1000 Mb/s auto-detection.
• Wake-on-LAN support.
Other features:
• Possibility to connect your device while running thanks to the Hot Plug support.
• Full Plug and Play support.
• Sleep mode support.
• Power via USB bus - USB bus power or from PD wall charger.
• Heavy-duty aluminium body for better hub cooling.
• The high quality shielded cable ensures high communication speed and minimal undesirable interference.
• Dimensions 120 x 46 x 15 mm.
• Weight 79 g (incl. cable).
• USB cable length 15 cm.
Supported operating systems:
• Microsoft Windows 10 / 11, macOS, iPadOS, iOS, Linux, Chrome OS and Android.
• Compatibility depends on the operating system and device manufacturer support.
• DisplayPort Alternate Mode (DP Alt Mode) is only supported in updated OS and also depends on support from device (notebook, phone) manufacturer.
• Graphics card drivers may also affect the correct operation of the product. We recommend downloading the latest version of drivers.
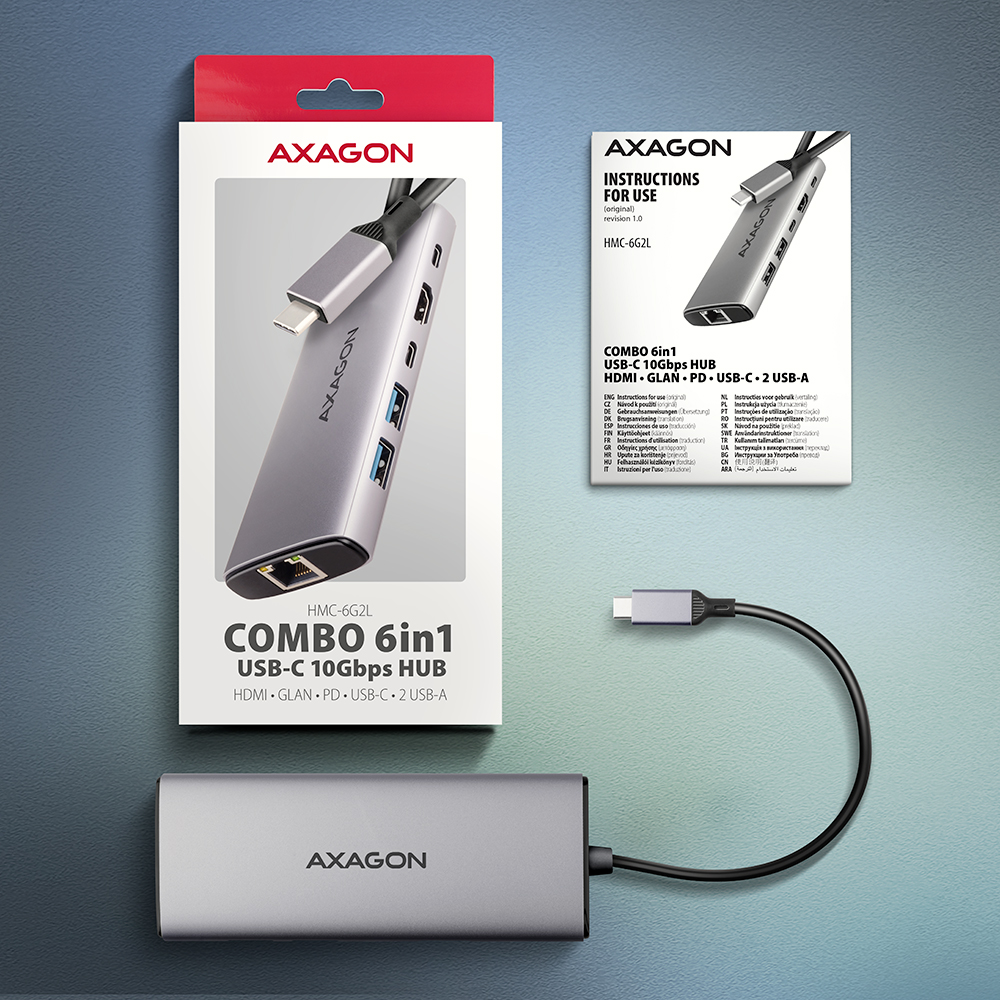
Package contains:
• USB-C hub with fixed 15 cm long cable,
• multilingual manual CZ / DE / DK / ENG / ESP / FIN / FR / GR / HR / HU / IT / NL / PL / PT / RO / SK / SWE / TR / UA / BG / CN / ARA,
• packed in a cardboard box with a hanging hole.
- USB-C hub with fixed 15 cm long cable
- multilingual guide
- multilingual guide CZ / DE / DK / ENG / ESP / FIN / FR / GR / HR / HU / IT / NL / PL / PT / RO / SK / SWE / TR / UA / BG / CN / ARA
- a cardboard box
- package dimensions 173 x 94 x 20 mm
- weight of 1 pc package 112 g
- EAN 8595247908056
- number of pieces in the box: 100
- total weight of the box: 12.55 kg G.W.
- box dimensions: 49 x 44 x 22 cm
HMC-6G2L - multilingual manual CZ / DE / DK / ENG / ESP / FIN / FR / GR / HR / HU / IT / NL / PL / PT / RO / SK / SWE / TR / UA / BG / CN / ARA
A): The necessary drivers are already included in all operating systems and install completely automatically, and no additional drivers are needed.
B): Plug the USB hub into another USB port (on the back of the computer where the USB ports are integrated directly into the motherboard). It should re-detect the USB hub and reinstall the drivers. Alternatively, try replacing the USB cable. The obsolete driver of the USB controller could also cause problems. Manufacturers of USB 3.0 chipsets often issue new versions of drivers to improve compatibility with different devices. If the problem with the USB bub persists, plug it into the USB port of another computer to verify its functionality.
A): If the network card is not displayed in "Device Manager", a USB port (or a PCIe slot in the event of an internal network card) may be malfunctioning.
B): Try plugging the network card into another USB port (or another PCIe slot on the PC motherboard in the event of an internal network card, or temporarily disconnect all other PCIe cards). The network card should be detected and you should be prompted to install the drivers. If the problem persists, plug the network card into the USB port (PCIe slot) of another computer to verify its functionality.
A): If this happens, it means that the operating system failed to get the necessary information to install the drivers.
B): The cause may be a defective USB extension cable or damaged device. If the problem persists, plug the network card into the PCIe slot of another computer to verify its functionality.
A): In the vast majority of cases, the USB hub can handle connection of one 2.5" external box. If more external boxes are connected, a higher current is needed that ordinary USB cannot deliver.
B): In this case, an auxiliary power supply is required. Use a USB hub with auxiliary power supply.
A): Before connecting the USB network card to an Android device (tablet), you first need to verify with the device manufacturer whether the device supports the Ethernet network feature and also whether the USB network card drivers are included in your specific ANDROID ROM installation.
B): Use a USB connector with OTG support to connect the USB network card to your tablet. If the device (tablet) is equipped with a Mini USB or Micro USB connector, use an OTG reduction or cable to connect it.
A): By initializing the disk, you can set the mode in which the hard disk will work
B): You can use the partition with the master boot record (MBR) or the GUID partition table (GPT). For disk up to 2TB, use the MBR option, we recommend selecting GPT on a larger disk than 2TB. Subsequently, the initialized disk should be formatted.
A): You can use a passive USB cable to connect a USB hub to your computer. However, with longer cables the USB hub may not work reliably.
B): In this case, we recommend using an active extension USB repeater cable, such as AXAGON ADR-205 or ADR-210.
A): Drivers are included with operating systems and are installed completely automatically. The card reader is detected as a standard storage device, such as a USB flash disk, no other drivers are available.
B): No other drivers need to be installed and are not even available. If you continue to have problems with your reader, check out more tips that can help you troubleshoot problems.
A): If the card reader is not displayed in "Device Manager," there may be a USB port (or a 20-pin USB 3.0 connector on the PC motherboard in the case of an internal reader) malfunction.
B): Try plugging the reader into another USB port (or another 20-pin USB 3.0 connector on the PC motherboard, if available, in the case of an internal reader). The card reader should be detected and the drivers loaded automatically. If this does not solve the problem, try checking the USB controller status in "Device Manager" in the "USB Drivers" section. If the problem persists, plug the card reader into the USB port of another computer to verify its functionality.
A): If this happens, it means that the operating system failed to get the necessary information to install the drivers.
B): The cause may be a defective USB cable or damaged device. Another option is to remove the record of the connected USB device using "USBDeview". After connecting the reader, the drivers should be reloaded. If the problem is caused by a driver error, the problem should be eliminated. If the problem persists, plug the card reader into the USB port of another computer to verify its functionality.
A): If this happens, it means that the operating system failed to get the necessary information to install the drivers.
B): The cause may be a defective USB extension cable or damaged device. If the problem persists, plug the network card into the USB port of another computer to verify its functionality.
A): If this happens, it means that the Windows operating system did not assign a drive letter to the new storage device.
B): If the drive letter is not assigned, open "Disk Management", right-click on the desired drive and manually assign the drive letter. Another option is that the correct formatting of the memory card is not performed. Format the card in "Disk Management" or in the device on which you are using the card (for example, the camera).
A): The sound interference is probably caused by the wireless mouse transmitter.
B): We recommend placing the mouse transmitter as far away from the sound card as possible (preferably on the opposite side of the computer – connect the transmitter to a USB port on the front panel of the PC and the sound card to a USB port on the back panel – use a USB extension cable if necessary). In the case of a laptop, place one device on each side.
A): By initializing the disk, you can set the mode in which the hard disk will work.
B): You can use the partition with the master boot record (MBR) or the GUID partition table (GPT). For disk up to 2TB, use the MBR option, we recommend selecting GPT on a larger disk than 2TB. Subsequently, the initialized disk should be formatted.
A): The problem could be a lack of resources, check (when a problem occurs) the processor load and operating memory filling in "Task Manager".
B): If the CPU usage is 100% or memory is full, you need to find out what causes this situation. Another option is to connect a sound card to another computer to verify that the sound card is not damaged.
A): You probably have allowed to listen to the microphone in Microphone Properties.
B): To disable this feature, follow these steps: Start -> Control Panels -> Hardware and Sound -> Sound -> Recording -> Microphone (USB Sound Device) -> Properties -> Listen -> Listen to this device - uncheck this box and confirm with "Apply".
A): Yes, it is possible to play two different tracks simultaneously on one computer.
B): This is primarily a software matter, requiring a player that supports redirecting sound to a different audio output than the one set as the “default” in the operating system. Such functionality is supported, for example, by VLC media player.
A): If this happens, it means that the Windows operating system did not assign a drive letter to the new storage device.
B): If the drive letter is not assigned, open "Disk Management", right-click on the desired drive and manually assign the drive letter. If the drive letter can not be assigned to the disk, it is possible that the disk is formatted as "dynamic". If you want to keep disk data, connect it to the original device and make a backup of the disk. Then convert it to a normal disk, initialize it to MBR (or GPT, see other points), and then perform Low Level Format (e.g. using the Low Level Format Tool)
A): The newly purchased disk must be initialized before first use.
B): If the new disk is not initialized automatically, open "Disk Management", right-click on the desired disk and initialize it.
In the ACTIVE profile, set the hard drive sleep time for battery and mains power to 0 minutes / Never.
A) Path in Windows 10: Settings > System > Power & Sleep > Additional power settings > in the ACTIVE profile Change Schema Settings> Change advanced power settings > Hard drive > Turn off hard disk after
B) Path in Windows 11: Search for: Control Panel > Hardware and Sound > Power Options > in the ACTIVE profile Change Schema Settings> Change advanced power settings > Hard disk > Turn off hard disk after.
You need to set the function of the headphone buttons to track skipping/playback control.
A) Example setting for Xiaomi phones (HyperOS overlay):
1st option:
In the notification bar, when headphones are connected, Audio playback via USB > click > Change headphone buttons to Playback control.
2nd option:
Settings > Sounds & Vibration > Sound effects > Change headphone buttons to Playback control.
B) Example setting for Xiaomi phones (MIUI overlay): Settings > Sounds & Vibration > Headphones > Change headphone buttons to Playback – back/next.
The keyboard is set to Apple mode. Switch it using Fn+S (mode for Windows and Android).
The keyboard is set to Windows mode. Switch it with Fn+A (Apple mode).
A: Check if the USB-C in the device supports video output.
B: Leave the HUB connected to the device and turn off the HUB via the ON/OFF button. Wait 5 seconds and then turn it back on with the ON/OFF button.
A: Check if your charger and device support the Power Delivery protocol and if the charger has sufficient power.
B: Leave the HUB connected to the device and turn off the HUB via the ON/OFF button. Wait 5 seconds and then turn it back on with the ON/OFF button.