Product code: PCEM2-DC
Category: M.2 cards , M.2 cards & controllers , Disk accessories , Expansion cards & controllers
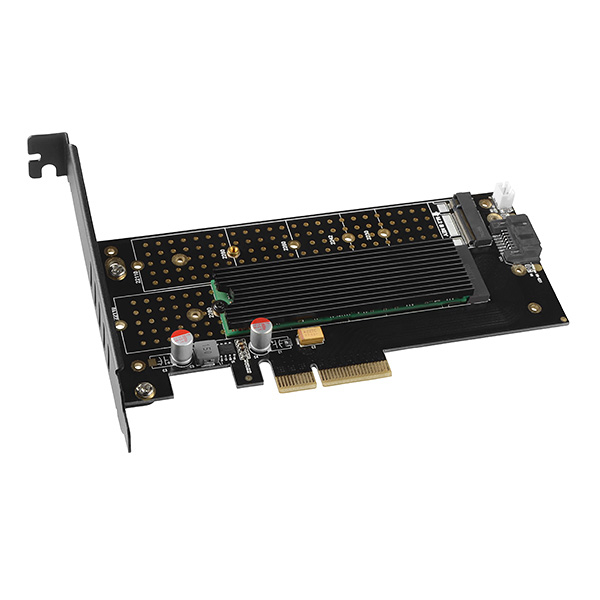
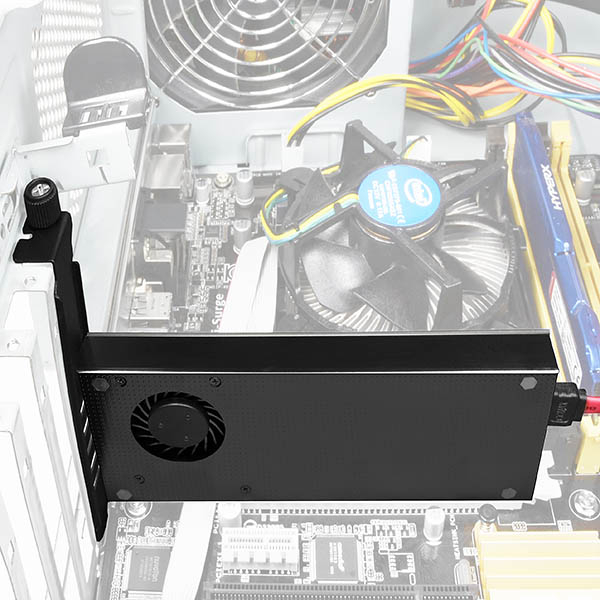
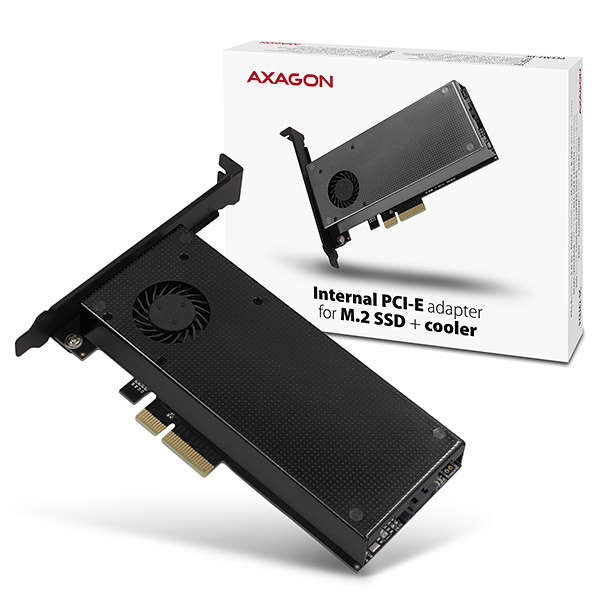
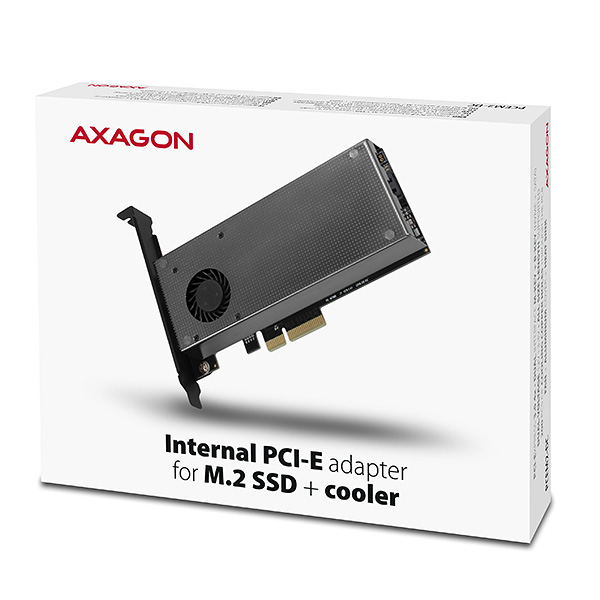
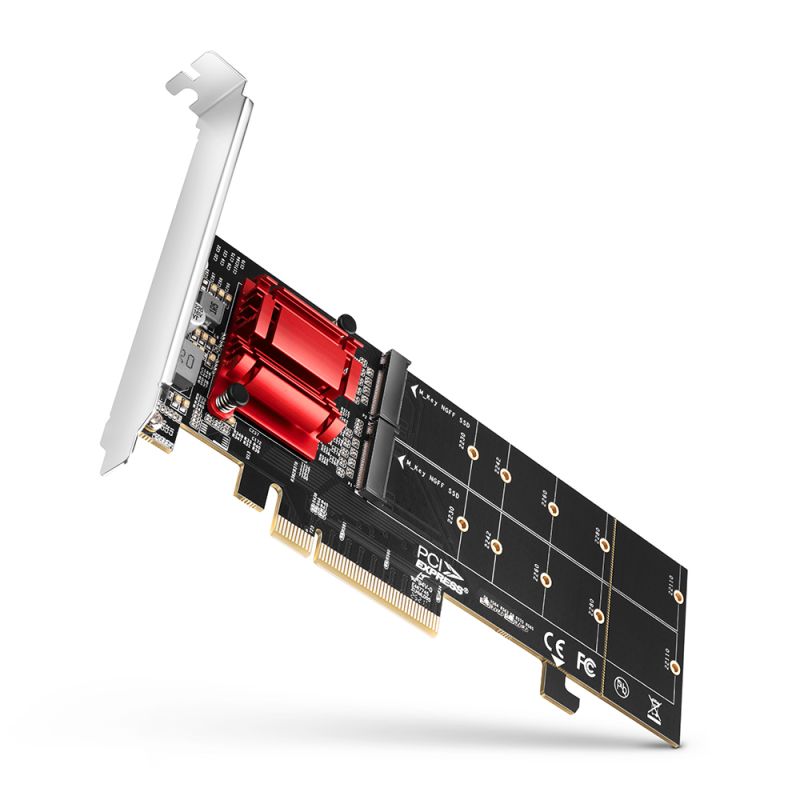
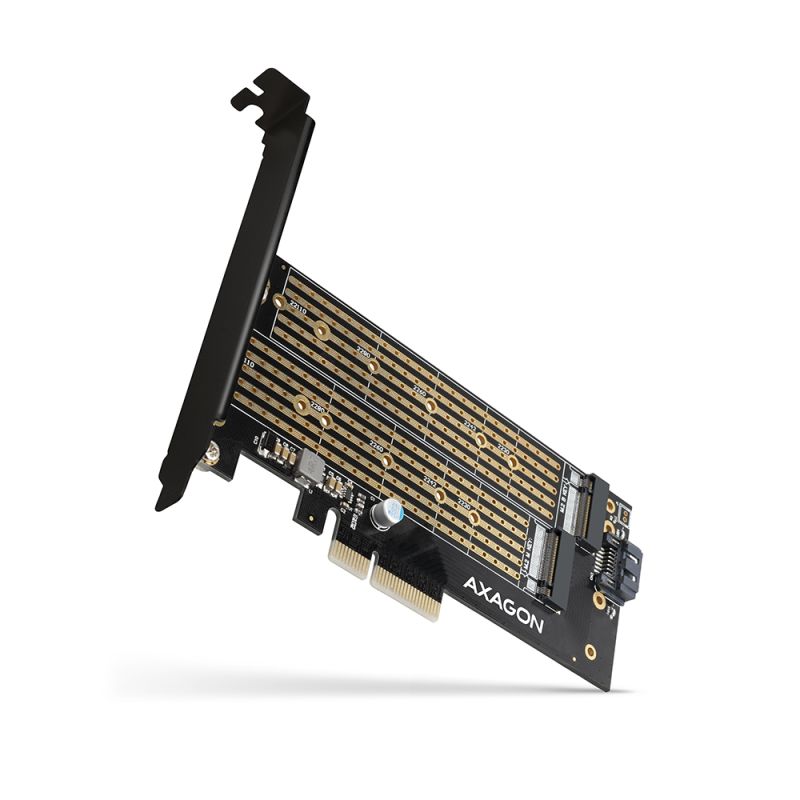
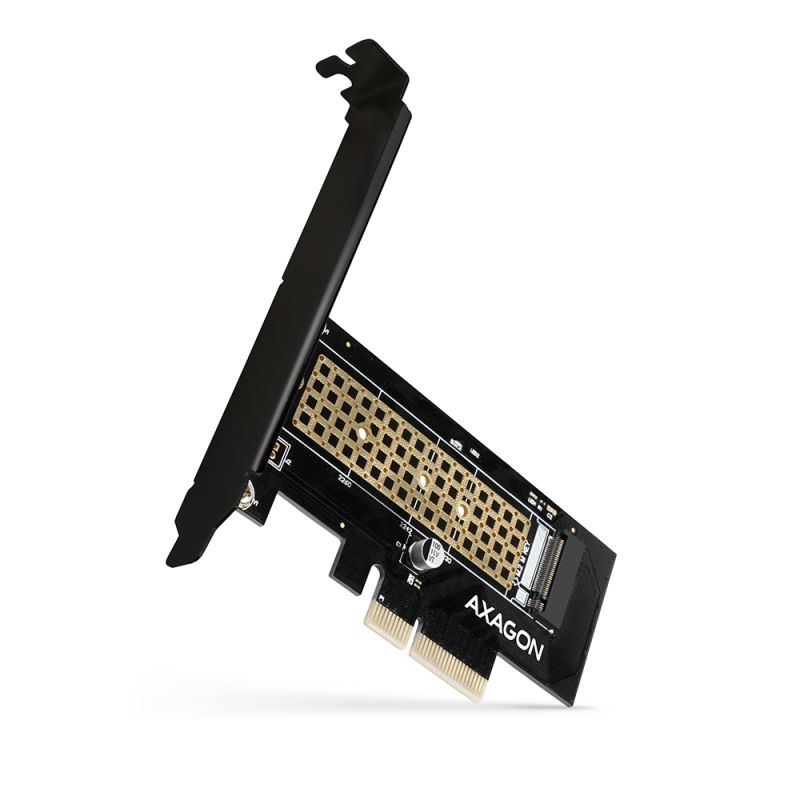
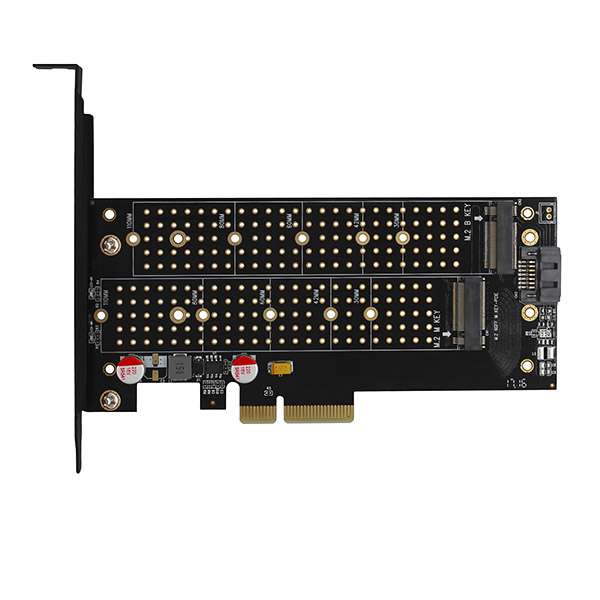
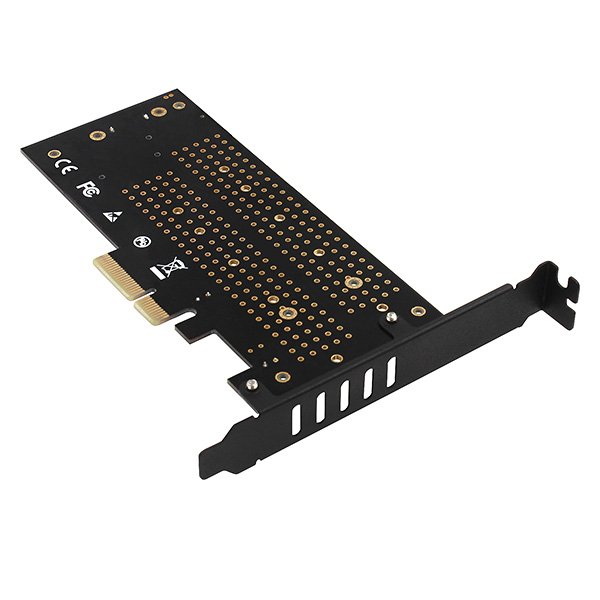
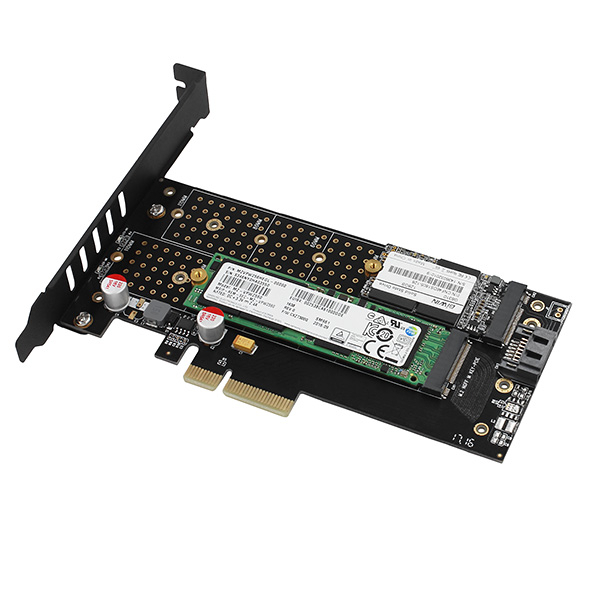
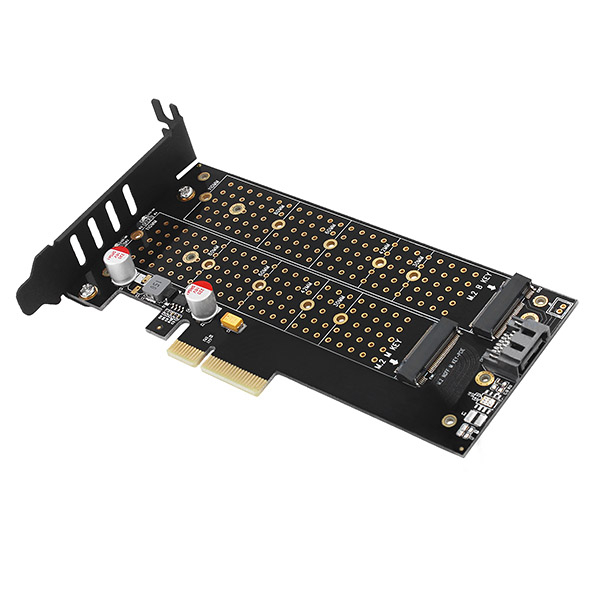
The internal AXAGON PCEM2-DC adapter allows to connect up to two M.2 SSDs to a desktop. So, it is an ideal choice for upgrading a desktop that has no M.2 slot.
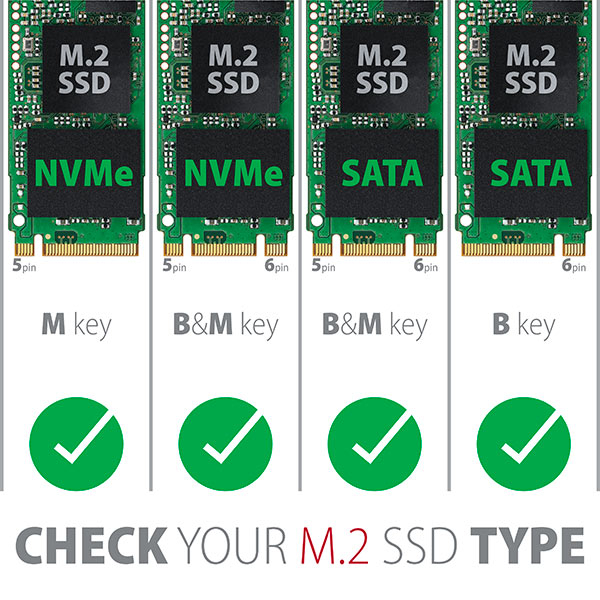
The adapter supports the use of both one-sided and double-sided SATA and NVMe (PCI Express) M.2 SSDs. The reduction does not limit SSD capacity, and any M.2 cards with a length up to 110 mm can be used. The simultaneous operation of both disks is commonplace.
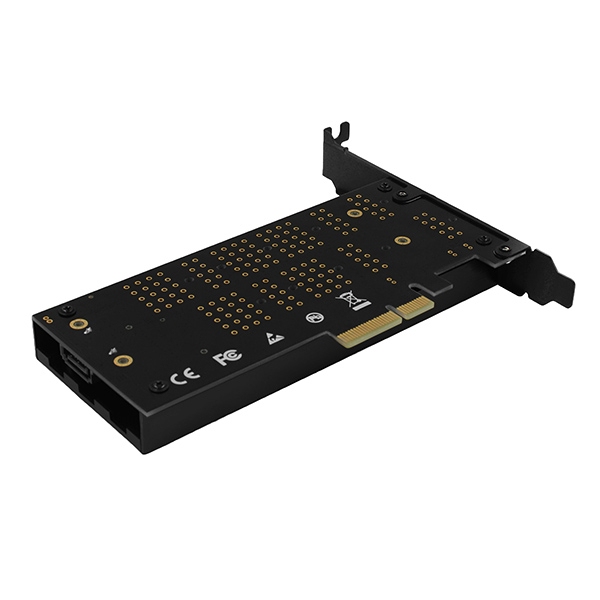
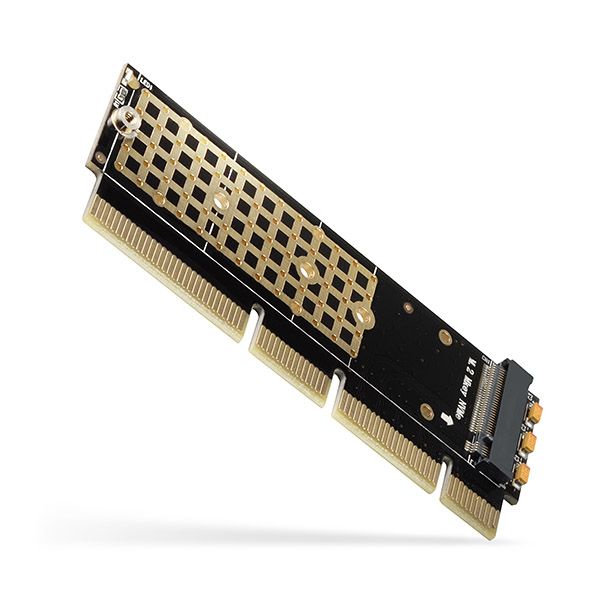
Thanks to PCI-Express 3.0 4-lane interface compatible with x4, x8 and x16 slots, a speed as high as 8GBps can be achieved. When compared to standard SATA SSDs, bit rates of NVMe SSDs are many times higher.
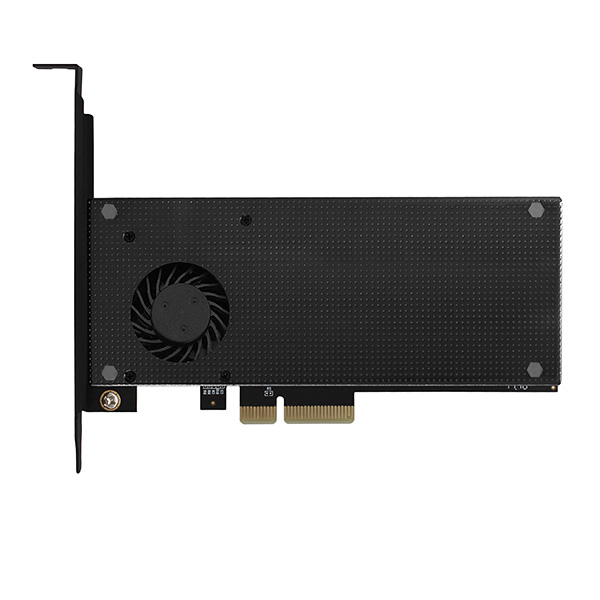
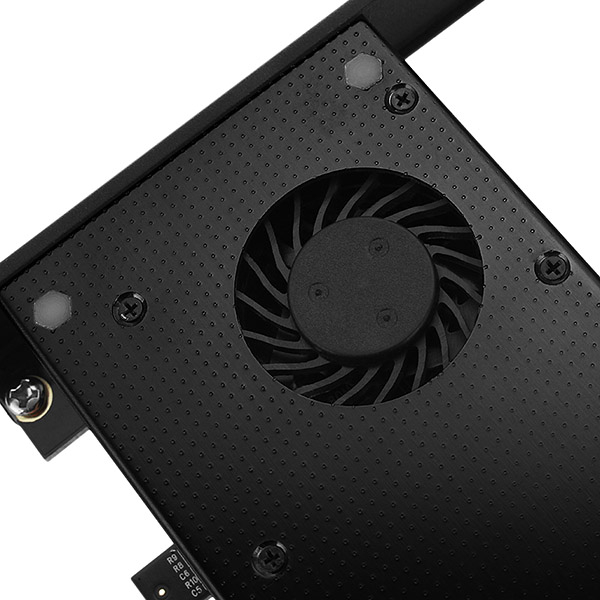
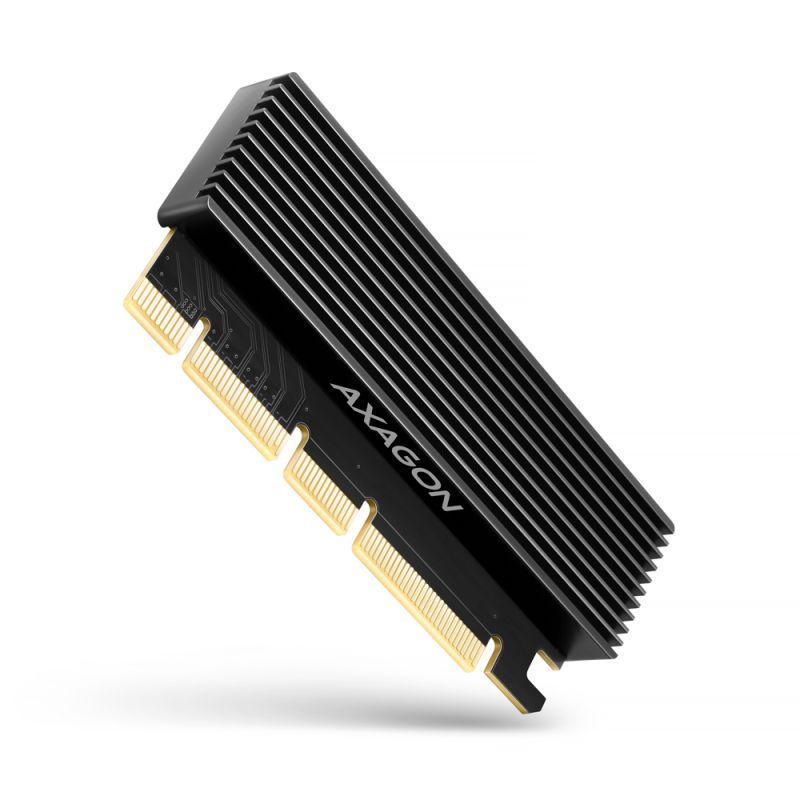
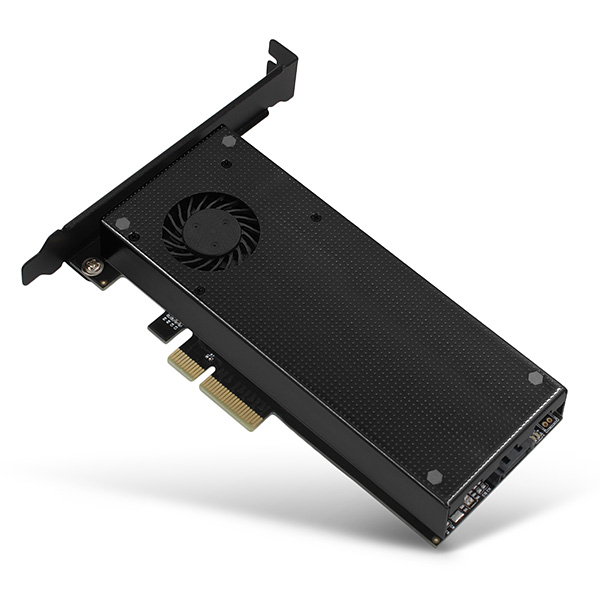
The high quality card design, including copper-plated vents, assists in a better dissipation of heat generated during the M.2 SSDs operation. A metal cover with fan and an attached passive cooler, incl. thermal pads, assist in M.2 SSDs cooling. It results in an ideal combination of passive and active cooling of M.2 SSDs and heat removal. Thanks to the cooling and temperature reduction by up to 35°C, it is possible to use the maximum power of deployed SSDs.
Double blue LEDs indicate either power on or data transfer in the M.2 slot. The package also contains a low profile blanking plug for mounting the adapter into low profile cases.
Input:
• PCI-Express 3.0 interface compatible with PCI-Express 1.0a / 1.1 / 2.0 / 2.1.
• Number of 4-Lane lines, compatible with x4 / x8 / x16 PCIe slots.
• Bandwidth of 4-Lane PCI-Express 3.0 bus of up to 8 GB/s (two-way).
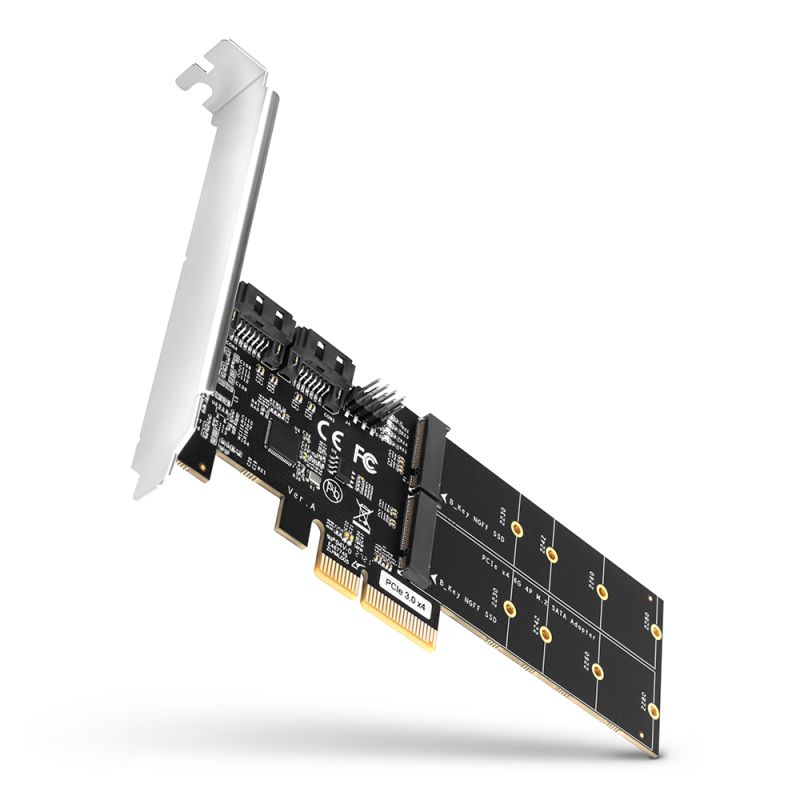
• SATA connector to connect the motherboard when a SATA M.2 SSD is used.
To achieve the best possible bit rates, the use of a SATA 6G controller is recommended.
 
Output:
• NGFF 75-pin M-key slot to install the  NVMe (PCI-Express) M.2 SSDs.
• NGFF 75-pin B-key slot to install the  SATA (AHCI) M.2 SSDs.
Other features:
• Full Plug and Play support.
• Support of M.2 disks of any size - 2230, 2242, 2260, 2280, 22110 mm.
• Support of M.2 disks of any capacity.
• Simultaneous operation of both disks.
• Support of both one-sided and double-sided M.2 disks.
• A better dissipation of heat from M.2 SSDs thanks to copper-plated vents.
• A metal cover with fan supplied from the card.
• An auxiliary fin cooler to provide a superior cooling option for M.2 SSD.
• Support of booting from SSD card.
• No drivers need to be installed.
• Card dimensions: 140 x 68 x 17 mm, weight 111 g.
• Note: CAUTION! The adapter allows to insert B+M-key disks in both M.2 slots. It is important to check the disk parameters, i.e. to make sure whether the disk is designed for SATA or NVMe (PCI-Express) interface, and to connect it to the right slot. SATA SSDs are connected to B-key slot, NVMe SSDs are connected to M-key slot.
Power supply:
• The adapter is directly supplied from PCI-Express bus; no external power supply is needed.
• The system of dual power supply ensures a sufficient power for connected M.2 SSDs.
• In addition, the system of redundant power supply reduces the adapter thermal load.
Supported operating systems:
• MS Windows 7 / 8 / 8.1 / 10 /11, Windows Server 2008 R2 / 2012 / 2016 (all 32-bit as well as 64-bit versions of OS Windows are supported), Linux with kernel 2.6.31 and higher.
• Note: When operating under Windows 7, contact the manufacturer of the M.2 SSD to find whether this OS is supported, especially when NVMe disks are used.
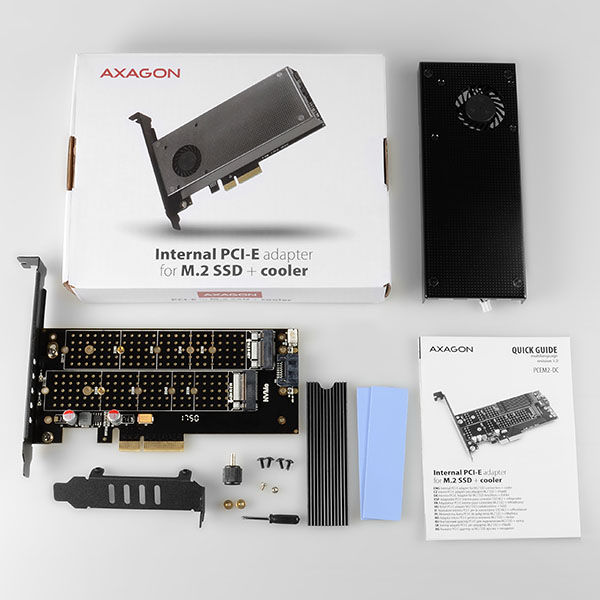
Package contains:
• PCI-Express adapter with a standard blanking plug and a cover with fan,
• passive cooler for M.2 SSD and 2 thermal pads,
• low profile blanking plug,
• mounting material and a screwdriver,
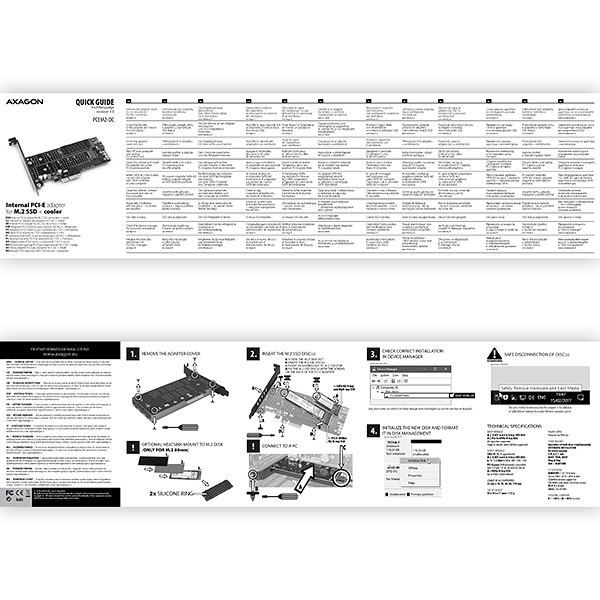
• printed installation manual CZ / EN / DE / ESP / FR / HU / IT / PL / RO / RU / SK / BG,
• packed in a cardboard box with clearly indicated parameters.
                                    - PCI-Express adapter with a standard blanking plug and a cover with fan
- low profile blanking plug
- passive cooler for M.2 SSD and 2 thermal pads
- mounting material and a screwdriver
-  installation guide
                                    - printed installation manual CZ / EN / DE / ESP / FR / HU / IT / PL / RO / RU / SK / BG
                                    - cardboard box
- package dimensions 136 x 170 x 32 mm
- weight of 1 pc package 178 g
- EAN 8595247903853
                                    - number of pieces in the box: 66
- total weight of the box: 13.7 kg G.W.
- box dimensions: 32 x 35 x 49 cm


                AXAGON M.2 SSD disk adapter is let say only HW connector change from M.2 into PCI-Express or SATA. Adapter itself do not have controller electronics and need no drivers. It is necessary to check M.2 disk driver availability for older OS like Windows 7.
Proper M.2 adapter function requires:
- computer mainboard support M.2 disks – SATA disks are more often supported than NVMe disks,
- computer mainboard support booting from PCI-Express bus – in case of OS installation to M.2 NVMe disk,  
- driver availability for M.2 SSD disk – apply especially for NVMe disks on Windows 7 OS.
Please contact the motherboard manufacturer's technical support to determine support for motherboard M.2 drives. In some cases updating the BIOS/UEFI is sufficient.
Check the M.2 SSD driver availability on the manufacturer's website or contact the disk manufacturer's technical support.
The disks connected to the SATA motherboard controller are usually displayed In BIOS/UEFI. The NVMe disk is usually displayed in the "Disk Boot Order" menu.
This applies when the requirements of "Prerequisites for proper M.2 function" are met.
A): If the PC does not run with the card or the card is mistakenly detected in “Device Manager”, or if there is a yellow exclamation mark on the driver, or if “Device Manager” reports an error code “Code 10 - The device cannot start”, the card is in conflict with another device in your computer.
B): In most cases, this conflict can be solved by moving the card to another PCI (PCIe) slot, with the BIOS assigning other free resources to the card. If the move does not help, try the card separately, with no additional cards inserted. If the card cannot be moved to another slot, you can reset the BIOS of the computer (by jumper on the board or pulling out the backup battery, we recommend that you note all the original settings and reset everything to the required values). This will cause the IRQ, DMA, and I/O resources to be redistributed.
A): By initializing the disk, you can set the mode in which the hard disk will work
B): You can use the partition with the master boot record (MBR) or the GUID partition table (GPT). For disk up to 2TB, use the MBR option, we recommend selecting GPT on a larger disk than 2TB. Subsequently, the initialized disk should be formatted.
A): The newly purchased disk must be initialized before first use.
B): If the new disk is not initialized automatically, open "Disk Management", right-click on the desired disk and initialize it.
A): If the network card is not displayed in "Device Manager", a USB port (or a PCIe slot in the event of an internal network card) may be malfunctioning.
B): Try plugging the network card into another USB port (or another PCIe slot on the PC motherboard in the event of an internal network card, or temporarily disconnect all other PCIe cards). The network card should be detected and you should be prompted to install the drivers. If the problem persists, plug the network card into the USB port (PCIe slot) of another computer to verify its functionality.
A): If this happens, it means that the operating system failed to get the necessary information to install the drivers.
B): The cause may be a defective USB cable or damaged device. If the problem persists, plug the external box into the USB port of another computer to verify its functionality.
A): The newly purchased disk must be initialized before first use.
B): If the new disk is not initialized automatically, open "Disk Management", right-click on the desired disk and initialize it.
A): By initializing the disk, you can set the mode in which the hard disk will work.
B): You can use the partition with the master boot record (MBR) or the GUID partition table (GPT). For disk up to 2TB, use the MBR option, we recommend selecting GPT on a larger disk than 2TB. Subsequently, the initialized disk should be formatted.
A): Drivers are included with operating systems and are installed completely automatically. The external box (adapter / docking station) is detected as a standard storage device, such as a USB flash disk, no additional drivers are needed.
B): No other drivers need to be installed and are not even available. If you continue to have problems with your external box (adapter / docking station), check out more tips that can help you troubleshoot problems.
A): If the external box (adapter / docking station) is not displayed in "Device Manager", there may be a USB port malfunction. It is also possible that your computer has a poor power supply to USB ports and the power is not sufficient to operate an external box (you can detect by listening that HDD is not spinning). This is a problem especially for older computers, where the source part already works at the limit of its parameters. In this case, it would help to use a USB hub, with an auxiliary power supply, by which the external box (adapter / docking station) would be connected to the computer.
B): Try plugging the external box (adapter / docking station) into another USB port, preferably on the back of your PC. The external box (adapter / docking station) should be detected and the drivers loaded automatically. If the problem persists, plug the external box (adapter / docking station) into the USB port of another computer to verify its functionality.
A): If this happens, it means that the operating system failed to get the necessary information to install the drivers.
B): The cause may be a defective USB cable or damaged device. If the problem persists, plug the external box (adapter / docking station) into the USB port of another computer to verify its functionality.
A): If this happens, it means that the Windows operating system did not assign a drive letter to the new storage device.
B): If the drive letter is not assigned, open "Disk Management", right-click on the desired drive and manually assign the drive letter. If the drive letter can not be assigned to the disk, it is possible that the disk is formatted as "dynamic". If you want to keep disk data, connect it to the original device and make a backup of the disk. Then convert it to a normal disk, initialize it to MBR (or GPT, see other points), and then perform Low Level Format (e.g. using the Low Level Format Tool)
A): The newly purchased disk must be initialized before first use.
B): If the new disk is not initialized automatically, open "Disk Management", right-click on the desired disk and initialize it.
A): By initializing the disk, you can set the mode in which the hard disk will work.
B): You can use the partition with the master boot record (MBR) or the GUID partition table (GPT). For disk up to 2TB, use the MBR option, we recommend selecting GPT on a larger disk than 2TB. Subsequently, the initialized disk should be formatted.
A): If the external box (adapter / docking station) with a 3.5“ HDD is not displayed in "Device Manager ", the inserted disk may not be powered.
B): Make sure you have the power supply plugged in and the external box (adapter / docking station) turned on with the power switch. If the disk is properly powered, it should spin (can be detected by listening).
A): The AXAGON external boxes (adapters / docking stations) are always equipped with the latest firmware to support disks of all capacities.
B): The 2TB limit is given as the maximum partition size when initializing a disk with the master boot record (MBR). If you want to create a larger partition on the HDD stored in the external box (e.g. 3TB or more), you must select the GUID partition table (GPT) when initializing the disk. Subsequently, the initialized disk should be formatted.
A): The external AXAGON boxes (adapters / docking stations) support the USB Mass Storage protocol making it easy to connect to TV.
B): When using a disk larger than 2TB, some TVs do not support GPT format. In such case, MBR format must be used when initializing a disk.
A): Check if the M.2 disk type is NVMe (neither SATA M.2 drives nor mSATA drives are covered by this box)
B): Update the firmware of your NVMe M.2 drive using the manufacturer's utility
C): Update the firmware of the external box - download link
A): If the copy speed is approximately 35 MB/s, it means that the connection between the controller and the connected device is working only in the USB 2.0 mode. Some types of USB 3.0 devices may have a problem with proper detection.
B): Make sure that the connected device is USB 3.0 compatible. Please check if an additional power supply to the controller is connected (the power reduction is not included, the card is powered by a standard power connector that is part of each source; we recommend avoiding Molex connectors and splitters that often cause problems). The error could be caused by, for example, the old firmware of the device you want to connect, some manufacturers provide a new firmware to their products, which could solve this situation. Alternatively, try replacing the USB 3.0 cable that may be damaged. When testing, do not use USB 3.0 extensions that could also cause this problem.
A): Booting from an additional USB card is not possible because each card has a different chip. The BIOS of the motherboard does not contain information that will allow to "see" the connected USB device. Detection of attached devices occurs only after the additional card drivers have been booted when the operating system starts running.
B): When using the integrated USB from the motherboard, of course, the BIOS is programmed to include information about the chip of the controller used for USB on the motherboard. Therefore, the motherboard BIOS "sees" the connected USB device and therefore can boot from it.
A): Please check your BIOS settings. Power Management Setup – Wake Up Event Setup – Resume by PCI-E Device (individual items may vary by MB type) should be set to disabled.
B): If this does not help, try updating your motherboard BIOS and check the ACPI item when still in the BIOS If not even this helps, move the controller card to another PCIe slot (may also be x16 - slots differ only in the number of lines). It is possible that the card is in conflict with another device on your computer. For some types of BIOS, you can do this directly by enabling Force Update ESCD (Reset Configuration Data etc.) in the PnP & PCI Configurations menu. This will cause the IRQ, DMA, and I/O resources to be redistributed.
A): The VBScript is incorrectly registered in your Windows installation.
B): To fix the problem and download the patch go to Microsoft site: https://blogs.technet.microsoft.com/fixit4me/2009/01/30/register-windows-script-engine-fix-it-live/
A): If this happens, it means that the operating system failed to get the necessary information to install the drivers.
B): The cause may be a defective USB extension cable or damaged device. If the problem persists, plug the network card into the PCIe slot of another computer to verify its functionality.
A): The following steps are necessary to install the drivers correctly.
B): Remove the card from PC. Uninstall the existing drivers using the "MOSCHIP_PCIUninst.exe" utility (located on the installation CD in the directory; if you do not have the CD, you can download the drivers from our support pages http://www.axagon.eu/en/podpora-faq). Restart the PC. Reinstall the drivers and turn off the PC. Re-insert the card. Once rebooted, the drivers should be properly installed.
A): Please make sure that the port "LPT1: (Printer port)" or other number is set correctly in the printer properties, depending on the port settings on your card. If the port is not set correctly, select the correct port, save with the "OK" button and restart the PC.
B): If problems continue to persist, automatic printer driver installation may have failed. Try removing the printer and restarting the PC. After restart, install the printer drivers again, but so that you cancel the automatic installation and add the printer manually in Control Panels / Printers with manual selection from the list of printer drivers. When installing the printer manually, select the correct LPT port. If the problem still is not resolved, try moving the card to another PCI (PCIe) slot; it may be that the card is in conflict with another device on your computer.
A): Yes, it creates a fully fledged LPT port. However, it is still about the compatible with the SW device you connect to the LPT port.
B): System resources, including the LPT port address with additional cards (not only AXAGON, but also of other manufacturers), are allocated by the computer BIOS already when booting. The address can be changed in MS-DOS using the driver for this system. For higher OSs (WIN98, 2000, XP, etc.) this address cannot be changed. Addresses 378 or 278 are firmly reserved for the so-called Legacy LPT ports that are integrated into motherboard chipsets. If the HW key bypasses Windows management, it will not work. You can try to consult the manufacturer of the HW key, to which address it is set up and whether the address can be changed.
A): This situation may be due to the motherboard BIOS incompatibility with the card driver.
B): In this case, we recommend updating the BIOS of your computer's motherboard.