


 English
 Czech
Czech
 Slovak
 German
 Hungarian
 Polish
-
Home

-
EOL products
- CRI-X6 internal USB 2.0 reader
 + 3 more photos
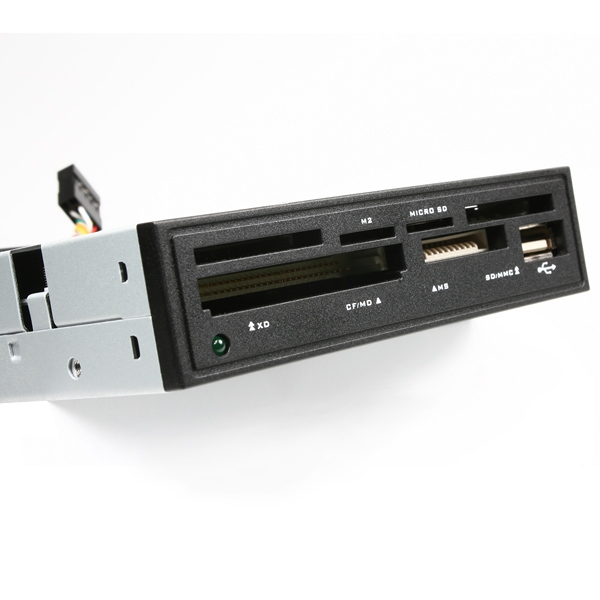
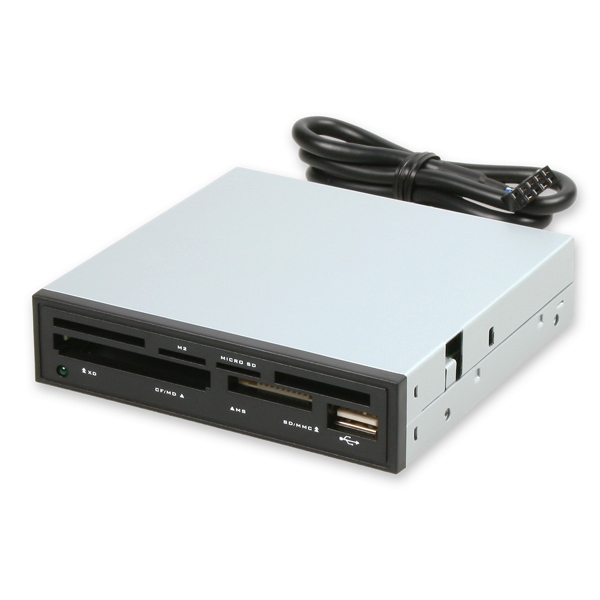
CRI-X6 internal USB 2.0 reader
Product code: CRI-X6
Category: EOL products , All Products
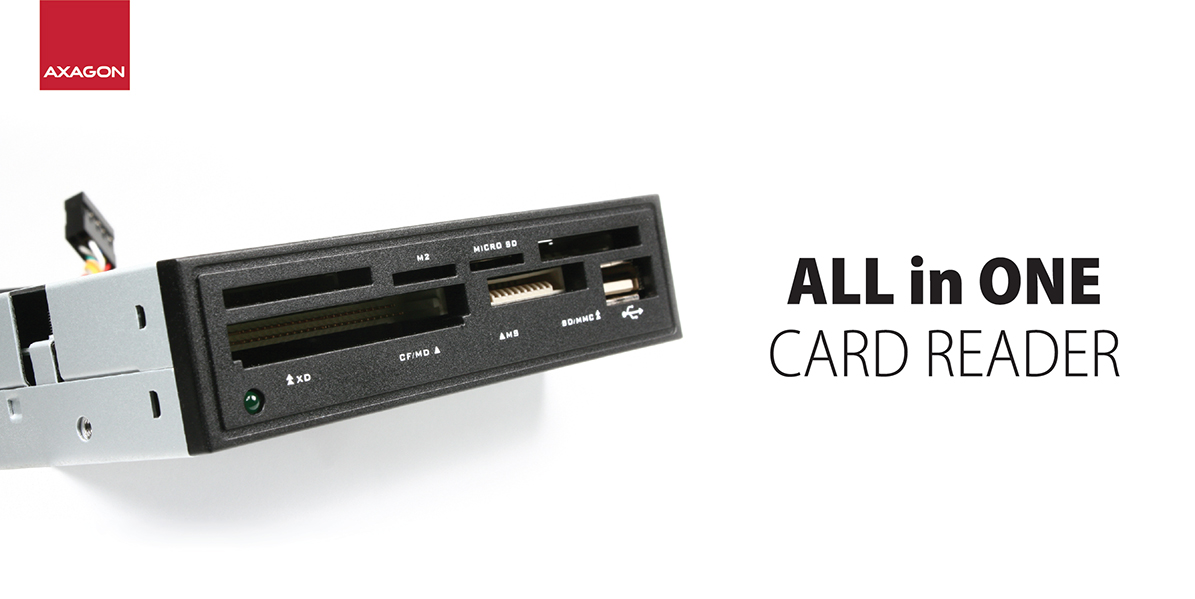
The all-in-one AXAGON CRI-X6 3.5" internal reader extends your desktop PC with functions for reading and writing
of all common memory card formats.
Supported are thus entire families of cards such as Secure Digital and microSD, Memory Stick and MS Micro as well as
Compact Flash and xD Picture Card.
ALL-IN-ONE • USB 2.0 HIGH SPEED • INTERNAL 3.5"
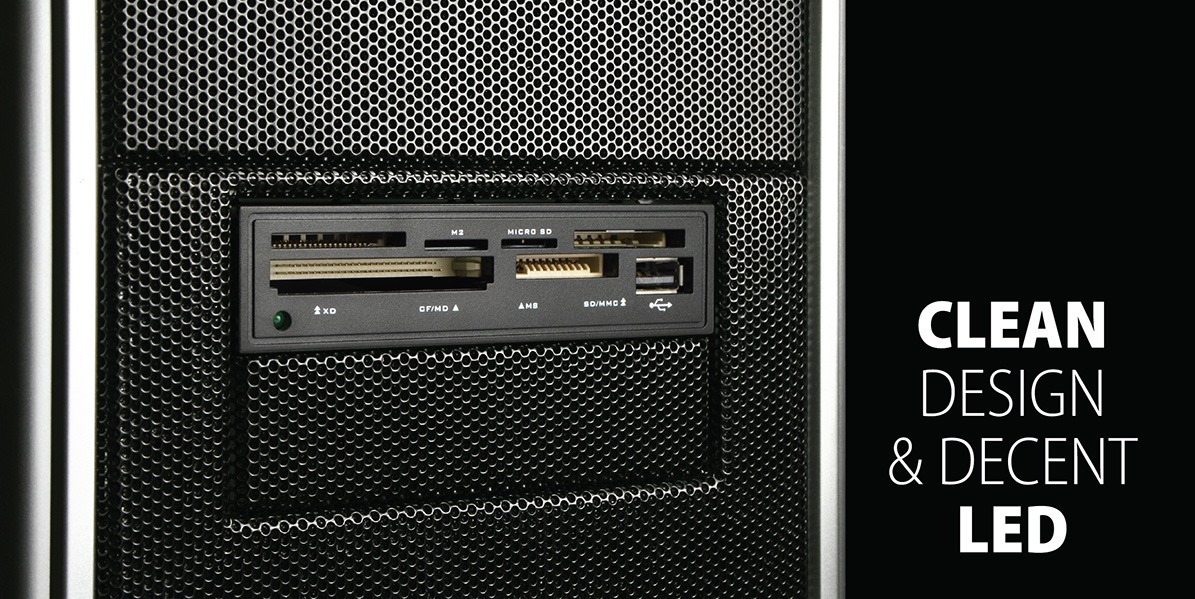
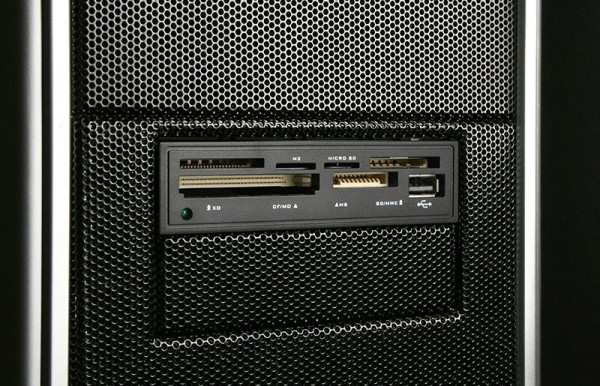
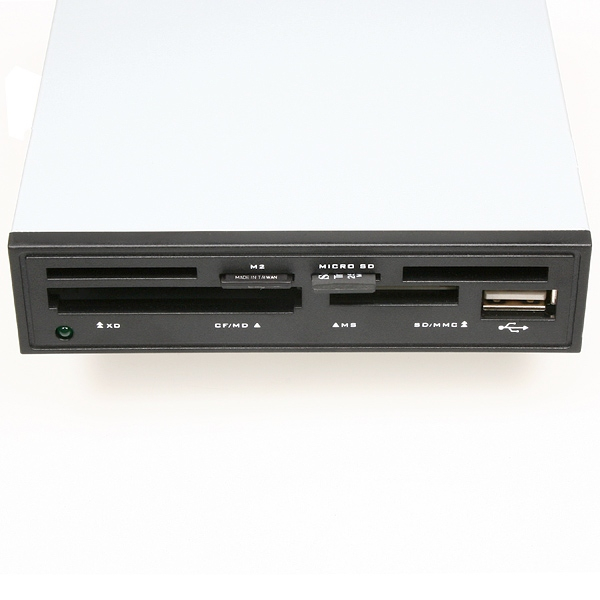
The simple, cleanly shaped front panel of the reader without the logo is well suited to any design of your PC housing.
One green LED indicates correct insertion of the card by permanent light, while the ongoing data transmission by blinking.
Without a card inserted, the LED does not bother you with unnecessary shine.
PURE DESIGN • SMART LED
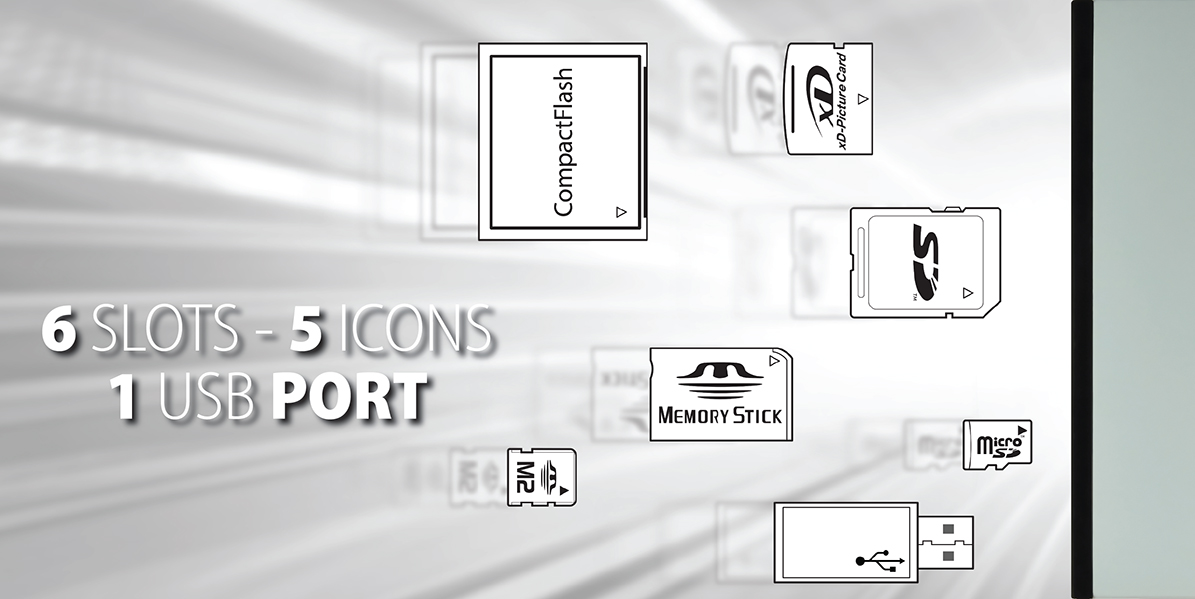
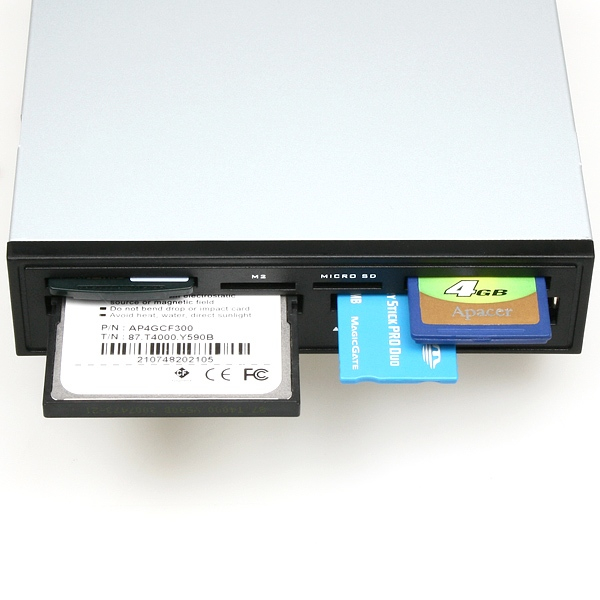
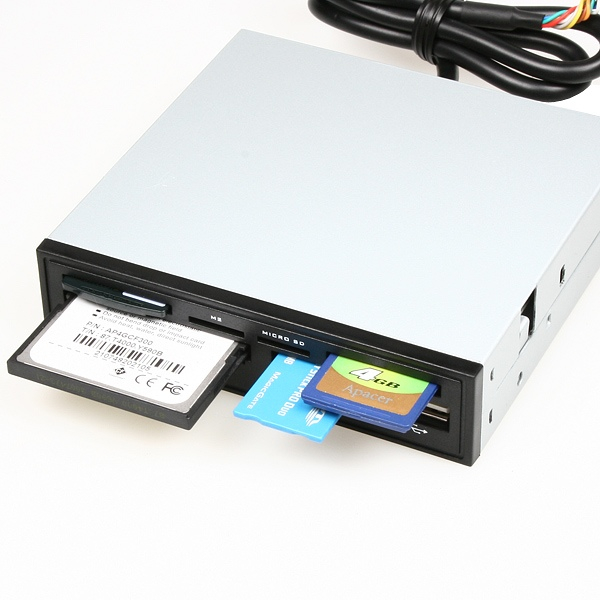
The six slots of this all-in-one reader directly support all common memory card formats such as micro SD/SDHC, SD/SDHC/SDXC, MMC, M2, MS/MS Duo, CF, xD without the need for an adapter (micro SDXC with an adapter).
Fast and convenient - data can be transmitted directly between cards in different slots of the reader (except for between MS and M2 slots).
One USB 2.0 port leads out to the front panel of the reader and allows for convenient connection of any USB accessory.
6 SLOTS • 5 ICONS • USB 2.0 PORT
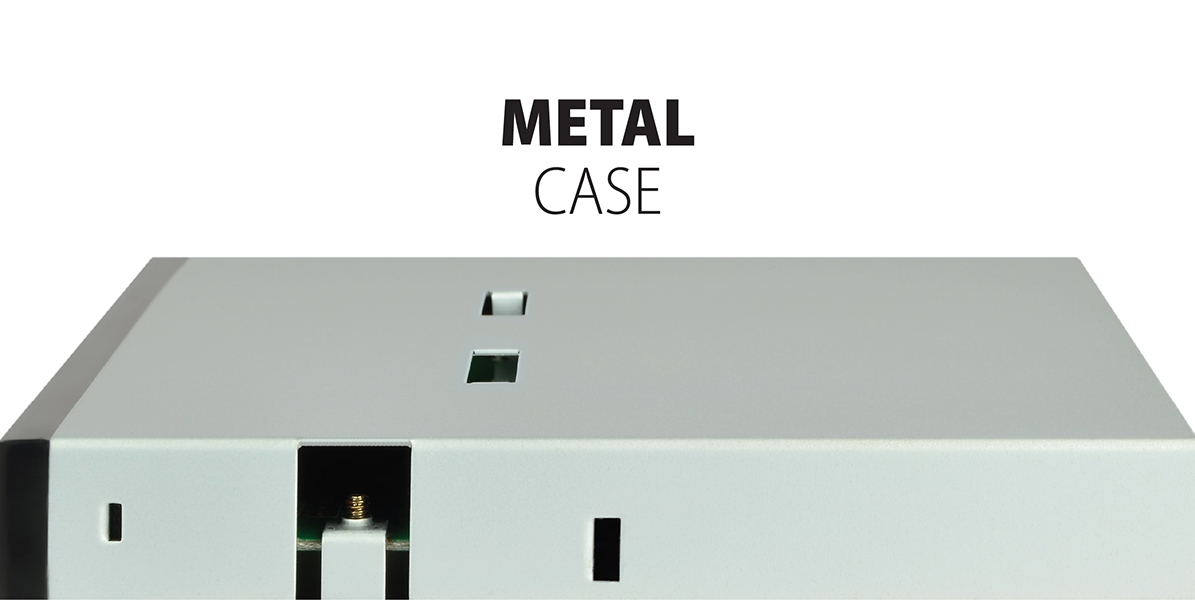
The high quality workmanship of the metal case guarantees trouble-free operation without electromagnetic interference.
HQ METAL CASE
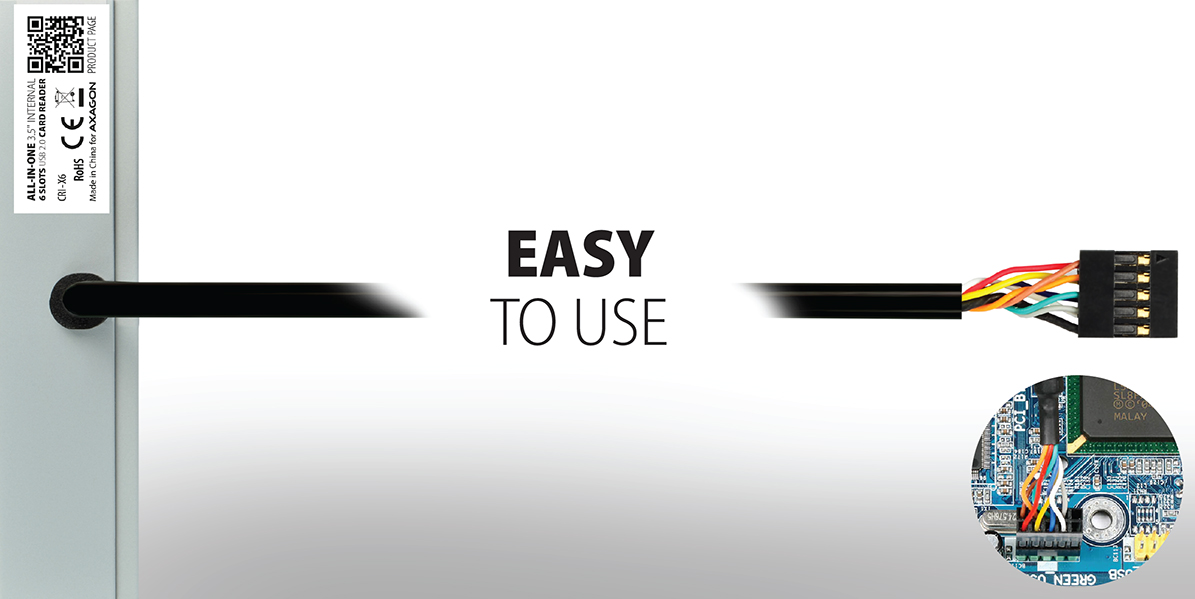
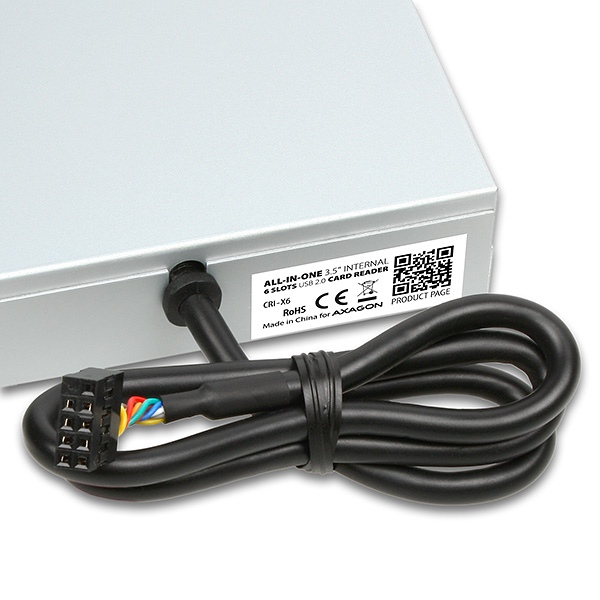
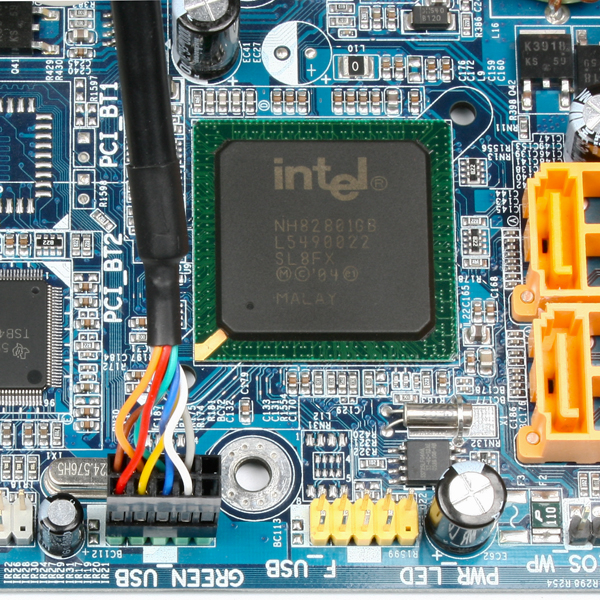
Permanently attached USB 2.0 cable with an internal 9/10-pin connector allows seamless connection to most motherboards.
Automatic installation can be handled even by a layman. Drivers are included with operating systems and are installed completely automatically.
AUTO INSTALL • FIXED USB CABLE 0.6M
The all-in-one 6-slot AXAGON CRI-X6 3.5" internal reader extends your desktop PC with reading and writing all common memory cards.
The six slots directly support all common formats of memory cards such as microSD/SDHC, SD/SDHC/SDXC, M2, MS/MS Duo, CF, and xD without the need for an adapter.
Data can be transmitted quickly and conveniently directly between cards in all different slots of the reader.
The USB 2.0 port led out to the front panel of the reader allows for convenient connection of any USB accessory.
The simple, cleanly shaped front panel of the reader without the logo is well suited to any design of your PC housing.
One decent green LED indicates the correct insertion of the card and data transmission; without the inserted card it does not bother you with unnecessary shine.
The high quality workmanship of the metal case guarantees trouble-free operation without electromagnetic interference.
Card reader:
• a six-slot reader supporting the following formats:
• M2 slot: MS Micro / M2,
• Micro SD slot: microSD / microSDHC / TransFlash,
• XD slot: xD Picture Card, xD Type M, xD Type M+, xD Type H, SmartMedia cards are not supported,
• CF/MD slot: CompactFlash (CF) Type I, CF Type II, Microdrive, Magicstor,
• MS slot: Memory Stick, MS Pro, MS Duo, MS Magic Gate, MS Pro Duo Magic Gate, Memory Stick Pro HG Duo,
• SD/MMC slot: Secure Digital, SDHC, SDXC, SD ROM, Multi Media Card, MMC 4.0, MMC Dual Voltage; micro SDXC, MMC Mobile / RS-MMC, miniSD and MMC Micro cards are supported with an adapter.
• flash card specifications support:
- SD 1.0/1.1 (SD - Secure Digital, up to 2GB),
- SD 2.0 (SDHC - Secure Digital High Capacity, up to 32GB),
- SD 3.0 (SDXC - Secure Digital eXtended Capacity, up to 2TB),
- MMC 3.x/4.0/4.1/4.2/4.3/4.4 (8-bit),
- MS 1.43, MS Pro 1.05, MS Pro HG 1.03, MS-XC 1.0 (up to 2TB),
- CF 5.0 (UDMA 0 - UDMA 6),
- xD 1.2.
• 5 LUN - the five icons of storage units are displayed in file managers - there is a possibility to transfer data directly between cards in all reader slots (only slots MS + M2 share the same buses - you cannot directly copy data between them).
• supports FAT 12/16/32/64, NTFS, exFAT (FAT 64) file formats.
Other features:
• Fully compatible with USB 2.0 and backward compatible with USB 1.1.
• Supports transmission rates 12 / 480 Mbit/s (full / high speed).
• Plug and Play, Hot Plug and Hot Swap full support.
• One USB 2.0 port led out to the front panel of the reader.
• Connection of the reader to an internal 10-pin (2x5-pin) USB connector of the motherboard.
• The power supply of the reader is via USB bus (bus-power).
• LED indicating the correct insertion of the card with a permanent light and the data transmission with blinking.
• Cleanly shaped front panel with a decent print without logo suitable for any PC housing design.
• The reader is enclosed in a high-quality metal case ensuring compliance with the electromagnetic emission standards.
• The reader body depth 96.5 mm, height and width fitting to 3.5" position.
• Weight 177 g (incl. USB cable).
Supported operating systems:
• MS Windows XP / Vista / 7 / 8 / 8.1 / 10 and later, Windows Server 2003 / 2008 / 2012 / 2016 and later (supported are all 32- and 64-bit Windows OS versions), Mac OS X 10.x and higher, Linux with kernel 2.4.x and above.
• Note: Drivers are included with supported operating systems and are installed completely automatically. No other drivers need to be installed and are not even available.
Package contains:
• internal card reader with a 60 cm long permanently attached cable,
• mounting screws,
• packed in a cardboard box.
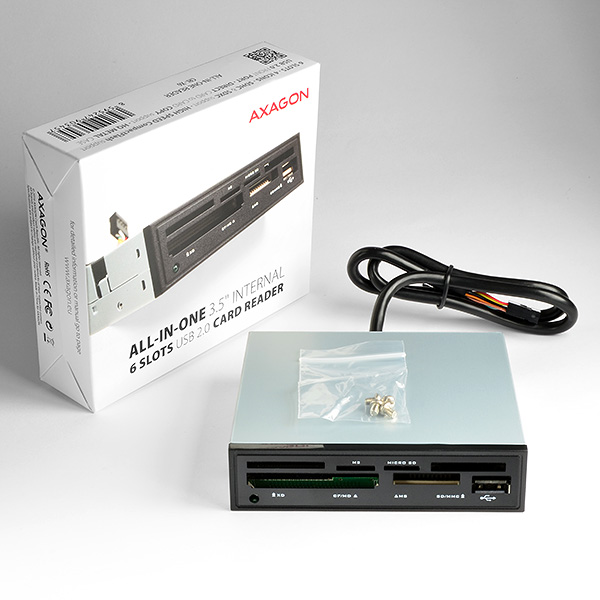
Package contents
- an internal reader with a black front and a 60 cm permanently attached USB 2.0 cable
- 4 pcs mounting screws
- installation procedure specified on the packaging
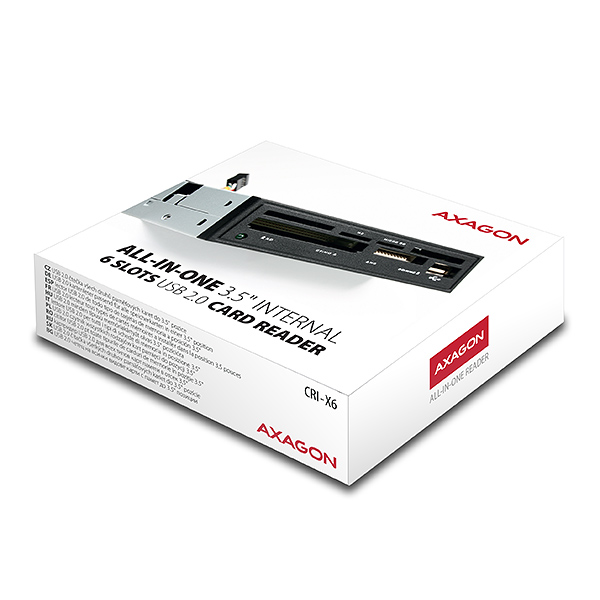
Product package
- cardboard box
- package dimensions 13 x 11 x 3.2 cm
- weight of 1 pc package 196 g
- EAN 8595247903457
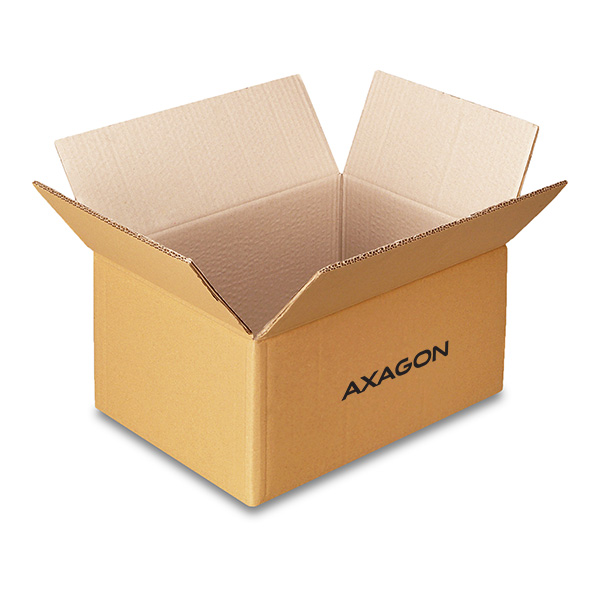
Export package
- number of pieces in the box: 60
- total weight of the box: 12.55 kg G.W.
- box dimensions: 40 x 35 x 25 cm
Where can I download drivers to my card reader?


A): Drivers are included with operating systems and are installed completely automatically. The card reader is detected as a standard storage device, such as a USB flash disk, no other drivers are available.
B): No other drivers need to be installed and are not even available. If you continue to have problems with your reader, check out more tips that can help you troubleshoot problems.
The card reader is not displayed in "Device Manager".
A): If the card reader is not displayed in "Device Manager," there may be a USB port (or a 20-pin USB 3.0 connector on the PC motherboard in the case of an internal reader) malfunction.
B): Try plugging the reader into another USB port (or another 20-pin USB 3.0 connector on the PC motherboard, if available, in the case of an internal reader). The card reader should be detected and the drivers loaded automatically. If this does not solve the problem, try checking the USB controller status in "Device Manager" in the "USB Drivers" section. If the problem persists, plug the card reader into the USB port of another computer to verify its functionality.
The card reader is reported in "Device Manager" as "Unknown Device".
A): If this happens, it means that the operating system failed to get the necessary information to install the drivers.
B): The cause may be a defective USB cable or damaged device. Another option is to remove the record of the connected USB device using "USBDeview". After connecting the reader, the drivers should be reloaded. If the problem is caused by a driver error, the problem should be eliminated. If the problem persists, plug the card reader into the USB port of another computer to verify its functionality.
The reader is not displayed in the "My Computer" folder.
A): If this happens, it means that the Windows operating system did not assign a drive letter to the new storage device.
B): If the drive letter is not assigned, open "Disk Management", right-click on the desired drive and manually assign the drive letter. Another option is that the correct formatting of the memory card is not performed. Format the card in "Disk Management" or in the device on which you are using the card (for example, the camera).
Prerequisites for proper M.2 function.
AXAGON M.2 SSD disk adapter is let say only HW connector change from M.2 into PCI-Express or SATA. Adapter itself do not have controller electronics and need no drivers. It is necessary to check M.2 disk driver availability for older OS like Windows 7.
Proper M.2 adapter function requires:
- computer mainboard support M.2 disks – SATA disks are more often supported than NVMe disks,
- computer mainboard support booting from PCI-Express bus – in case of OS installation to M.2 NVMe disk,
- driver availability for M.2 SSD disk – apply especially for NVMe disks on Windows 7 OS.
Please contact the motherboard manufacturer's technical support to determine support for motherboard M.2 drives. In some cases updating the BIOS/UEFI is sufficient.
Check the M.2 SSD driver availability on the manufacturer's website or contact the disk manufacturer's technical support.
There are image defects (noise, stripes, distorted colors).
A): Check that all connectors on the adapter, source device, and display device are properly connected and seated.
B): Check the connecting cables and replace them if necessary.
C): When using long cables (over 10 m), we recommend using high-quality or active cables, or signal amplifiers.
D): Connect a microUSB charger to the external power input.
The desired resolution or refresh rate does not appear in the list.
A): Verify that the given resolution or refresh rate is supported by the display device (monitor, TV, projector), graphics card, drivers, or operating system.
The video adapter does not transmit sound.
A): Check the settings according to the chapter “SETTING UP AUDIO OUTPUT TO MONITOR, TV, OR PROJECTOR.”
The option “DISPLAY MODE SETTINGS” is unavailable or does not appear.
A): Check all connections.
B): Verify in Device Manager that you are not using the “Microsoft Basic Display Adapter.” If you are, install the latest graphics card driver.
Should I use the supplied original cable to charge the power bank or can I use any micro USB cable?
A): We recommend using the original micro USB cable supplied with the power bank.
B): The original cable has stronger conductors and less resistance. This minimizes charging losses. General cables for phones may have smaller diameter conductors, which may cause slower or interrupted charging. Such cables are designed for synchronization (data connection) and are not suitable for charging.
M.2 SSD disk does not appear in the BIOS / UEFI motherboard disk list.
The disks connected to the SATA motherboard controller are usually displayed In BIOS/UEFI. The NVMe disk is usually displayed in the "Disk Boot Order" menu.
This applies when the requirements of "Prerequisites for proper M.2 function" are met.
The USB hub is not detected when connected to a computer; where can I download drivers for the USB hub?
A): The necessary drivers are already included in all operating systems and install completely automatically, and no additional drivers are needed.
B): Plug the USB hub into another USB port (on the back of the computer where the USB ports are integrated directly into the motherboard). It should re-detect the USB hub and reinstall the drivers. Alternatively, try replacing the USB cable. The obsolete driver of the USB controller could also cause problems. Manufacturers of USB 3.0 chipsets often issue new versions of drivers to improve compatibility with different devices. If the problem with the USB bub persists, plug it into the USB port of another computer to verify its functionality.
After installing the PCI (PCIe) card into my computer, “Device Manager” generates the error code "Code 10 - The device cannot start".
A): If the PC does not run with the card or the card is mistakenly detected in “Device Manager”, or if there is a yellow exclamation mark on the driver, or if “Device Manager” reports an error code “Code 10 - The device cannot start”, the card is in conflict with another device in your computer.
B): In most cases, this conflict can be solved by moving the card to another PCI (PCIe) slot, with the BIOS assigning other free resources to the card. If the move does not help, try the card separately, with no additional cards inserted. If the card cannot be moved to another slot, you can reset the BIOS of the computer (by jumper on the board or pulling out the backup battery, we recommend that you note all the original settings and reset everything to the required values). This will cause the IRQ, DMA, and I/O resources to be redistributed.
Can I use a RAID controller to connect and run one or more disks without creating a RAID?
A): Yes, even a RAID controller can be used to connect separate hard disks.
B): If you do not create a RAID controller in the BIOS, each disk will behave as a standalone unit, just like when plugging into the motherboard.
The network card is not displayed in "Device Manager".
A): If the network card is not displayed in "Device Manager", a USB port (or a PCIe slot in the event of an internal network card) may be malfunctioning.
B): Try plugging the network card into another USB port (or another PCIe slot on the PC motherboard in the event of an internal network card, or temporarily disconnect all other PCIe cards). The network card should be detected and you should be prompted to install the drivers. If the problem persists, plug the network card into the USB port (PCIe slot) of another computer to verify its functionality.
Where can I download drivers to my USB sound card?
A): The basic drivers are already part of the operating system.
B): When you connect the USB sound card to your computer, the necessary drivers are automatically detected and installed.
For RSI adapters, the HDD / drive is not displayed in "Device Manager".
A): If the HDD / drive is not displayed in "Device Manager", it is possible that the RSI adapter is not powered.
B): Make sure that you have the Floppy 4-pin power connector correctly plugged into the adapter and that your disk is powered at the same time. If the power supply does not help solve the problem, try replacing the SATA cable. For the IDE device, check the control jumper setting - it should not conflict with any other IDE device.
The sound does not work through the video adapter; what to do with it?
A) The VGA connector does not transmit the sound, so the RVH-VGA audio stereo output is to a 3.5 jack to which headphones or active speakers can be connected.
B) To use the audio output, set the HDMI output as the default sound playback device (or install audio drivers for the graphics card of your computer).
The adapter does not work with Raspberry Pi, Apple TV or some Smart TV boxes.
A) Some devices may need auxiliary power via the microUSB connector on the adapter body. When connecting to a desktop PC or laptop, additional power is not needed.
B) The power supply is not included, but any mobile phone charger with a microUSB output can be used.
The controller works with the connected device only in the USB 2.0 mode.
A): If the copy speed is approximately 35 MB/s, it means that the connection between the controller and the connected device is working only in the USB 2.0 mode. Some types of USB 3.0 devices may have a problem with proper detection.
B): Make sure that the connected device is USB 3.0 compatible. Please check if an additional power supply to the controller is connected (the power reduction is not included, the card is powered by a standard power connector that is part of each source; we recommend avoiding Molex connectors and splitters that often cause problems). The error could be caused by, for example, the old firmware of the device you want to connect, some manufacturers provide a new firmware to their products, which could solve this situation. Alternatively, try replacing the USB 3.0 cable that may be damaged. When testing, do not use USB 3.0 extensions that could also cause this problem.
Can I use booting from the USB port of an additional card?
A): Booting from an additional USB card is not possible because each card has a different chip. The BIOS of the motherboard does not contain information that will allow to "see" the connected USB device. Detection of attached devices occurs only after the additional card drivers have been booted when the operating system starts running.
B): When using the integrated USB from the motherboard, of course, the BIOS is programmed to include information about the chip of the controller used for USB on the motherboard. Therefore, the motherboard BIOS "sees" the connected USB device and therefore can boot from it.
After installing the controller on a PC, the PC cannot turn off or wakes itself from the sleep mode.
A): Please check your BIOS settings. Power Management Setup – Wake Up Event Setup – Resume by PCI-E Device (individual items may vary by MB type) should be set to disabled.
B): If this does not help, try updating your motherboard BIOS and check the ACPI item when still in the BIOS If not even this helps, move the controller card to another PCIe slot (may also be x16 - slots differ only in the number of lines). It is possible that the card is in conflict with another device on your computer. For some types of BIOS, you can do this directly by enabling Force Update ESCD (Reset Configuration Data etc.) in the PnP & PCI Configurations menu. This will cause the IRQ, DMA, and I/O resources to be redistributed.
When installing a controller, the error "Unable to access the JavaScript runtime object for the action itself" is reported.
A): The VBScript is incorrectly registered in your Windows installation.
B): To fix the problem and download the patch go to Microsoft site: https://blogs.technet.microsoft.com/fixit4me/2009/01/30/register-windows-script-engine-fix-it-live/
Is it possible to charge your phone / tablet with a USB hub while having a USB device connected to it?
A): The phone / tablet cannot be powered by an OTG cable, this is given by the OTG principles. The tablet can be connected to a charger by a normal cable and charged itself or devices can be connected to it with an OTG cable
B): Phones / tablets that have a power connector located outside the microUSB have an advantage - here the tablet can be powered through a round connector and connect other peripherals (mouse, keyboard, flash disk, etc.) to the microUSB using an OTG cable (via the USB hub).
No image appears on the monitor, TV, or projector after connection.
A): Check that all connectors on the adapter, source device, and display device are properly connected and seated.
B): The adapter is one-way; check that it is not connected in the wrong direction.
C): Check that the correct input source is selected on the display device.
D): Check that the display output settings on the source device (PC, notebook) are correct. See the chapter “DISPLAY MODE SETTINGS.”
E): Check all connecting cables.
F): Restart the PC (notebook) with the adapter and display device connected.
G): If none of the above works, test the adapter with another device.
What is the power bank's stated capacity?
A): The capacity of the power bank is determined by the actual (physical) capacity of the battery cells that the power bank is equipped with.
B): The internal power bank batteries have a voltage of 3.7 V. To charge the phone, this voltage needs to be converted to 5 V, which is the standard for USB interface. In the charged device (such as a mobile phone or tablet), conversion from 5 V to 3.7 V is in turn needed to charge the internal batteries. With each voltage conversion, losses occur (most often in the form of heat), which are usually 5 to 15 %. As a result, the energy that the charged device is able to take is after necessary conversion of voltage of the two devices reduced by 2 x 5 % to 2 x 15 % and the efficiency of charging reaches 70 to 90 %.
The network card is reported in "Device Manager" as "Unknown Device" (PCIe).
A): If this happens, it means that the operating system failed to get the necessary information to install the drivers.
B): The cause may be a defective USB extension cable or damaged device. If the problem persists, plug the network card into the PCIe slot of another computer to verify its functionality.
The network card is reported in "Device Manager" as "Unknown Device" (USB).
A): If this happens, it means that the operating system failed to get the necessary information to install the drivers.
B): The cause may be a defective USB extension cable or damaged device. If the problem persists, plug the network card into the USB port of another computer to verify its functionality.
The USB sound card is not displayed in "Device Manager".
A): If the USB sound card is not displayed in "Device Manager", there may be a USB port malfunction.
B): Try plugging the sound card into another USB port. The sound card should be detected and the drivers loaded automatically. If the problem persists, plug the sound card into the USB port of another computer to verify its functionality.
Card drivers have not been installed correctly. How to proceed correctly with the next installation?
A): The following steps are necessary to install the drivers correctly.
B): Remove the card from PC. Uninstall the existing drivers using the "MOSCHIP_PCIUninst.exe" utility (located on the installation CD in the directory; if you do not have the CD, you can download the drivers from our support pages http://www.axagon.eu/en/podpora-faq). Restart the PC. Reinstall the drivers and turn off the PC. Re-insert the card. Once rebooted, the drivers should be properly installed.
Is it possible to boot from CDROM and HDD via RSI device?
A): The RSI converter supports booting from a connected disk / CDROM. Of course, the correct setting of the motherboard BIOS order is the prerequisite.
B): The device boot order (CDROM, HDD ... etc) needs to be set if your computer has multiple disks. On the first place set the disk with operating system (the item is labeled "Hard disk boot priority" or "Hard disk drives" in the BIOS).
I purchased a battery supported by “fast recharging” function but my cell phone keeps recharging the same time as when recharged from my regular charger. Why?
A): Fast charging must be supported also by the equipment being charged - e.g. cell phone, tablet etc.
B): If charging from an external battery lasts approximately as long as from the charger, it means that the device does not have a fast charging function.
Can I connect a 2.5" external box to a USB hub?
A): In the vast majority of cases, the USB hub can handle connection of one 2.5" external box. If more external boxes are connected, a higher current is needed that ordinary USB cannot deliver.
B): In this case, an auxiliary power supply is required. Use a USB hub with auxiliary power supply.
Can I connect an ANDROID tablet to Ethernet?
A): Before connecting the USB network card to an Android device (tablet), you first need to verify with the device manufacturer whether the device supports the Ethernet network feature and also whether the USB network card drivers are included in your specific ANDROID ROM installation.
B): Use a USB connector with OTG support to connect the USB network card to your tablet. If the device (tablet) is equipped with a Mini USB or Micro USB connector, use an OTG reduction or cable to connect it.
What is the disk initialization?
A): By initializing the disk, you can set the mode in which the hard disk will work
B): You can use the partition with the master boot record (MBR) or the GUID partition table (GPT). For disk up to 2TB, use the MBR option, we recommend selecting GPT on a larger disk than 2TB. Subsequently, the initialized disk should be formatted.
Why my new hard disk does not appear in the "My Computer" folder after connecting to the controller?
A): The newly purchased disk must be initialized before first use.
B): If the new disk is not initialized automatically, open "Disk Management", right-click on the desired disk and initialize it.
The printer appears functional in the OS but does not print.
A): Please make sure that the port "LPT1: (Printer port)" or other number is set correctly in the printer properties, depending on the port settings on your card. If the port is not set correctly, select the correct port, save with the "OK" button and restart the PC.
B): If problems continue to persist, automatic printer driver installation may have failed. Try removing the printer and restarting the PC. After restart, install the printer drivers again, but so that you cancel the automatic installation and add the printer manually in Control Panels / Printers with manual selection from the list of printer drivers. When installing the printer manually, select the correct LPT port. If the problem still is not resolved, try moving the card to another PCI (PCIe) slot; it may be that the card is in conflict with another device on your computer.
After connecting a CDROM / DVD via an RSI adapter, my drive does not work.
A): For some types of older motherboards, the CDROM / DVD may not work and the SATA port must be set to IDE emulation for proper drive operation.
B): The emulation of SATA port on the IDE is set in the motherboard BIOS. This means that SATA ports must not be set to RAID or AHCI, but to IDE emulation mode.
I have a PC/NTB that has 10/100 Mbps Ethernet on the motherboard and only USB 2.0, will I have a faster data transmission when I buy Gigabit Ethernet?
A): The Ethernet interface transmission speed setting is a fully independent from USB connection and can be set in the network card's properties. The default setting is an automatic negotiation when the speed is set according to other elements in the LAN network.
B): If you connect the Gigabit adapter via the USB 2.0 port, the overall bandwidth of the adapter will be limited by bandwidth of the USB 2.0 interface, which is theoretically 480 Mb/s; in Gigabit Ethernet environments this adapter will be up to 4x faster than 10/100 Ethernet adapters.
The MAC do not install USB network adapter driver properly. Device do not work.
The problem probably is that you did not allow the „installation of application from an unidentified developer“ from "Security & Privacy" application during installation the driver.
Please check "Security & Privacy" application if there is possible to allow the „installation of application from an unidentified developer“. If this option is no longer available, you need to proceed as follows:
- Close the "Security & Privacy" window - IMPORTANT !!!
- uninstall the driver using the "AX88772C_772B_772A_760_772_Uninstall_v140.command" file from the folder with the driver
- during the uninstallation the „application is from an unidentified developer“ message appears – left this window OPEN !!!
- open "Security & Privacy" again and allow „installation of application from an unidentified developer“ - you will need an administrator password
- Close the "Security & Privacy" window via OK button.
- Continue and finish uninstallation of the driver
- Restart the computer and then reinstall the driver
Because you have already allowed „installation of application from an unidentified developer“, the message should not be displayed again.
If it appears, do not close it, and allow „installation of application from an unidentified developer“ in "Security & Privacy".
Can I use an USB extension cable to connect a USB hub to my computer?
A): You can use a passive USB cable to connect a USB hub to your computer. However, with longer cables the USB hub may not work reliably.
B): In this case, we recommend using an active extension USB repeater cable, such as AXAGON ADR-205 or ADR-210.
How about discharging and charging the power bank?
A): We recommend that you do not discharge the power bank completely to zero and do not let it run out of power for a long time.
B): If you want to extend the life of your power bank, do not discharge it to zero. It is good to leave about 10 to 25 % of its capacity. If the power bank is discharged, we recommend recharging it in the shortest possible time. Never store the power bank in a discharged state. As soon as you start charging the power bank, do not interrupt charging. Interrupted charging again reduces the life of your power bank.
Is it possible to use a USB sound card without a PC, e.g. use it as an amplifier?
A): The USB sound card cannot be used without a computer, e.g. by plugging into a TV.
B): The USB sound card uses the computer, its operating system and drivers for its operation. So it cannot operate without a PC.
Why my new hard disk does not appear in the "My Computer" folder after connecting to the RSI adapter?
A): The newly purchased disk must be initialized before first use.
B): If the new disk is not initialized automatically, open "Disk Management", right-click on the desired disk and initialize it.
Does the card create a fully fledged LPT port? E.g. to connect a HW key.
A): Yes, it creates a fully fledged LPT port. However, it is still about the compatible with the SW device you connect to the LPT port.
B): System resources, including the LPT port address with additional cards (not only AXAGON, but also of other manufacturers), are allocated by the computer BIOS already when booting. The address can be changed in MS-DOS using the driver for this system. For higher OSs (WIN98, 2000, XP, etc.) this address cannot be changed. Addresses 378 or 278 are firmly reserved for the so-called Legacy LPT ports that are integrated into motherboard chipsets. If the HW key bypasses Windows management, it will not work. You can try to consult the manufacturer of the HW key, to which address it is set up and whether the address can be changed.
Where can I download drivers to my adapter?
A): Drivers are included with operating systems (except for WIN98SE/ME), and are installed completely automatically. The user only installs drivers for the connected printer, if necessary. Try to find them using Windows Update or check with your printer manufacturer. For more information, see the user guide on the product page.
B): No other drivers need to be installed and are not even available. If you continue to have problems with your adapter, check out more tips that can help you troubleshoot problems.
When is it necessary to use the auxiliary power via the AC-5V2A power adapter?
A): If a device without own power supply and higher current consumption is connected to an active power cord , the device may not work or works unreliably. If you want to use a self-powered device such as a printer at the end of the cable, no auxiliary power is needed.
B): The auxiliary power supply should be used at a higher demand than 100 mA, or when several cables are connected in series (behind each other). For details, refer to the User Manual (downloadable on the product page).
With the PCEA series cards, when a Windows-based computer starts, the so-called "blue screen of death" occurs.
A): This situation may be due to the motherboard BIOS incompatibility with the card driver.
B): In this case, we recommend updating the BIOS of your computer's motherboard.
After inserting a newly purchased HDD/SSD into an external box and connecting to a computer, the disk is not displayed in "Device Manager".
A): The newly purchased disk must be initialized before first use.
B): If the new disk is not initialized automatically, open "Disk Management", right-click on the desired disk and initialize it.
Is your SATA 6G controller connected via a PCI-e 2.0 bus not running at full speed?
A): First, try moving the card to another PCI-e slot in case there is a device conflict. The issue could also be caused by a poor-quality or damaged SATA cable.
B): Check whether your SSD partition is properly aligned (using a program that displays this information, e.g., ASS SSD Benchmark). More information about this issue can be found here: http://pctuning.tyden.cz/software/ladeni-windows/17030-optimalizace-windows-7-pro-ssd-co-funguje-a-co-ne?start=2
Do you hear a humming noise from the speaker when connecting a transmitter, e.g., from a wireless mouse?
A): The sound interference is probably caused by the wireless mouse transmitter.
B): We recommend placing the mouse transmitter as far away from the sound card as possible (preferably on the opposite side of the computer – connect the transmitter to a USB port on the front panel of the PC and the sound card to a USB port on the back panel – use a USB extension cable if necessary). In the case of a laptop, place one device on each side.
The adapter is not displayed in "Device Manager".
A): If the adapter is not displayed in "Device Manager" (in USB Bus Controllers - USB Print Support), there may be a USB port malfunction.
B): Try plugging the adapter into another USB port. The adapter should be detected and the drivers loaded automatically. If the problem persists, plug the adapter into the USB port of another computer to verify its functionality.
What is the disk initialization?
A): By initializing the disk, you can set the mode in which the hard disk will work.
B): You can use the partition with the master boot record (MBR) or the GUID partition table (GPT). For disk up to 2TB, use the MBR option, we recommend selecting GPT on a larger disk than 2TB. Subsequently, the initialized disk should be formatted.
Test
Test
During playback, the sound repeatedly cuts out.
A): The problem could be a lack of resources, check (when a problem occurs) the processor load and operating memory filling in "Task Manager".
B): If the CPU usage is 100% or memory is full, you need to find out what causes this situation. Another option is to connect a sound card to another computer to verify that the sound card is not damaged.
The adapter is reported in "Device Manager" as "Unknown Device".
A): If this happens, it means that the operating system failed to get the necessary information to install the drivers.
B): The cause may be a defective USB cable or damaged device. If the problem persists, plug the adapter into the USB port of another computer to verify its functionality.
After installing the Axagon SATA controller, my PC has a slow start to Windows. Can something be done about it?
A): The lead time is naturally longer by the time it takes to detect the controller and connected disks. The start time can be shortened in the MB BIOS by enabling the "Quick Boot" feature. For newer boards, this feature is labeled "Fast boot". The lead time depends, of course, also on the disk used for the SSD/HDD operating system and the number of peripherals connected to the computer.
B): In the case of newer motherboards, it is more practical to use the spin down (instead of turn off) feature.
The sound card has only one input – for a microphone. How can I record?
A): For most Axagon USB sound cards, the line-in input is combined with the microphone input.
B): The sound card can detect whether a microphone or a stronger “line” signal is connected. Therefore, for example, when recording from the headphone output of a mobile phone, you should reduce the phone’s volume to about 80–90%, or reduce the input signal level in the recording software to avoid signal overload. In the recording software (e.g., Audacity), you should then select Microphone – USB as the input source.
Can the ADP adapter replace a fully fledged parallel port? E.g. to connect a HW key.
A): Converters from USB to LPT ADP-xx do not create an LPT port. After installation, it creates USB print support in Device Manager for printers equipped with LPT port, but does not replace (or create) a fully fledged parallel port.
B): You can buy one of the PCEA-xx cards to create a fully fledged parallel port.
The signal brought to line-in is delayed. Is it possible to change it?
A): The USB sound cards generally have a higher latency (delay).
B): The solution is to use the ASIO4ALL drivers (http://www.asio4all.com/). ASIO are special sound drivers designed to achieve the smallest latency.
Does any sound card work with the Raspberry Pi mini computer?
A): Yes, for example, the ADA-17 sound card can be used for Raspberry Pi.
B): The installation can be handled even by a layman, only plug the sound card into the USB port of the computer and the rest is done automatically.
The printer appears functional in the OS but does not print.
A): Please make sure that the port - USB001 - Virtual printer port for USB is correctly set in printer properties.
B): If "USB Print Support" is displayed twice in the Device Manager, it is possible that the printer is mapped to the second Virtual Port USB002 - try changing the port setting to USB002 (or another available in the printer port settings).
When I plug my headphones and microphone into the USB sound card, I hear microphone feedback from my headphones, which makes Skype calls very unpleasant.
A): You probably have allowed to listen to the microphone in Microphone Properties.
B): To disable this feature, follow these steps: Start -> Control Panels -> Hardware and Sound -> Sound -> Recording -> Microphone (USB Sound Device) -> Properties -> Listen -> Listen to this device - uncheck this box and confirm with "Apply".
sylius.ui.no_question
Can the ADS-xx adapter replace a fully fledged serial port?
A): After installing the drivers the adapter will log in Device Manager in the section Ports (COM and LPT) as USB to serial Comm Port, so it can.
B): However, it still depends on the SW device, some very old programs need a specific interrupt (IRQ) that does not work correctly with the USB / COM converter.
sylius.ui.no_question
I have a device with a male end, what reduction should I buy for the ADS-xx?
A): You will need a female-female reduction because the ADS-xx has a male end.
B): Be careful that this reduction is not cross-linked (so called Null Modem), so you need a standard non-cross-linked reduction to connect.
Is it possible to use a USB external sound card to set up music mixing so that one track plays through the speakers and the next one plays through the headphones?
A): Yes, it is possible to play two different tracks simultaneously on one computer.
B): This is primarily a software matter, requiring a player that supports redirecting sound to a different audio output than the one set as the “default” in the operating system. Such functionality is supported, for example, by VLC media player.
Can I create multiple serial ports on my PC (NTB) thanks to ADS-xx?
A): Yes, using multiple ADS-xx units on one PC (NTB) is possible.
B): Each adapter gets its own COM port number assigned by the system, which can be changed in the settings as needed by the user.
sylius.ui.no_question
sylius.ui.no_question
Where can I download drivers to my external box (adapter / docking station)?
A): Drivers are included with operating systems and are installed completely automatically. The external box (adapter / docking station) is detected as a standard storage device, such as a USB flash disk, no additional drivers are needed.
B): No other drivers need to be installed and are not even available. If you continue to have problems with your external box (adapter / docking station), check out more tips that can help you troubleshoot problems.
The external box (adapter / docking station) is not displayed in "Device Manager".
A): If the external box (adapter / docking station) is not displayed in "Device Manager", there may be a USB port malfunction. It is also possible that your computer has a poor power supply to USB ports and the power is not sufficient to operate an external box (you can detect by listening that HDD is not spinning). This is a problem especially for older computers, where the source part already works at the limit of its parameters. In this case, it would help to use a USB hub, with an auxiliary power supply, by which the external box (adapter / docking station) would be connected to the computer.
B): Try plugging the external box (adapter / docking station) into another USB port, preferably on the back of your PC. The external box (adapter / docking station) should be detected and the drivers loaded automatically. If the problem persists, plug the external box (adapter / docking station) into the USB port of another computer to verify its functionality.
The external box (adapter / docking station) is reported in "Device Manager" as "Unknown Device".
A): If this happens, it means that the operating system failed to get the necessary information to install the drivers.
B): The cause may be a defective USB cable or damaged device. If the problem persists, plug the external box (adapter / docking station) into the USB port of another computer to verify its functionality.
The external box (adapter / docking station) is not displayed in the "My Computer" folder.
A): If this happens, it means that the Windows operating system did not assign a drive letter to the new storage device.
B): If the drive letter is not assigned, open "Disk Management", right-click on the desired drive and manually assign the drive letter. If the drive letter can not be assigned to the disk, it is possible that the disk is formatted as "dynamic". If you want to keep disk data, connect it to the original device and make a backup of the disk. Then convert it to a normal disk, initialize it to MBR (or GPT, see other points), and then perform Low Level Format (e.g. using the Low Level Format Tool)
After inserting a newly purchased HDD/SSD into an external box (adapter / docking station) and connecting to a computer, the disk is not displayed in "Device Manager".
A): The newly purchased disk must be initialized before first use.
B): If the new disk is not initialized automatically, open "Disk Management", right-click on the desired disk and initialize it.
What is the disk initialization?
A): By initializing the disk, you can set the mode in which the hard disk will work.
B): You can use the partition with the master boot record (MBR) or the GUID partition table (GPT). For disk up to 2TB, use the MBR option, we recommend selecting GPT on a larger disk than 2TB. Subsequently, the initialized disk should be formatted.
The external box (adapter / docking station) with a 3.5“ HDD is not displayed in "Device Manager".
A): If the external box (adapter / docking station) with a 3.5“ HDD is not displayed in "Device Manager ", the inserted disk may not be powered.
B): Make sure you have the power supply plugged in and the external box (adapter / docking station) turned on with the power switch. If the disk is properly powered, it should spin (can be detected by listening).
Does the external box (adapter / docking station) support disk capacity greater than 2TB?
A): The AXAGON external boxes (adapters / docking stations) are always equipped with the latest firmware to support disks of all capacities.
B): The 2TB limit is given as the maximum partition size when initializing a disk with the master boot record (MBR). If you want to create a larger partition on the HDD stored in the external box (e.g. 3TB or more), you must select the GUID partition table (GPT) when initializing the disk. Subsequently, the initialized disk should be formatted.
Do the external boxes (adapters / docking stations) support the USB Mass Storage (UMS) protocol and can be easily connected to a TV like a USB Flash disk?
A): The external AXAGON boxes (adapters / docking stations) support the USB Mass Storage protocol making it easy to connect to TV.
B): When using a disk larger than 2TB, some TVs do not support GPT format. In such case, MBR format must be used when initializing a disk.
What are the main differences between USB 2.0 and USB 3.2 Gen 1 (USB 3.0)?
A): The connectors are compatible, but inside the USB 3.0 connector has five more contacts. The USB 3.2 Gen 1 (USB 3.0) connector is usually identified by the use of blue (exceptionally black) plastic.
B): The main difference is the speed of data transmission. USB 2.0 reaches a maximum speed of about 30 MB/s, while USB 3.2 Gen 1 (USB 3.0) is able to achieve a theoretical speed of up to 600 MB/s. If you place a disk in the external box that has a read speed of 120 MB/s, you can only get a quarter speed, that is about 30 MB/s, in the box with USB 2.0.
How is it with the disk spin-down feature with external boxes (adapters / docking stations) that are logged on as "Mass Storage"?
A): For proper spin-down setting, this feature must be supported by all components that are in the path between the operating system and the HDD, i.e. the USB controller, box electronics, and the disk itself. The spinning down of idle disks is set up by the operating system, but it is very complicated.
B): We recommend setting up using one of the freeware programs, where the procedure is mostly simplified. E.g. by HDDScan (http://hddscan.com/). The program has the ability to verify whether the disk and all components in the path support the feature. Select "Spindown" to test an immediate spin down of the disk. Set up the spindown time using a slider in the "Power Management" section.
Example of supported devices:
• Apple iPhone 8, 8 plus, X, XR, XS, XS Max, 11, 11 Pro, 11 Pro Max
• Samsung Galaxy S6, S6 edge, S6 edge+, S7, S7 edge, S8, S8+, S9, S9+, S10e, S10, S10+, S20, S20+, S20Ultra, Fold a Galaxy Note 5, 7, FE, 8, 9, 10, 10+
• HUAWEI Mate RS, Mate 20 Pro, Mate 20 RS, Mate 30, Mate 30 Pro, Mate 30 RS, P30 Pro, P40 Pro, P40 Pro+
• Honor V30 Pro, View30 Pro
• Xiaomi Mi Mix 2S, Mi Mix 3, Mi 9, Mi 9 Pro, Mi 10, Mi 10 Pro
• LG G8 ThinQ, G8X ThinQ, G8S ThinQ, V30, V30S ThinQ, V35 ThinQ, V40 ThinQ, V50 ThinQ, V50S ThinQ, V60 ThinQ
• Google Pixel 3, 3 XL, 4, 4 XL,
• Sony Xperia XZ2, XZ2 Premium, XZ3, 1 II
• Other devices supporting Qi wireless charging: HERE
How to install the cardreader
Installation of the Axagon Smard Card reader is fully automatic, just plug it into a PC, the drivers are included in the operating systems. Information about requirements, installation of Electronic ID (eID) application/service you will find on your national eID provider website or government website.
The external box does not see my M.2 drive
A): Check if the M.2 disk type is NVMe (neither SATA M.2 drives nor mSATA drives are covered by this box)
B): Update the firmware of your NVMe M.2 drive using the manufacturer's utility
C): Update the firmware of the external box - download link
sylius.ui.no_question
Contact us
Similar products
Follow!